Skip to content

Code Assistant

New! The Db2 for IBM i extension, as of 1.6.3, has the ability to integrate with specific AI extensions:

GitHub Copilot

✅ Requires GitHub Copilot licence
Continue

✅ Multiple AI Providers available, including Watsonx!

Introduction

alt text

The Db2 for i SQL code assistant provides intregrations with AI code assistants such as GitHub Copilot Chat and Continue. These integrations allow you to ask questions about your Db2 for IBM i database, and get help with writing SQL queries. The best part is that you can do this directly from your VS Code editor.

Use cases

Common Use cases of the SQL code assistant include:

  • 📝 SQL query generation
  • 💡 SQL query explanation
  • 🛠️ SELF Error analysis
  • 🚀 SQL query optimization

Getting Started: Github Copilot

alt text

You can use GitHub Copilot, with the @db2i chat participant, to ask questions either about Db2 for IBM i or about specific tables in the current schema of the selected job. You can ask things like:

@db2i What columns make up an employee?
@db2i Can you get the department name for each employee?
@db2i Write a select statement to count how many employees are in each department

Install the GitHub Copilot extension

  1. Install GitHub Copilot from the VS Code Marketplace.

  2. Install the Db2 for IBM i extension from the VS Code Marketplace.

  3. Connect to your IBM i system using the Code for IBM i extension.

  4. Once connected, the @db2i chat participant is available in the chat window. You can ask questions about your database, and get help with writing SQL queries.

Examples

Once GitHub Copilot is installed, you can ask questions about your database using the @db2i chat participant. Here are some examples:

Example 1 Summarize the columns in the EMPLOYEE table

This is a simple example to show how you can ask questions about the structure of your database. You can ask the chat participant to summarize the columns in a table.

alt text

Example 2: Get the department name for each employee

This example shows how you can ask the chat participant to write a query that joins two tables to get the department name for each employee. The chat participant will generate the SQL query for you that you can run directly in your SQL editor in VS Code.

alt text

Run the Generated SQL to get the result: alt text

Example 3: Calculate the Average salary for each department

A slightly more complex example that shows how you can ask the chat participant to write a query that calculates the average salary for each department. alt text

Getting Started: Continue

alt text

Continue is the leading open source AI code assistant for VS Code. It provides a wide range of AI features:

  • Chat Interface
  • Code Completion
  • Autocomplete

Install the Continue extension for VS Code

  1. Install the Continue extension from the VS Code Marketplace. alt text
  2. Once Installed, there will be a new icon in your VS Code menu (mine is on the top right). Click on the icon to open the chat window. alt text

Once you have the extension installed, you can configure the AI provider you want to use. Continue supports multiple AI providers (including Watsonx!). You can choose the provider you want to use by clicking on the settings icon in the chat window.

For demonstration purposes, we will use the Ollama Provider for hosting LLMs locally on your machine.

Setting up Ollama Provider

Here is a step-by-step guide to setting up the Ollama provider with the IBM Granite models in Continue:

1. Install Ollama

Install Ollama on your machine by following the link below:

2. Fetch the IBM Granite 3.0 models

The IBM Granite 3.0 models are available in the Ollama model registry. More information about the IBM Granite models can be found here.

Using the Ollama CLI, fetch the IBM Granite 3.0 8b model by running the following command:

Terminal window
ollama pull granite3-dense:8b

3. Configure the Ollama provider in Continue

Open the VSCode Command Palette (Press ctrl+shift+p) and search for Continue: open config.json. This will open the Continue central config file $HOME/.continue/config.json in your editor. To enable the Granite models in Ollama, add the following configuration to the models section:

~/.continue/config.json
"models": [
{
"title": "Granite Code 8b",
"provider": "ollama",
"model": "granite3-dense:8b"
}
],

save this file and select the Granite model in the chat window.

alt text

Examples

Once you have the extension installed and the AI provider configured, you can ask questions about your database using the chat window using the @db2i context provider. In Continue, a context provider is very similar to a chat participant in GitHub Copilot. It provides additional context to the AI model to help it generate more accurate SQL queries.

More on context providers can be found here.

Example 1: Summarize the columns in the EMPLOYEE table

alt text

Example 2: Get the department name for each employee

alt text

How does this work?

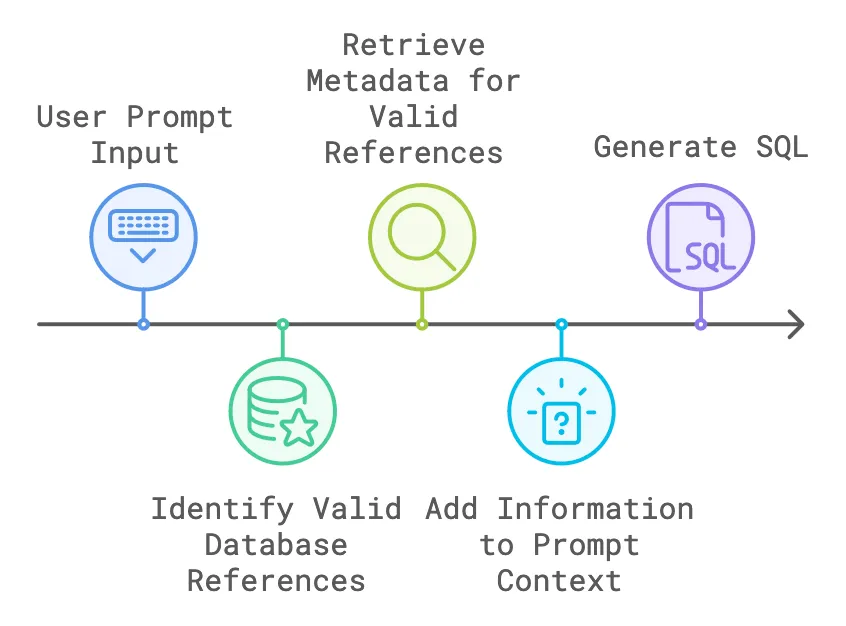
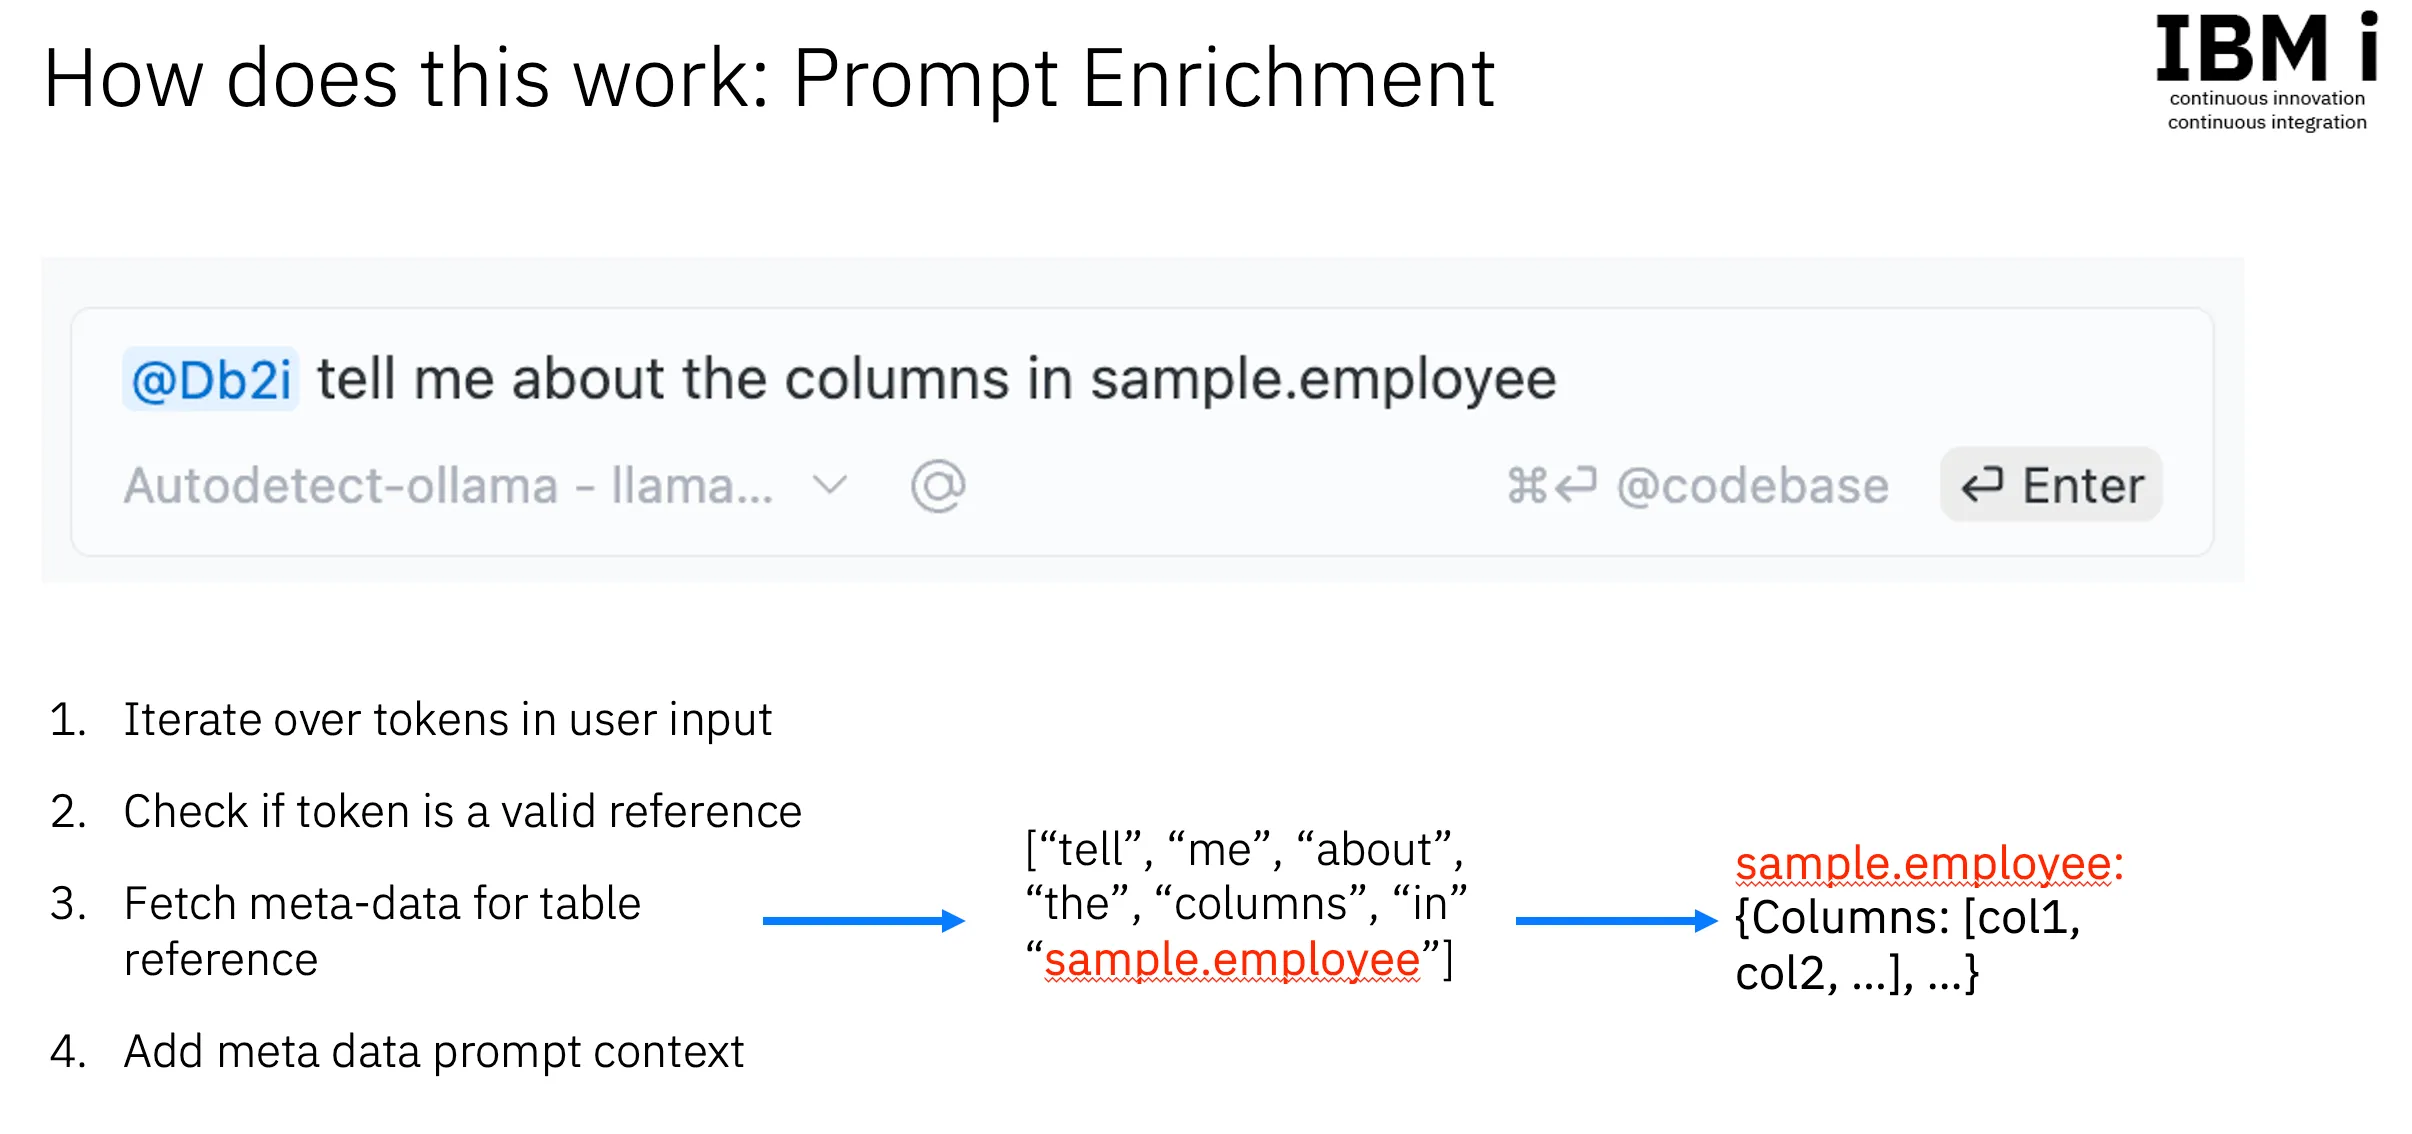
The @db2i GitHub Copilot chat participant and the @Db2i Continue context provider work in the same way by extracting relevant database information from the user prompt. Here is breakdown of the algorithm:
alt text

Step 1: Tokenize User Input

Given a prompt like:

tell me about the columns in sample.employee
  • First, we split the user input into individual words, or “tokens.”
  • Note: We use spaces to tokenize the input, so each token is a single word.

Step 2: Identify Valid Database References

  • For each token, we check if it corresponds to a valid table or object reference within the active SQL Job.
  • In this example, sample.employee is recognized as a valid table reference.

Step 3: Retrieve Metadata for Valid References

  • When valid references are found, we fetch associated metadata, such as column names, data types, and descriptions.
  • This retrieval is done through the SQL Job Manager in the Db2 for i VSCode extension, which queries relevant database information based on the user’s active connection.

Step 4: Add Metadata to Prompt Context

  • Finally, we insert the fetched column metadata into the prompt context using the Continue API

Metadata Integration

let’s break down the process of how the @db2i chat participant and the @Db2i context provider work:
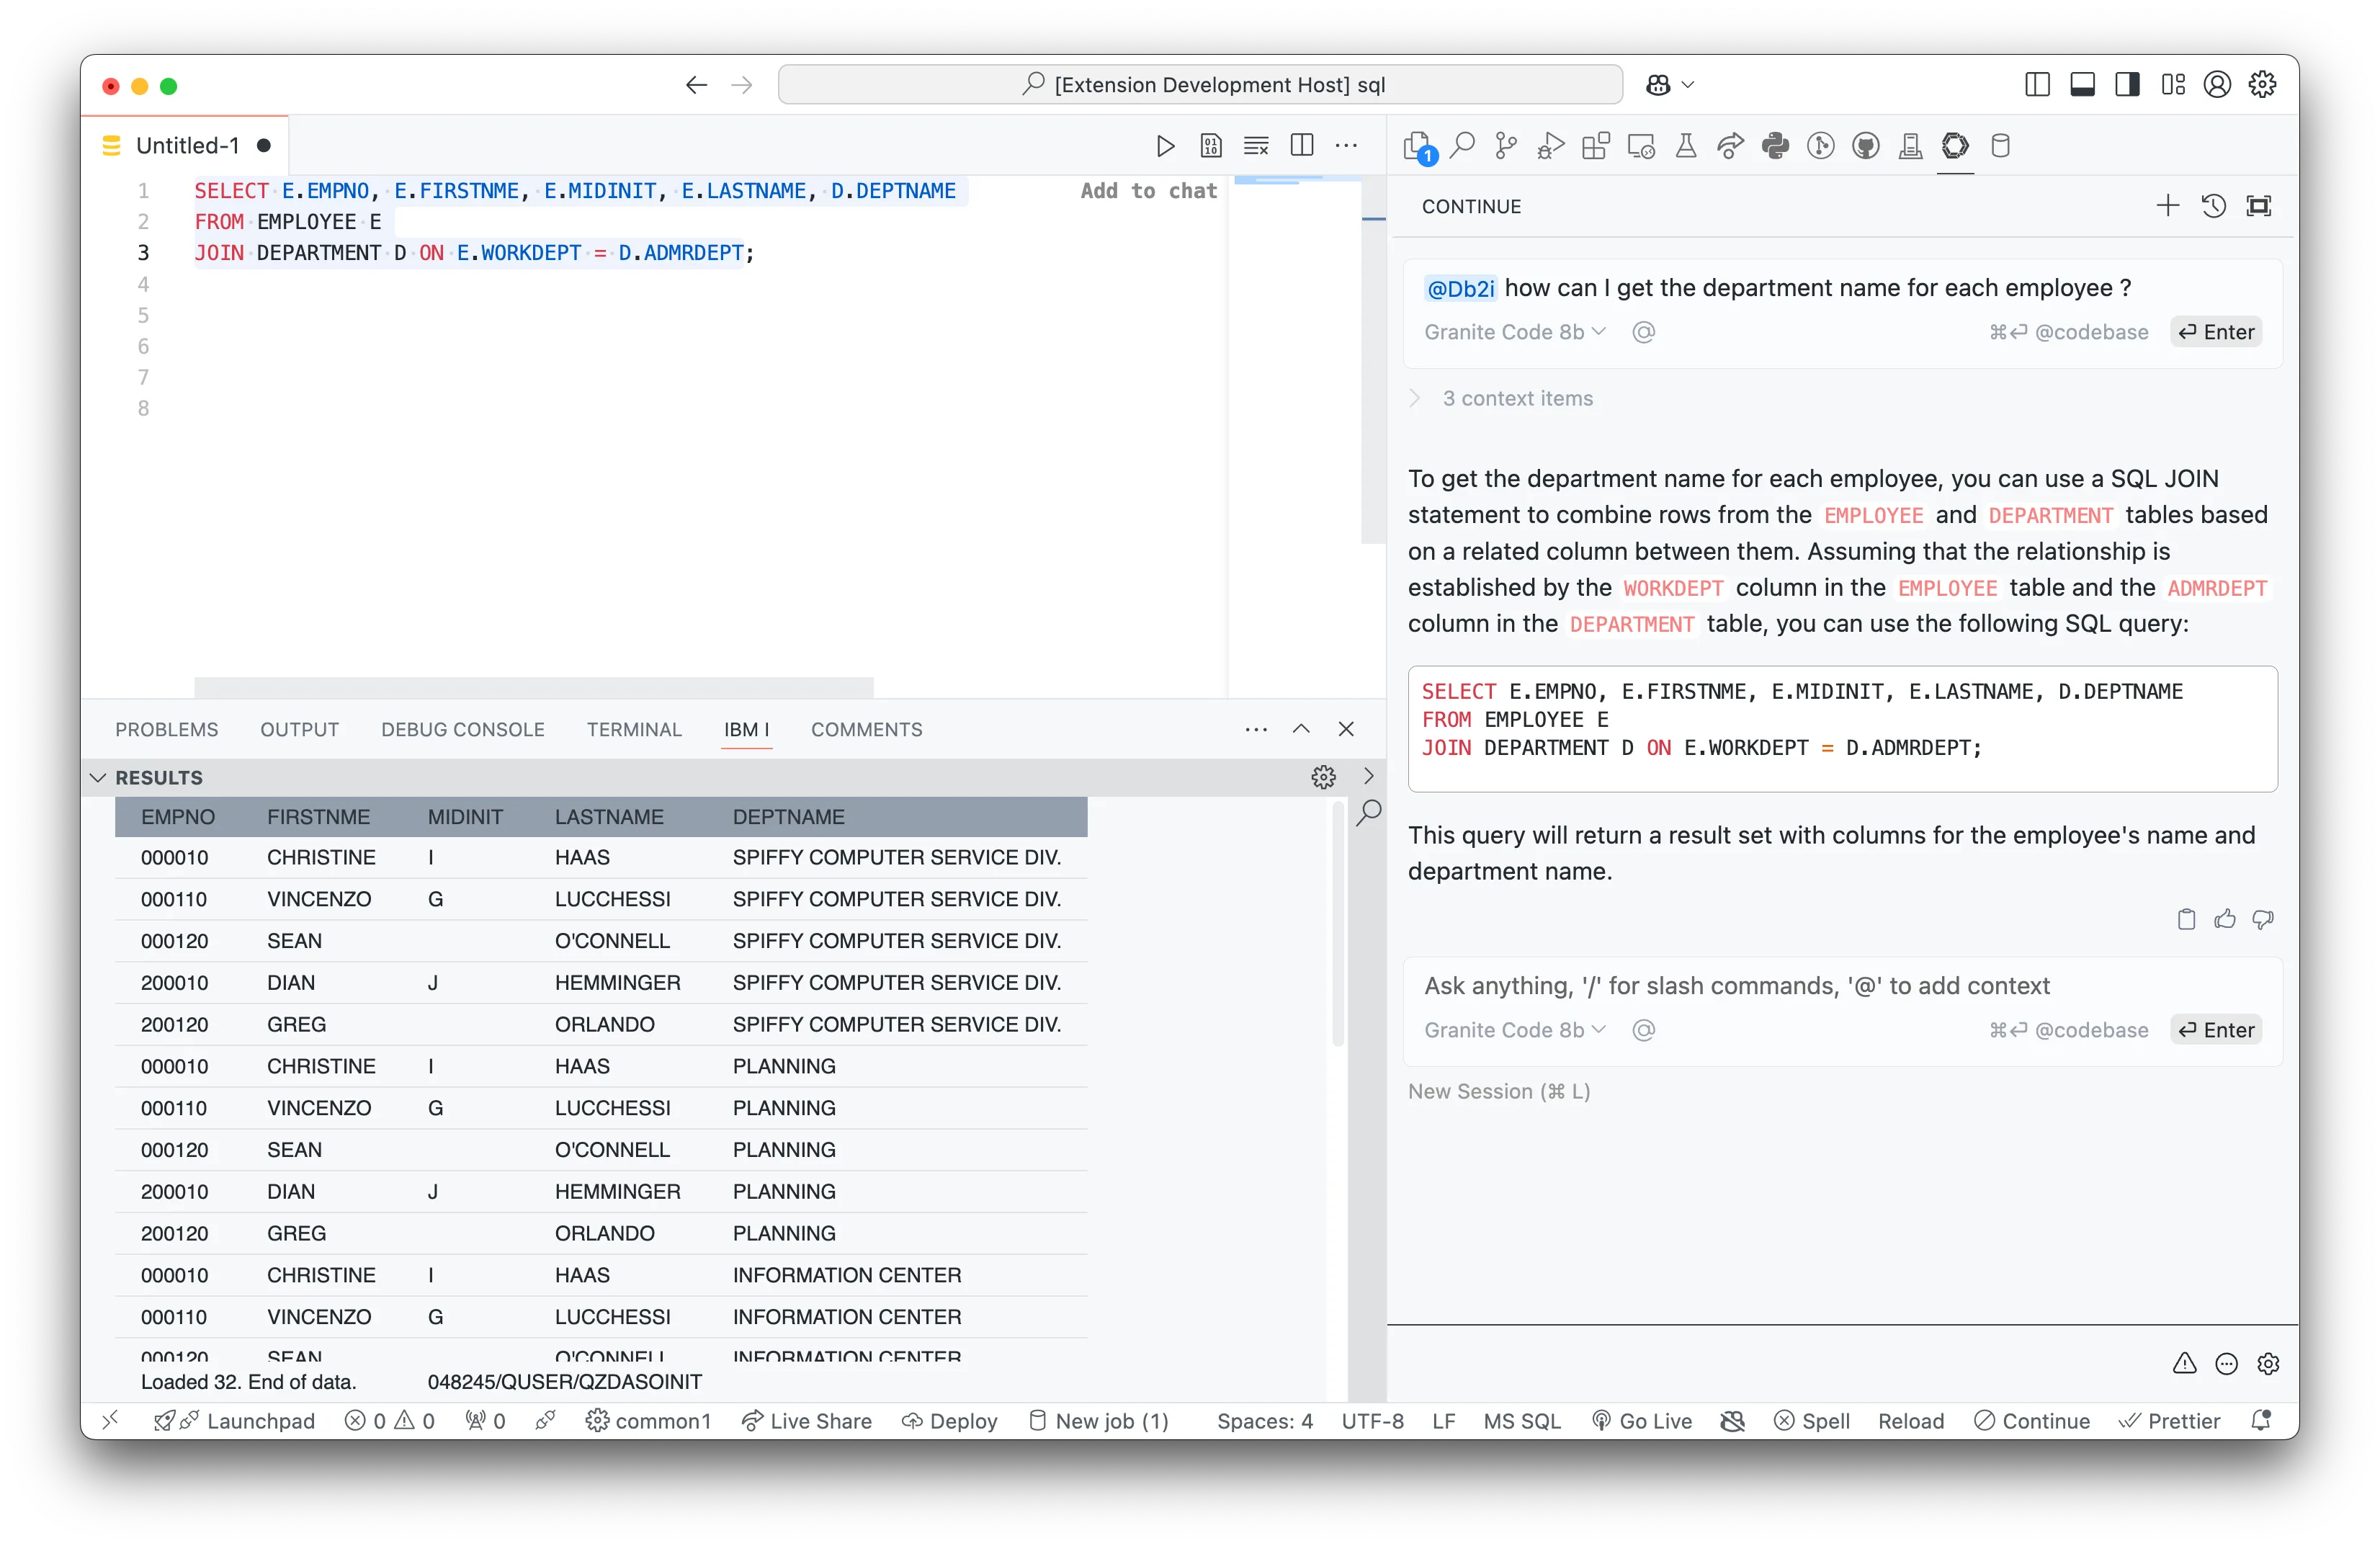
Here’s a breakdown of the process:

alt text

  1. Activate the @Db2i Context Provider
    • Start by typing the ”@” symbol in the chat text box to invoke the @Db2i context provider.
  2. Enter Your Query
    • Use a prompt like:
      How can I get the department name for each employee ?
  3. SQL Generation with Contextual Insights
    • With the relevant column metadata from employee and department tables, the model generates an accurate SQL JOIN statement.
  4. Execute and View Results Instantly
    • Copy the generated SQL into the active SQL editor, run the query, and instantly view the result set right inside VSCode! 🔥

By integrating database context directly into our prompts, we make SQL generation not only faster but more accurate and insightful.

What data is shared?

If you do not want to share your data with any AI services, then do not invoke the functionality through VS Code. For example, we only fetch metadata when the user explicitly requests it through the chat windows. We do not fetch any metadata without the user explicitly using the chat windows in either Copilot Chat or Continue. Simply don’t install the extensions, or don’t use the @db2i context.

We do not

  • Send any data in your own tables, views, programs, etc
  • Send user info from the IBM i system
  • Train external services using any data from your systems
  • Send any requests to any service without the user explicitly using any of the AI functionality.

We do

  • Send table metadata which can be found from QSYS2.SYSCOLUMNS2 and QSYS2.SYSKEYCST in the context based on user input, including table names, column names, types and comments
  • Send system metadata (when the user is asking for the activity summary) which is found with TABLE(QSYS2.SYSTEM_STATUS(RESET_STATISTICS=>'YES',DETAILED_INFO=>'ALL')) when requested by the user.

Known Limitations

The @db2i chat participant and the @Db2i context provider are designed to provide accurate and insightful SQL generation based on the user’s database context. However, there are some limitations to keep in mind:

  1. Schema Resolution
    • The @db2i chat participant and the @Db2i context provider rely on the active SQL Job’s schema to resolve table references. If the schema is not set or is incorrect, the model may not be able to resolve table references accurately.
    • To get better results, make sure to set the current schema in the SQL job settings, or reference the schema in your queries: SAMPLE.EMPLOYEE
  2. Complex Queries
    • The @db2i chat participant and the @Db2i context provider are optimized for generating simple SQL queries. For more complex queries, the model may not be able to provide accurate results.
    • For complex queries, it is recommended to manually write the SQL query or use the model’s generated SQL as a starting point.
  3. Data Sensitivity
    • The @db2i chat participant and the @Db2i context provider do not store or transmit any user data. All database metadata is fetched from the SQL Job Manager based on the user’s active connection.
    • To ensure data privacy and security, it is recommended to review the model’s generated SQL before executing it in the active SQL editor.
  4. Model Accuracy
    • The @db2i chat participant and the @Db2i context provider are continuously being improved to provide more accurate and insightful SQL generation. If you encounter any issues or have feedback, please let us know!