You may not need to do this step yet. Wait until later, if Git complains.
The first thing you should do when you install Git is to set your user name and email address. This is important because every Git commit uses this information, and it’s immutably baked into the commits you start creating:
Terminal window
gitconfig--globaluser.name"John Doe"
gitconfig--globaluser.emailjohndoe@example.com
Again, you need to do this only once if you pass the --global option, because then Git will always use that information for anything you do on that system. If you want to override this with a different name or email address for specific projects, you can run the command without the --global option when you’re in that project.
We are using the Code for IBM i extension to write, deploy and compile our RPGLE code. It is an extension that can be used for IBM i development in many ways.
If you are doing this workshop as part of a hosted lab, then a user profile and system will be provided to you. If you’re using your own system, then ensure SSH is running on your system. Check out the requirements.
Goals
The main goal of this workshop is to understand how you can write IBM i code (be it RPGLE, COBOL, CL, etc) when storing source code inside of a git repository. This is made easy through some of the functionality provided in Code for IBM i (the extension) as part of Visual Studio Code.
Terminology
Here are some common terms that you will read throughout this workshop.
Term
Meaning
Repository
The place, usually a directory, where files and history of those files are stored.
Clone
The act of ‘copying’ (literally cloning) the repository from another location.
Push
Pushing commits from one repository to another
Deploy
Moving files/sources from your local workspace to an IBM i server
Workspace
Visual Studio Code with one or more folders opened
PR
Acronym for Pull Request
Understanding Local Development
Unlike developing in source members, or developing in the IFS, IBM i code will actually be written on a local device - like a laptop or desktop system. This is actually new to the ecosystem, since it is not typically done for IBM i development.
This is done because all of the best git tools are developed to run on systems other than IBM i (VS Code being one of them!) and using git without great tools can be painful for beginners.
This sometimes leads to the question of ‘well how do we compile if not developing on IBM i’; this is where the ‘Deploy’ process comes in. More on that later.
Tasks
1. Create a new folder on your local device
Simply create a new directory somewhere on your device. This directory will become a git repository. You can also use your system File Explorer to create the directory/folder.
Terminal window
mkdirmyworkshop
2. Opening a Workspace Folder
Opening a folder in Visual Studio Code adds that folder to that Workspace. You need at least one folder open in the Visual Studio Code workspace for local development.
To open a directory in Visual Studio Code, you can go to File→Open and select the folder you created in step 1.
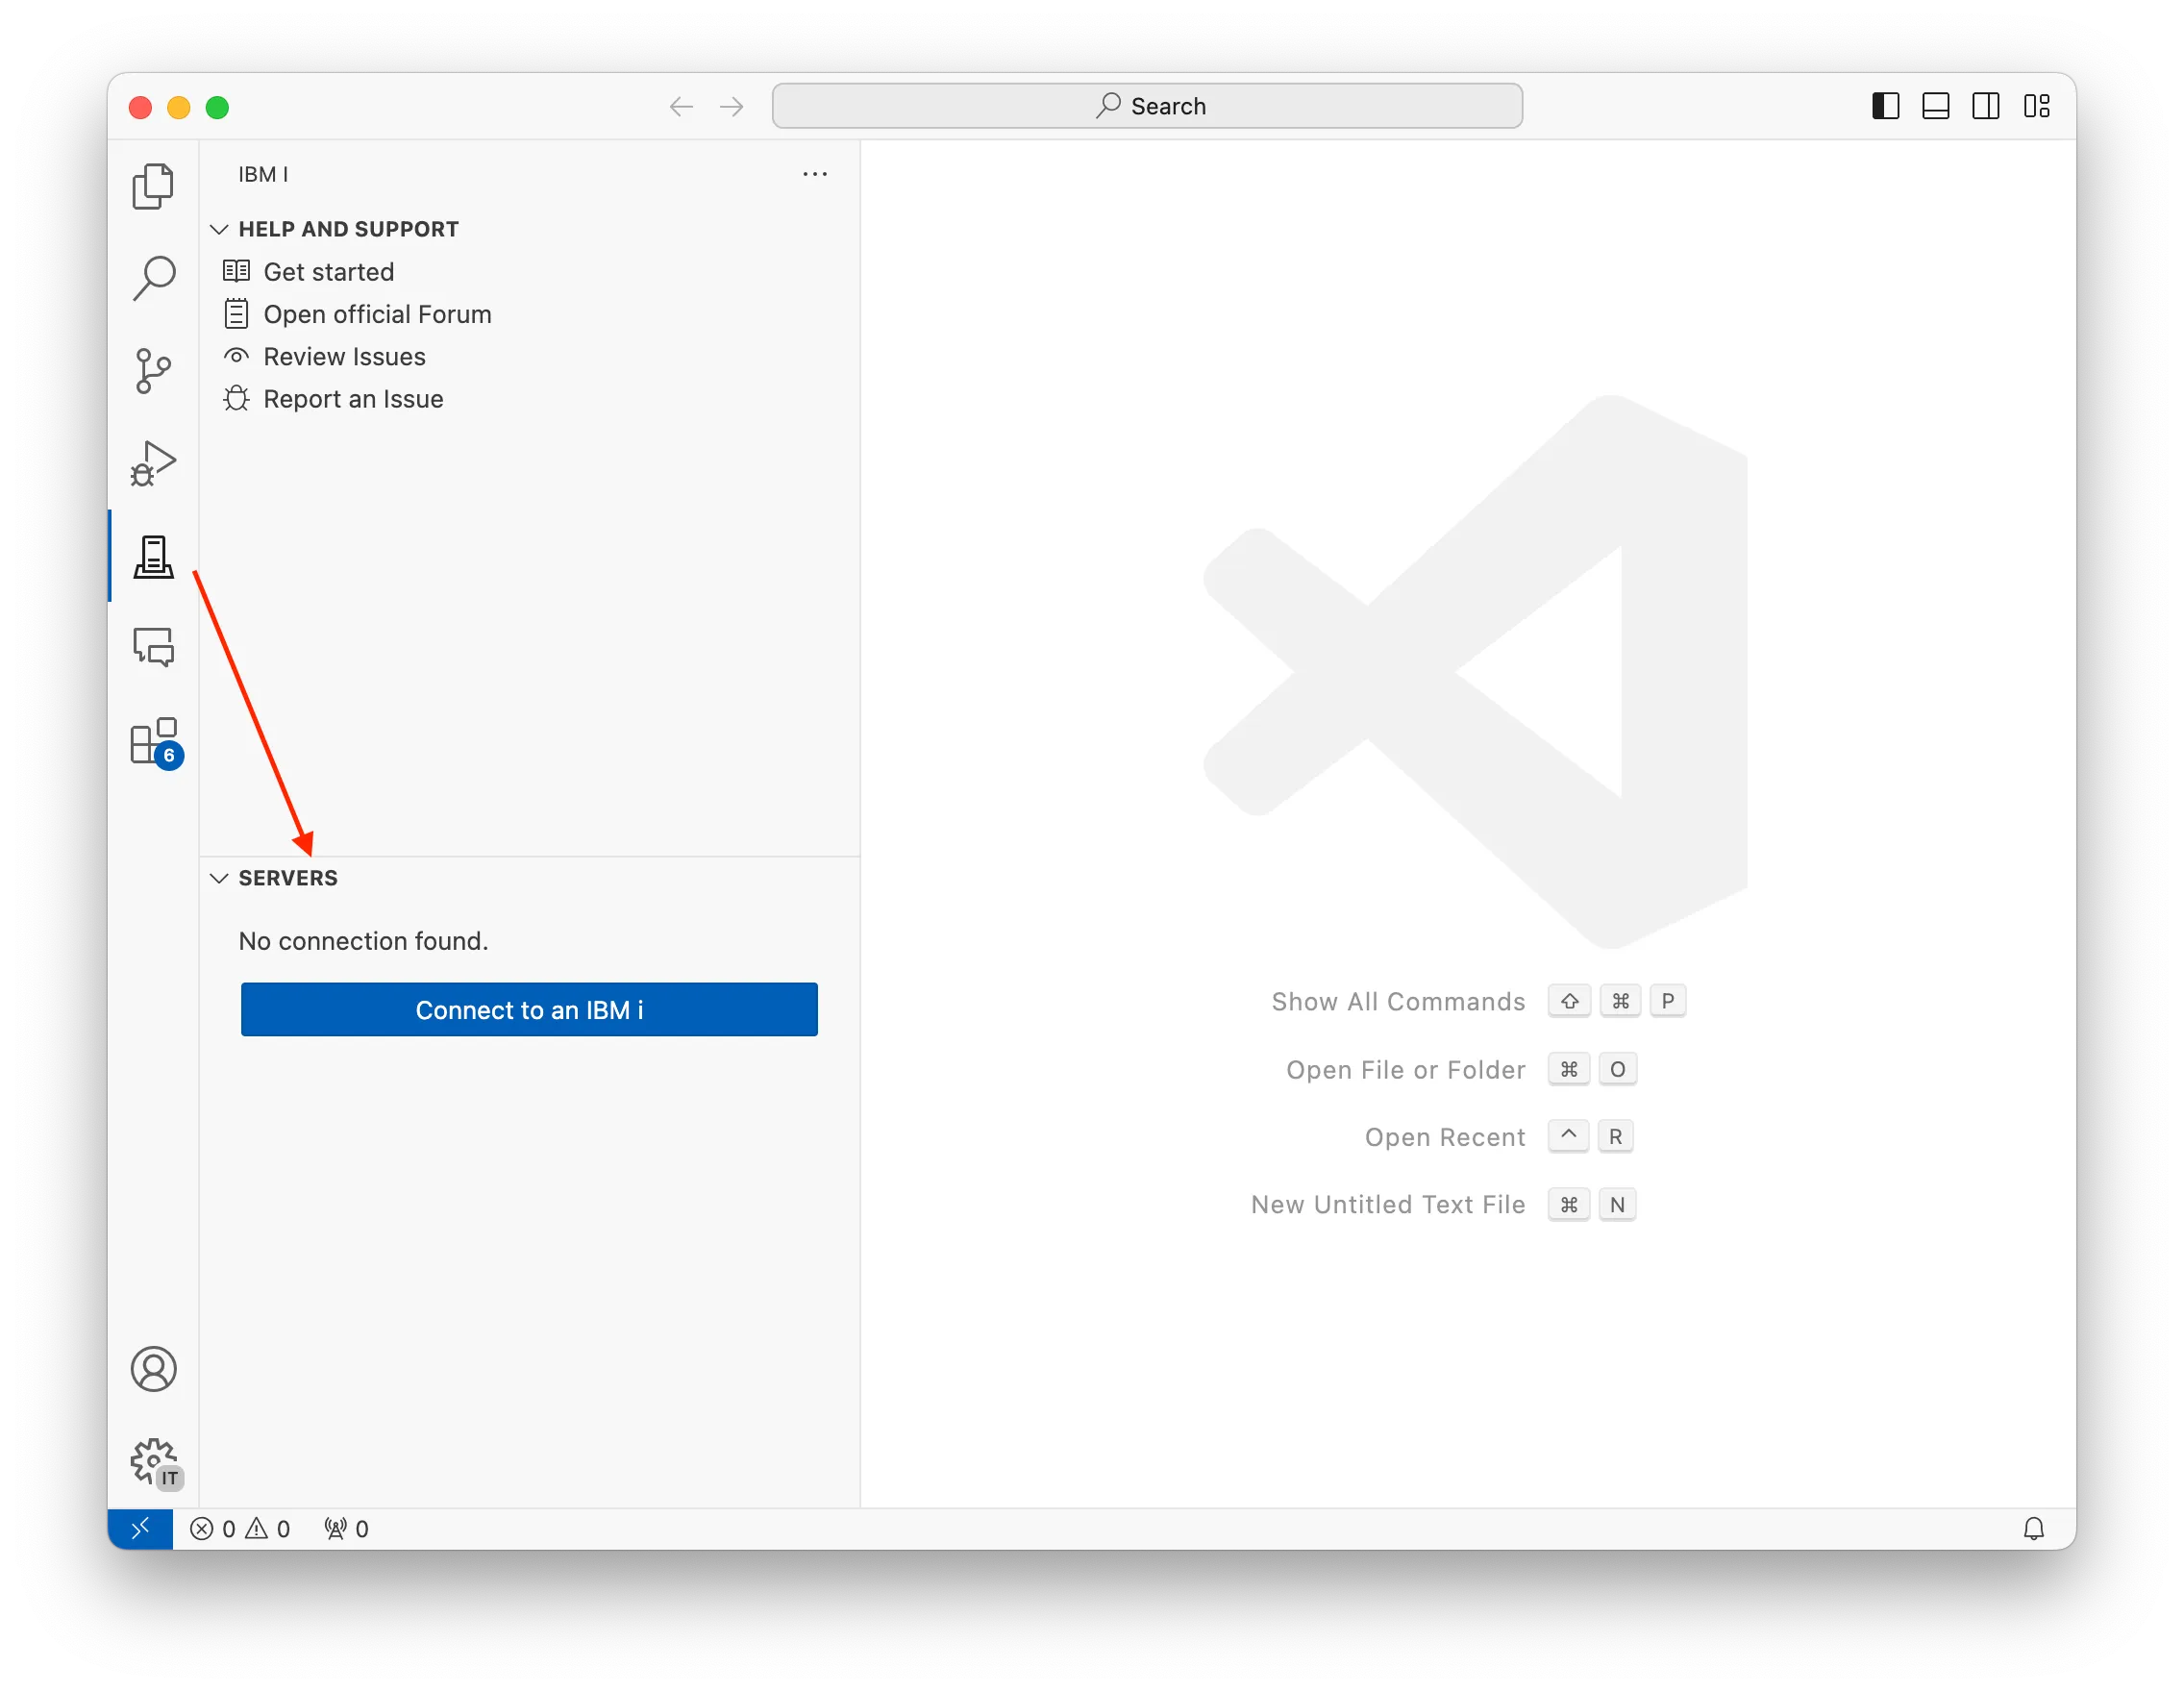
3. Connect to an IBM i system
Using the Code for IBM i extension, you can create a new connection to an IBM i system.
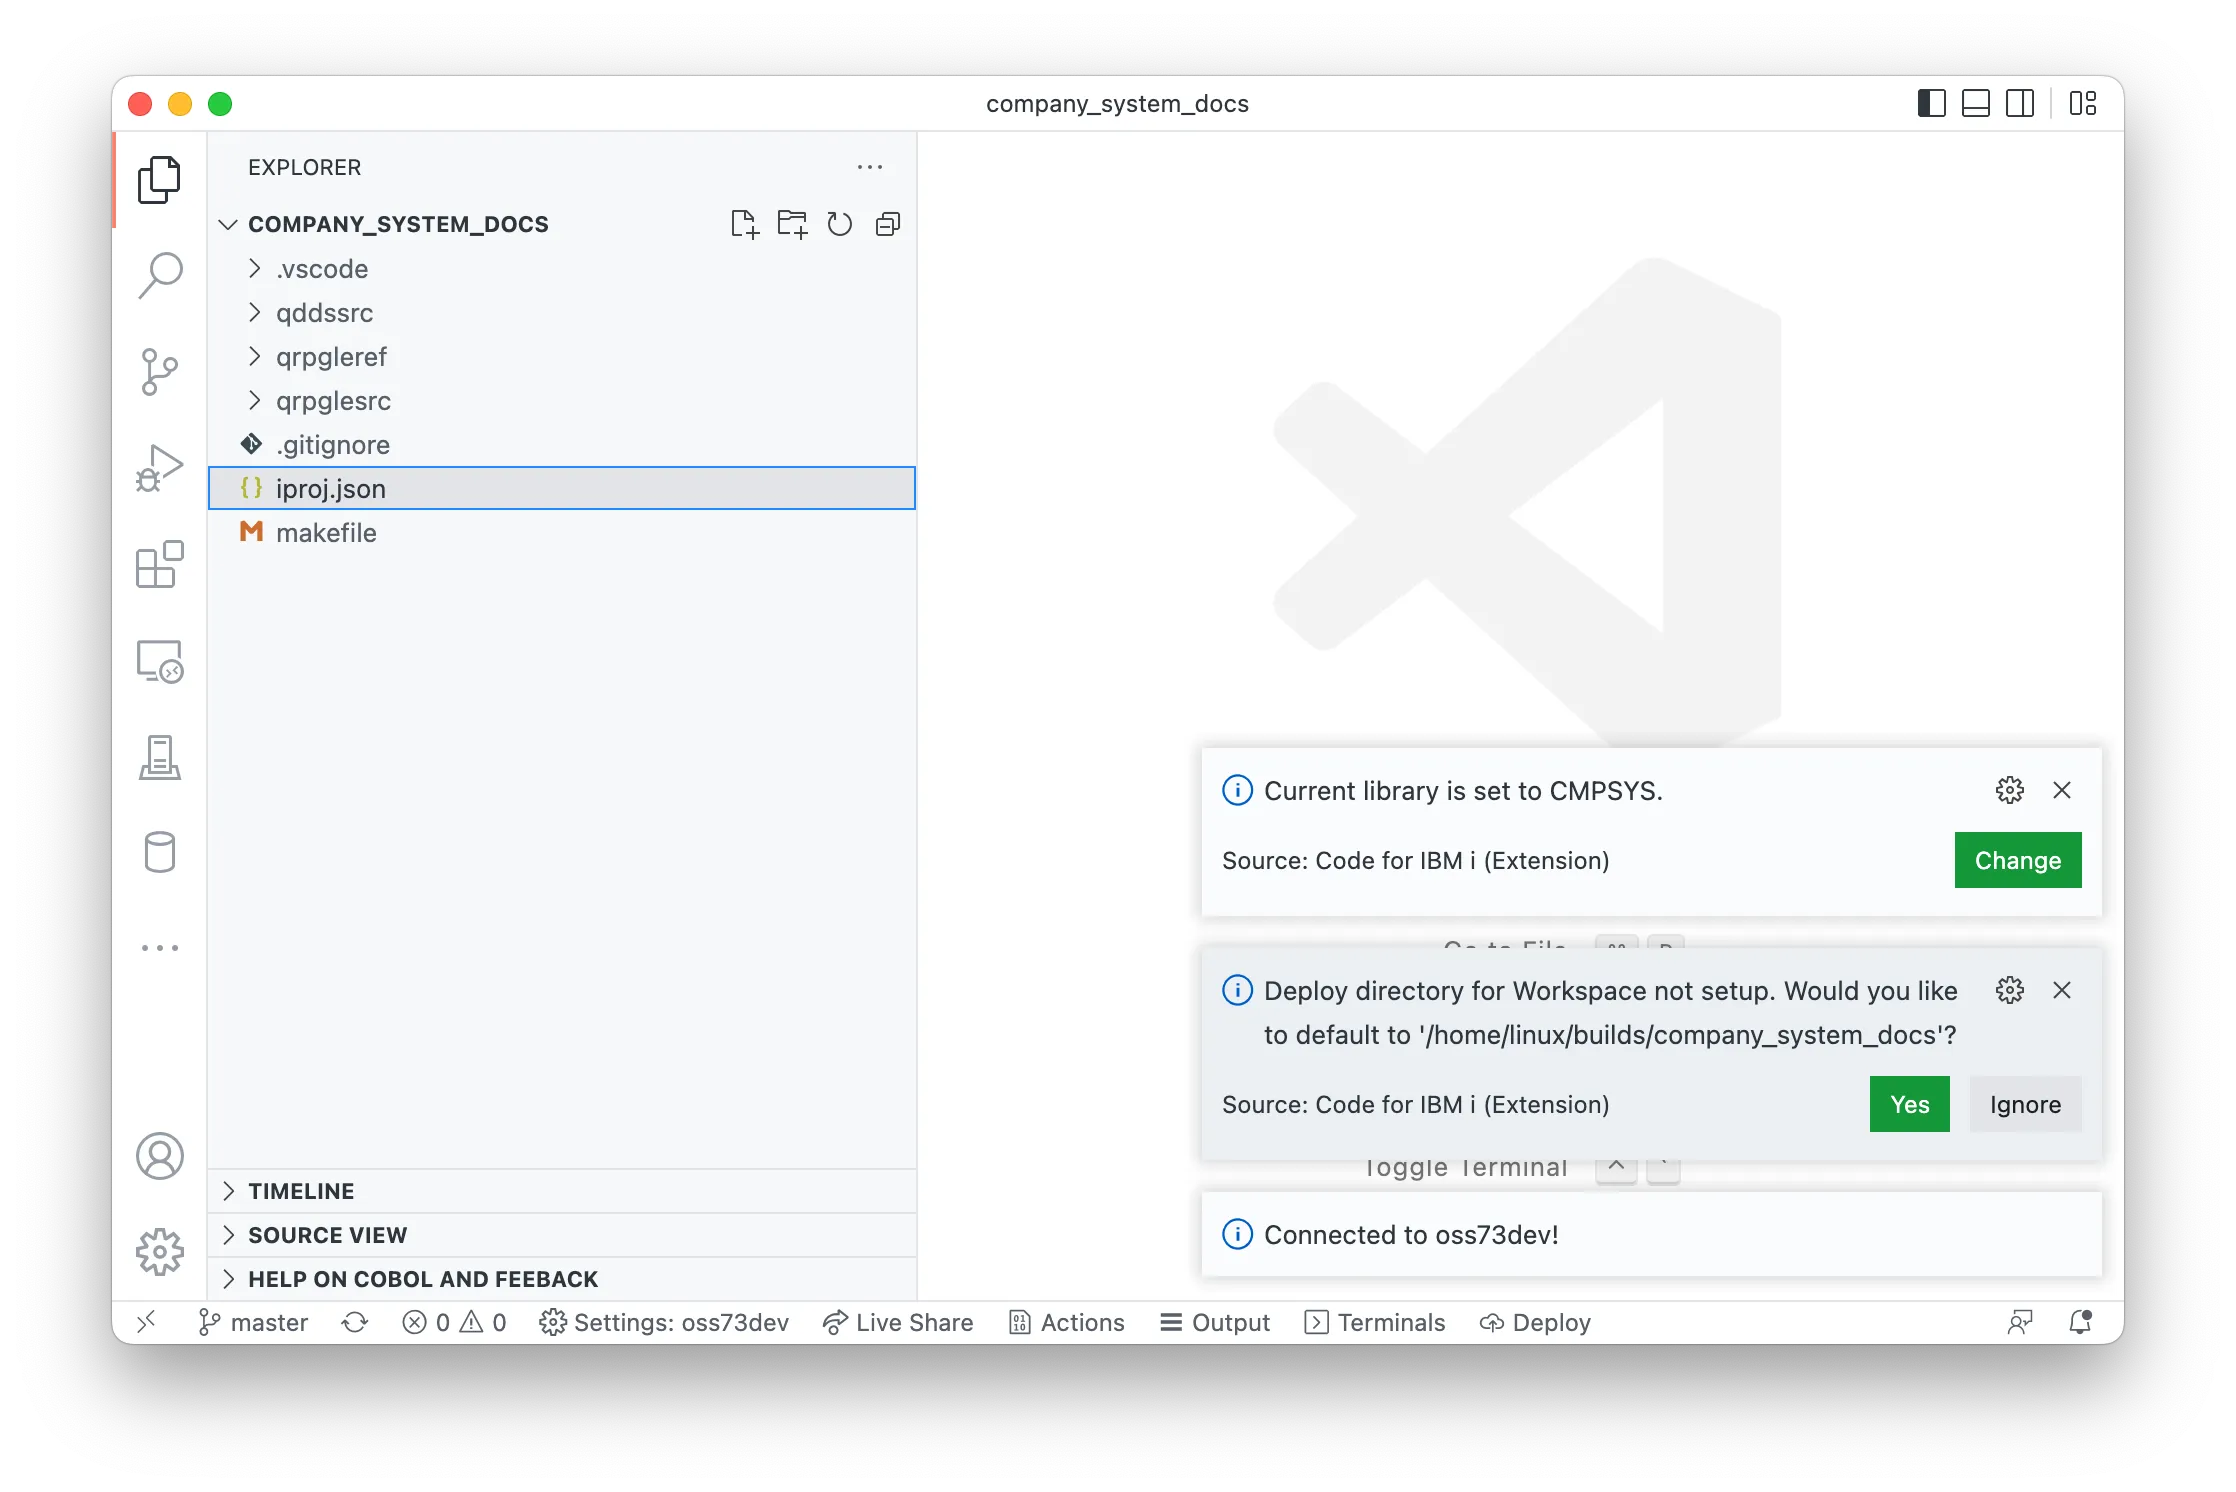
3. Setting the deploy location
If it is the first time connecting with the workspace it will prompt the user to set a default Deploy directory.
If you would prefer to change the default location, the user can right-click on any directory in the IFS Browser and select the ‘Deploy Workspace to location’ option.
The user can change the deploy directory at any by using the same right-click option on another directory.
Compiling your first program
Now that you have a directory to write some code and a connection made in Visual Studio Code, it’s almost time to write code. Before that, there are some concepts we must understand.
Folder structure
Since we are not developing in source members, there are not as many rules as the QSYS file system.
Files can be any case
Can use any extension with any length
Unlike QSYS, we can have folders within folders
It is not an issue to continue using folder names like QRPGLESRC, or qddssrc, but it is always recommended to use lowercase naming.
Actions are synonymous for compile commands. An Action defines how the compile command should be run. When doing local development, Actions are stored in the folder .vscode, and inside that actions.json (.vscode/actions.json).
Here is an example Action that would be found in the actions.json file:
Actions are stored as part of the repository so they can be shared between developers. Generally, we want developers to use the same compile commands. Therefore, it is convenient to store them as part of the repository.
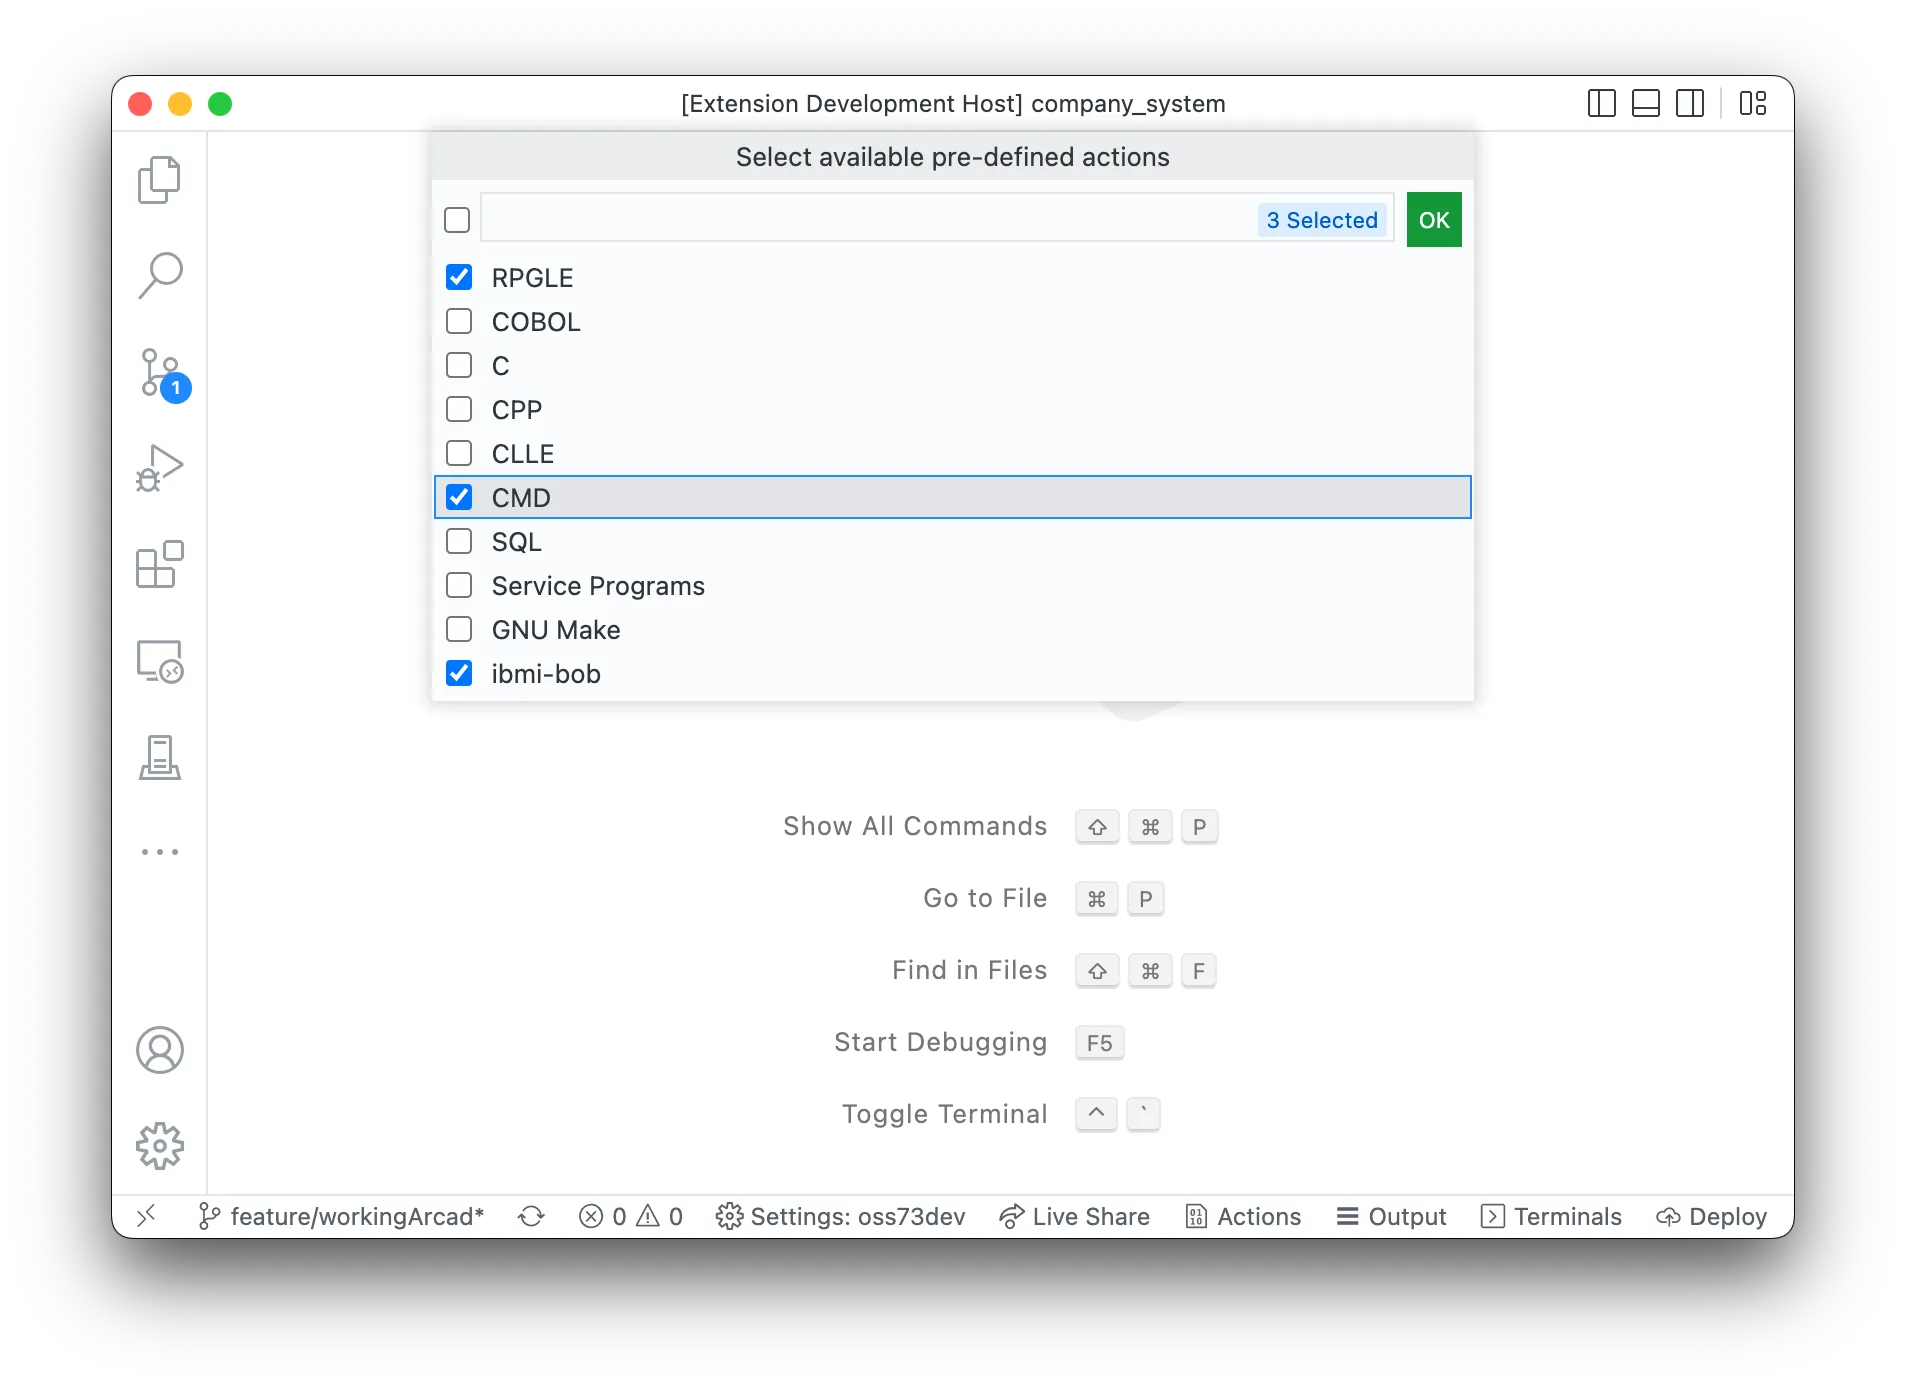
There is a tool that can generate an initial actions.json file for you. After connecting to a system, open the command palette (F1) and search for ‘Launch Actions Setup’. This shows a multi-select window where the user can pick which technologies they’re using. Based on the selection, an actions.json will be created.
For the next step, ensure RPGLE is selected.
2. Set your current library
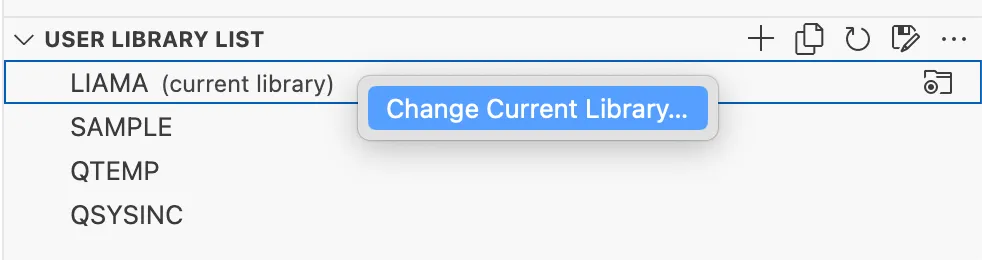
Notice in your action.json file, where each command is defined, the &CURLIB variable is used in place of the target library. This variable is set based on the User Library List view in Visual Studio Code.
The current library should be unique to your user and not shared by multiple users. You are able to right click on the current library and select ‘Change current library’ and enter the unique library.
3. Writing the first program
Next, you can create your first program.
Create a directory and give it a name like src, or qrpglesrc, or whatever name you would like.
Create a new file inside of that directory named mypgm.pgm.rpgle. We use .pgm. for later, as it is an indicator that it is a program.
Fill the new file with the source code shown here.
**free
dcl-s mytext char(20);
mytext = 'Hello from the world';
dsply mytext;
return;
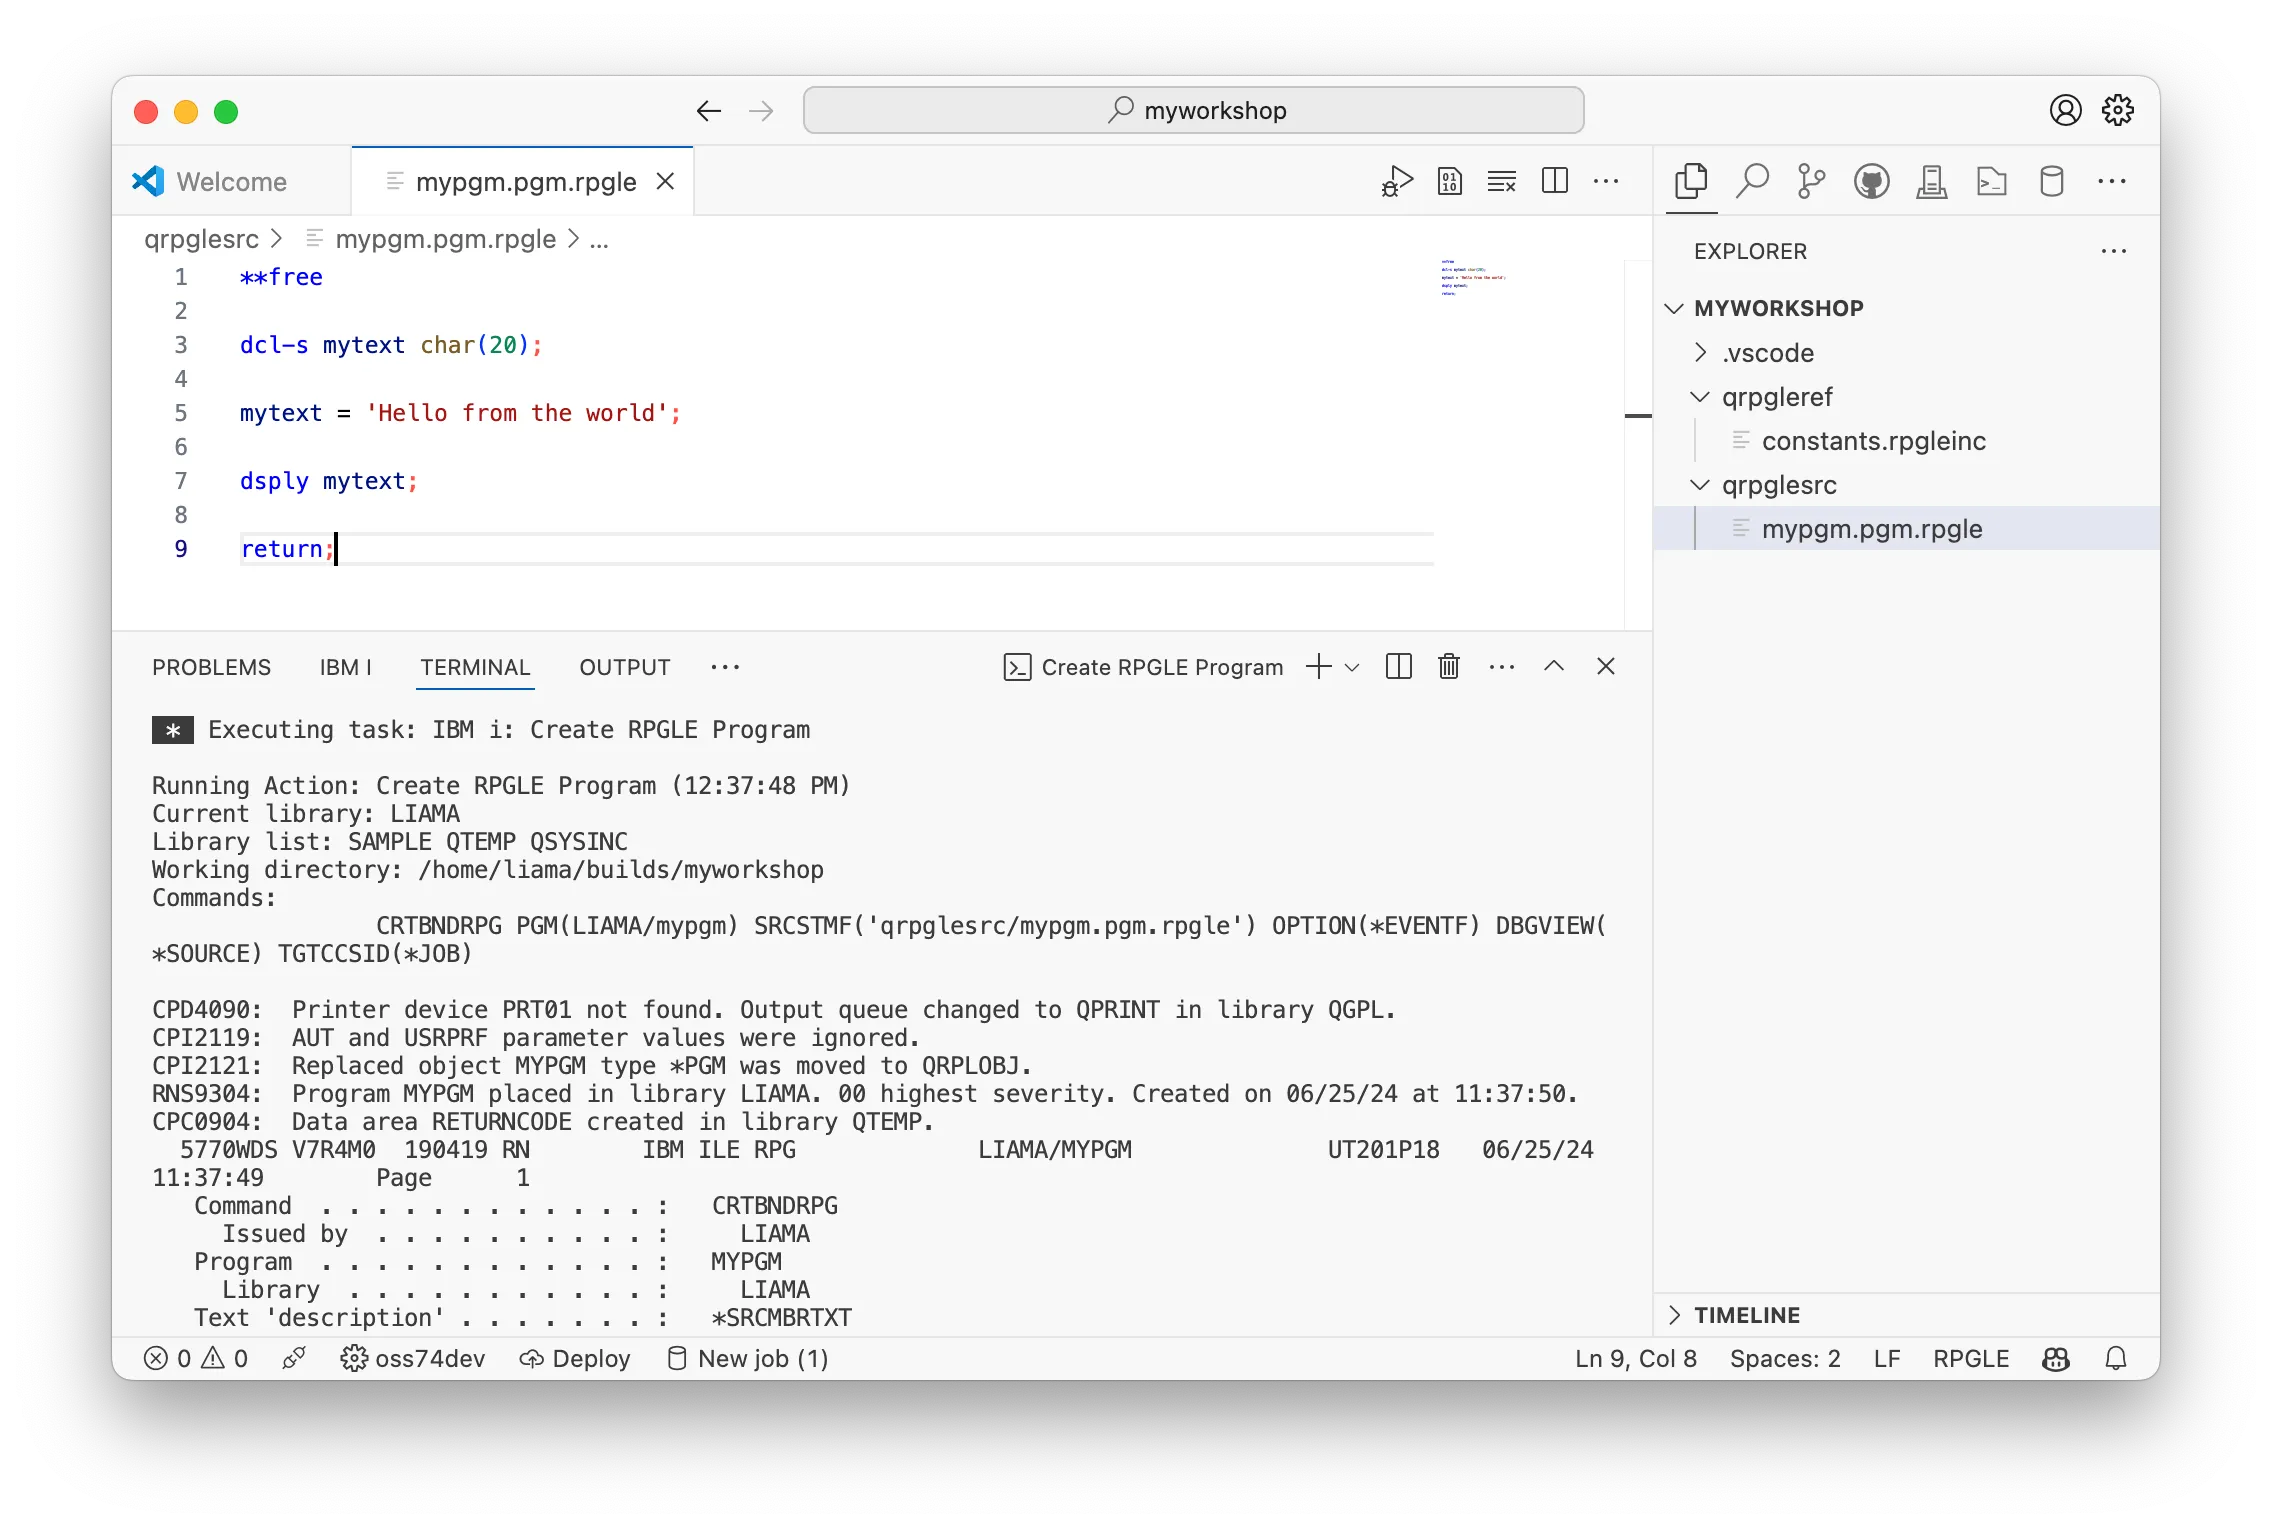
4. Deploy and build
Once you have connecting to a system, setup the repo Actions and created your first piece of source code, then it is time to build that source code. From here on out, the dev-test loop is simple: make changes and then build.
To build, from your source code you can either:
Use the shortcut: Control + E (Windows/Linux), Command + E (Mac)
Find the ‘Run Action’ button in the editor UI.
The first quickpick is going to show with a list of the Actions as defined in the actions.json file. If you correctly selected RPGLE when creating the Actions, then you should see an option for ‘Create RPGLE Program’. Select that, and the deploy and build will commence.
Following that, another quickpick will show so the user can select which deployment method they want to use. To keep things simple, use Compare if it shown.
Following the choices of Action and deploy method, you can navigate to the Terminal tab to see the command that was submitted, as well as the spool file from the compiler.
5. Using copybooks / includes
When developing locally, ‘member style’ includes are no longer used for /COPY or /INCLUDE statements. Instead, we can use ‘posix style’ includes, which means using a path relative to the root of the directory.
Create a new directory for copybooks/header files. Usually a name like qrpgleref, or headers, works.
Create a brand new source file in that new directory, named constants.rpgleinc, with the content shown here:
**free
dcl-c MYLABEL 'Hello from the world';
Go back to the original source that was created and add a /copy or /include statement to bring in the new file that was created.
Add a reference to the constant that was defined in the included file.
**free
/copy 'qrpgleref/constants.rpgleinc'
dcl-s mytext char(20);
mytext = MYLABEL;
dsply mytext;
return;
Recompile your source using the shortcut (Command/Control+E) or the UI.
Initialising your git repository
Your repositories should have three files at this point:
mypgm.pgm.rpgle
constants.rpgleinc
actions.json
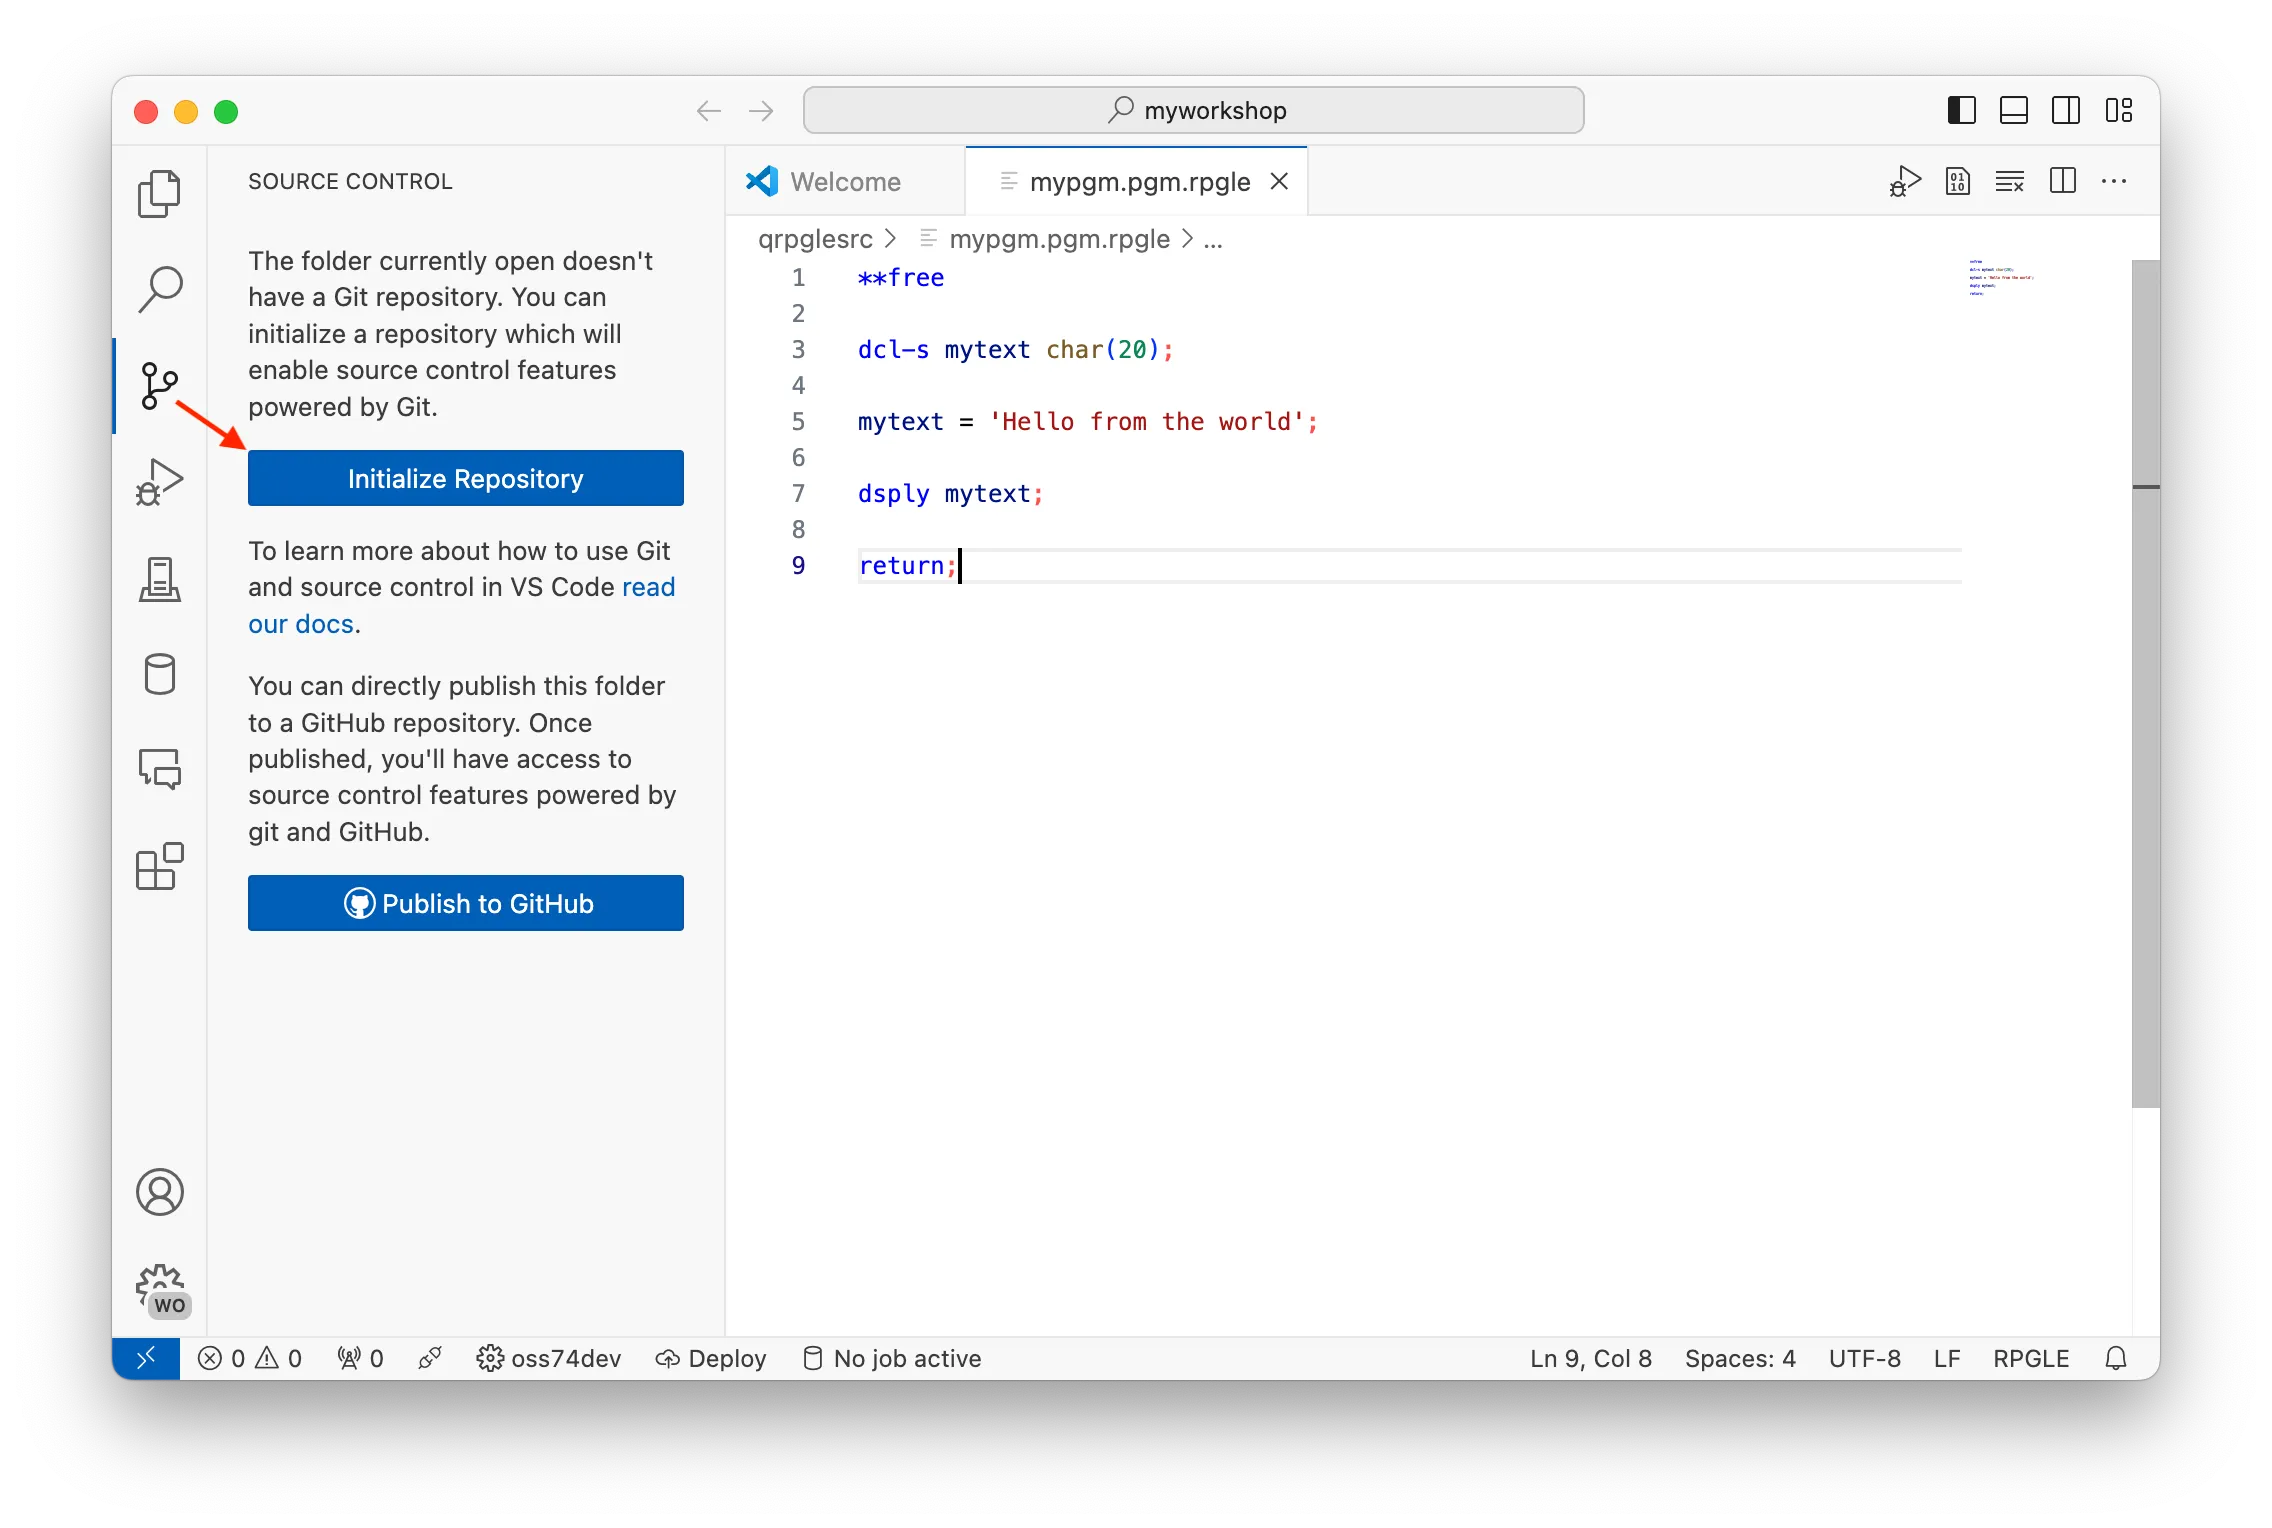
To track this files in git, we need to turn the root directory with these files into a git repository. This can be done in two ways:
from the command line: git init, or
through Visual Studio Code’s Source Control view. Switch to that view and select the ‘Initialise git repository’ and then the view will show the files to be tracked.
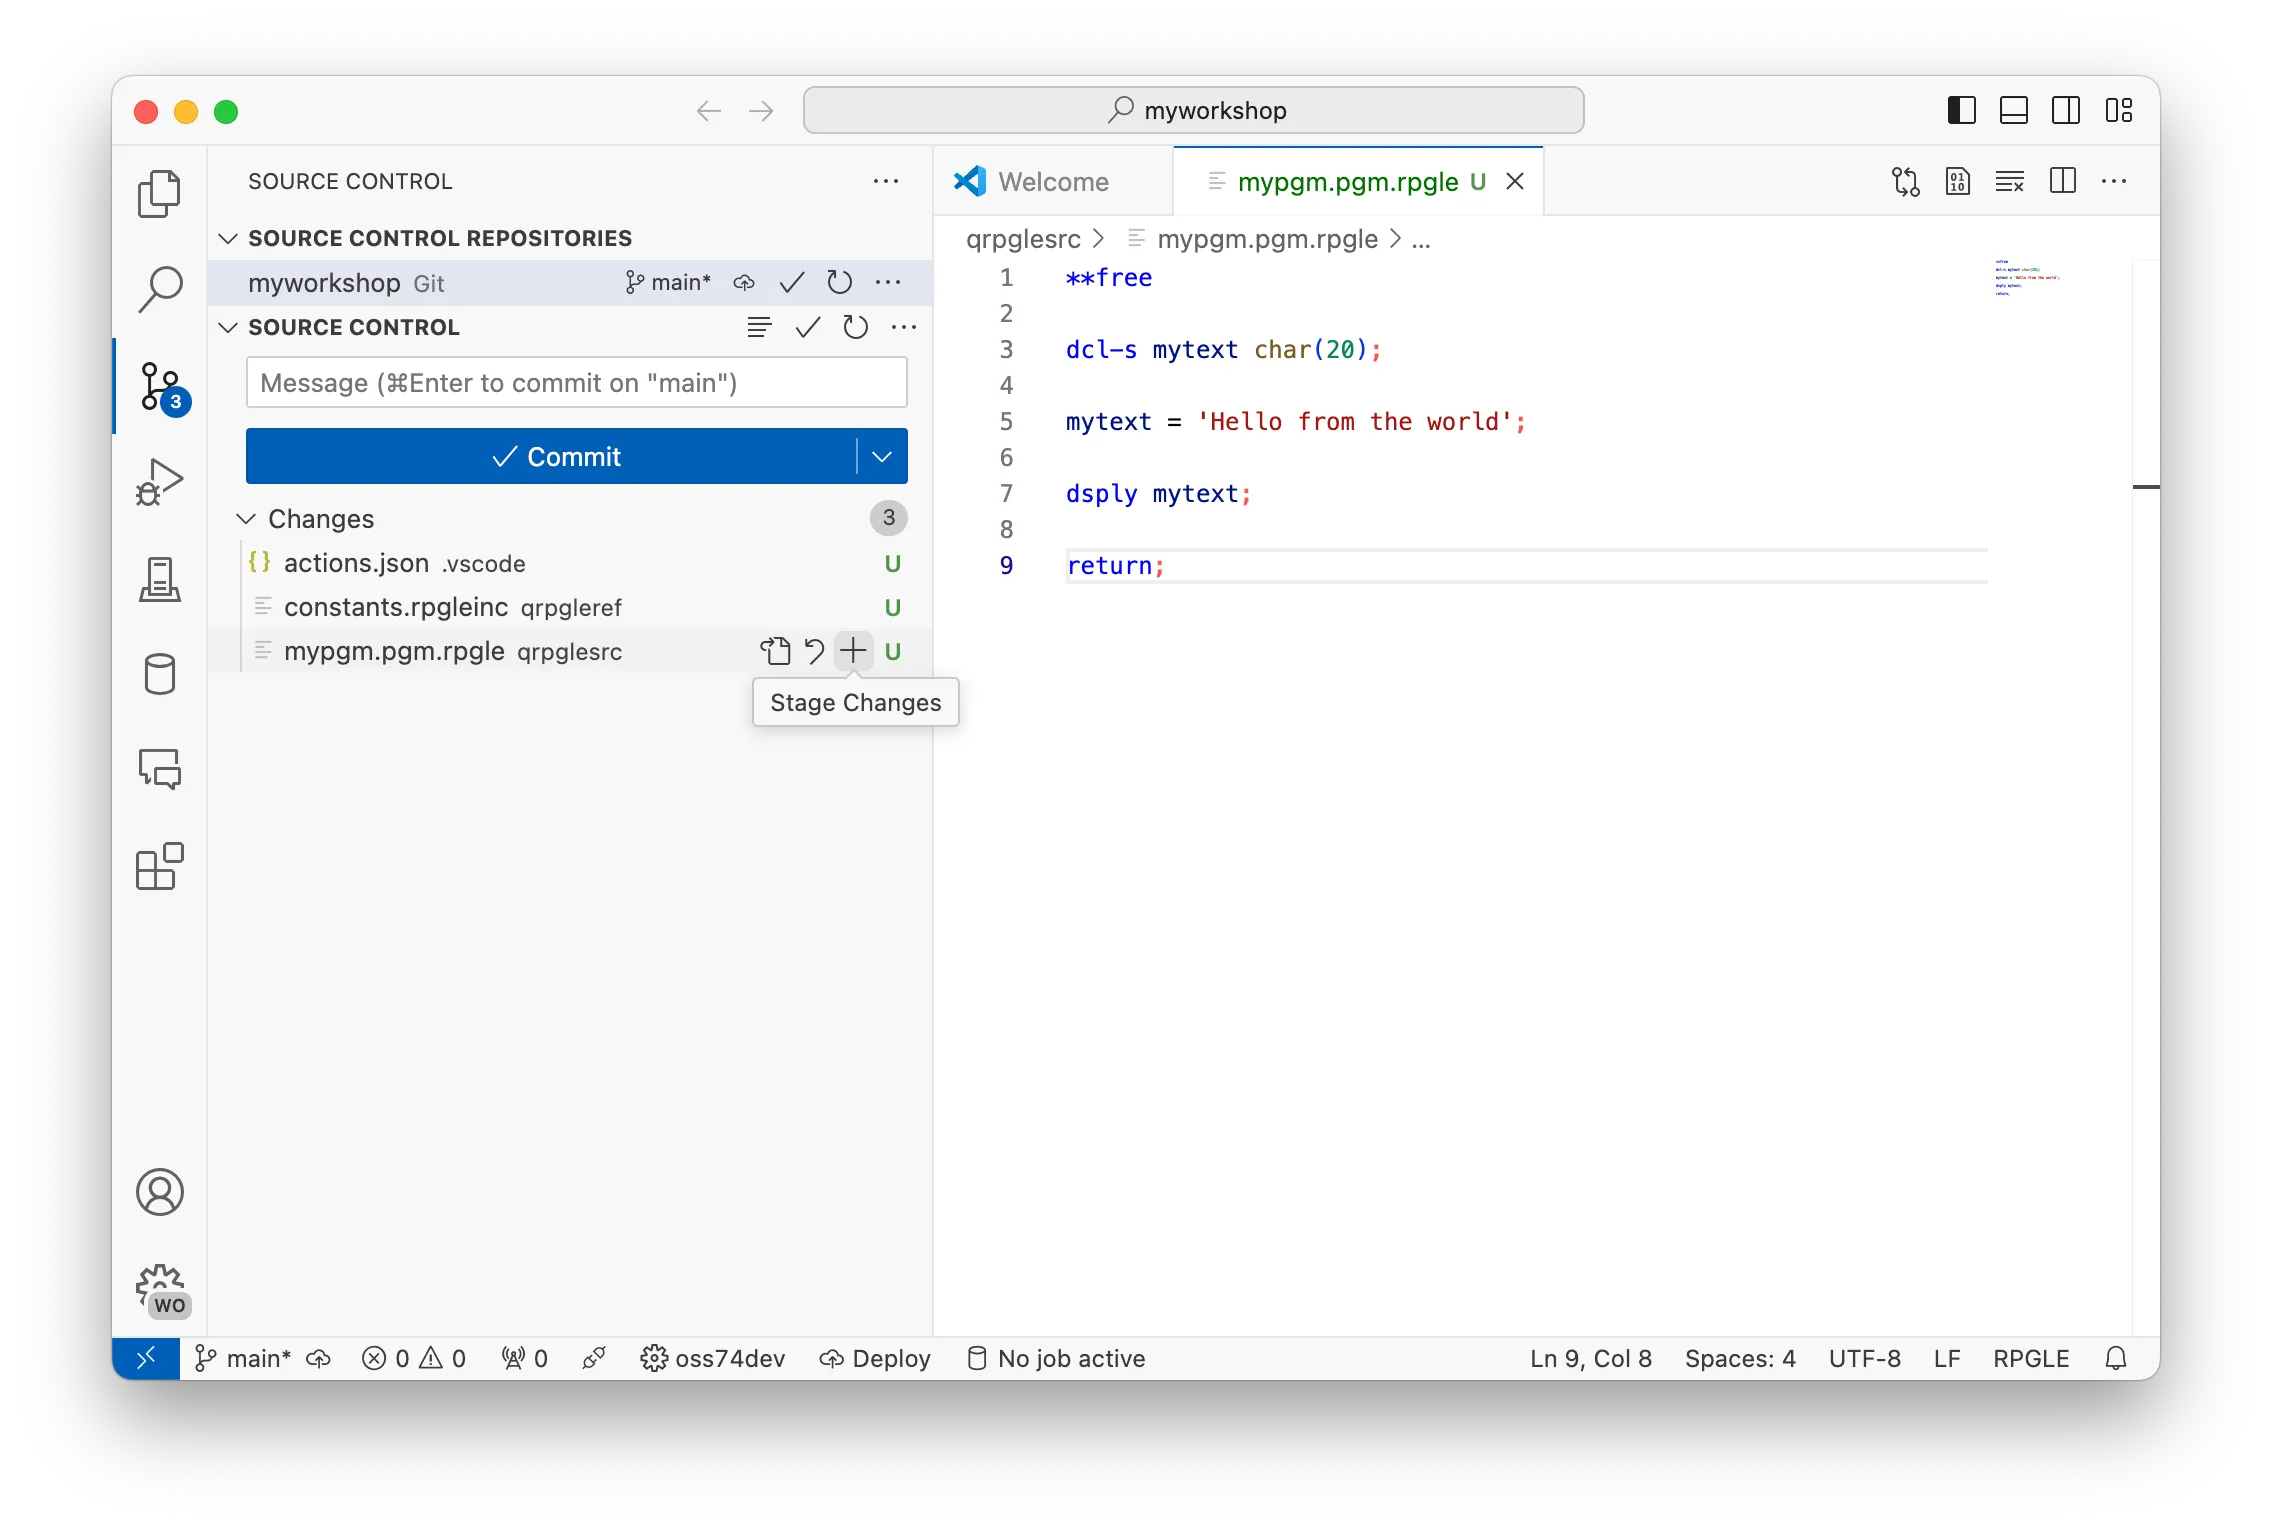
All new files in the Source Control view have the letter ‘A’ next to this, which stands for ‘Added’. It is ‘added’ because it is a new file to the git repository. When you hover over the files in the view, you will see a plus (+) icon appear on it (as well as the parent note). Select the plus (+) on each file to stage the file.
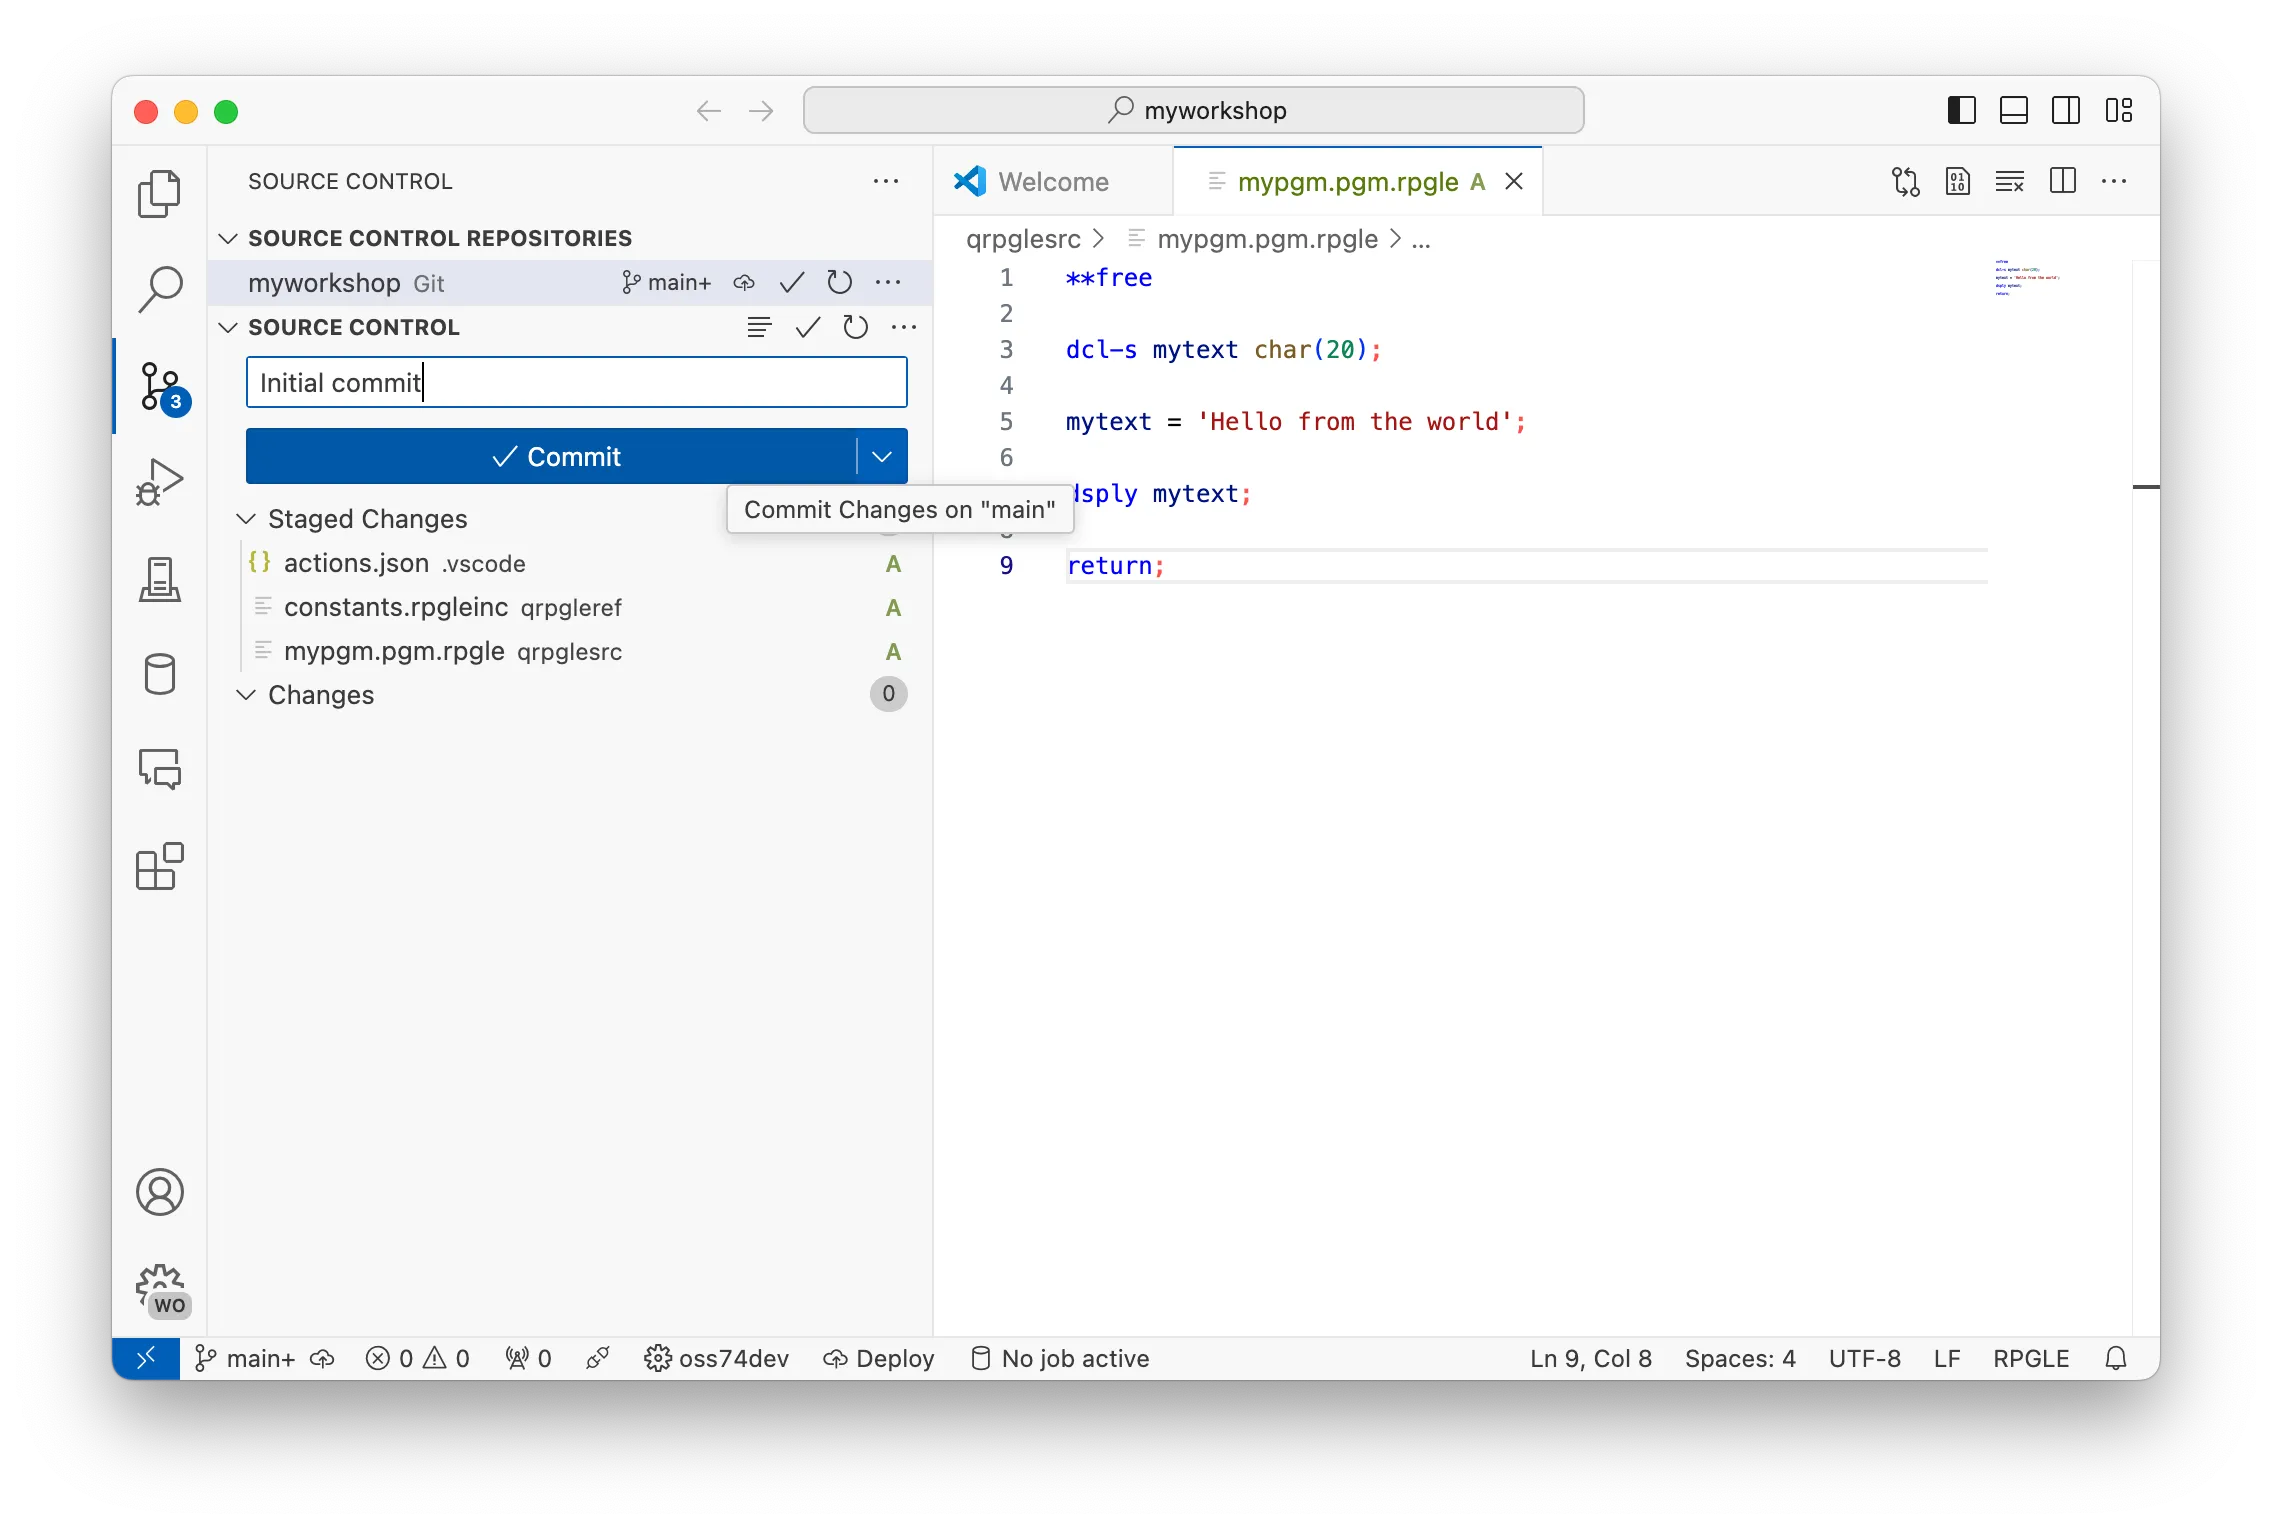
When the files are staged, enter a commit message above and then select ‘Commit’. This will take the staged files, create a commit with the changes and store them into the history of the repository. The list of files will then be empty, since it will show only changes sources in the ‘working tree’ (e.g. the directory).
Making additional changes
Since the repository has been created, any new changes that are made (be it modifications, deletions or new files) will be tracked. The Source Control view will reflect this.
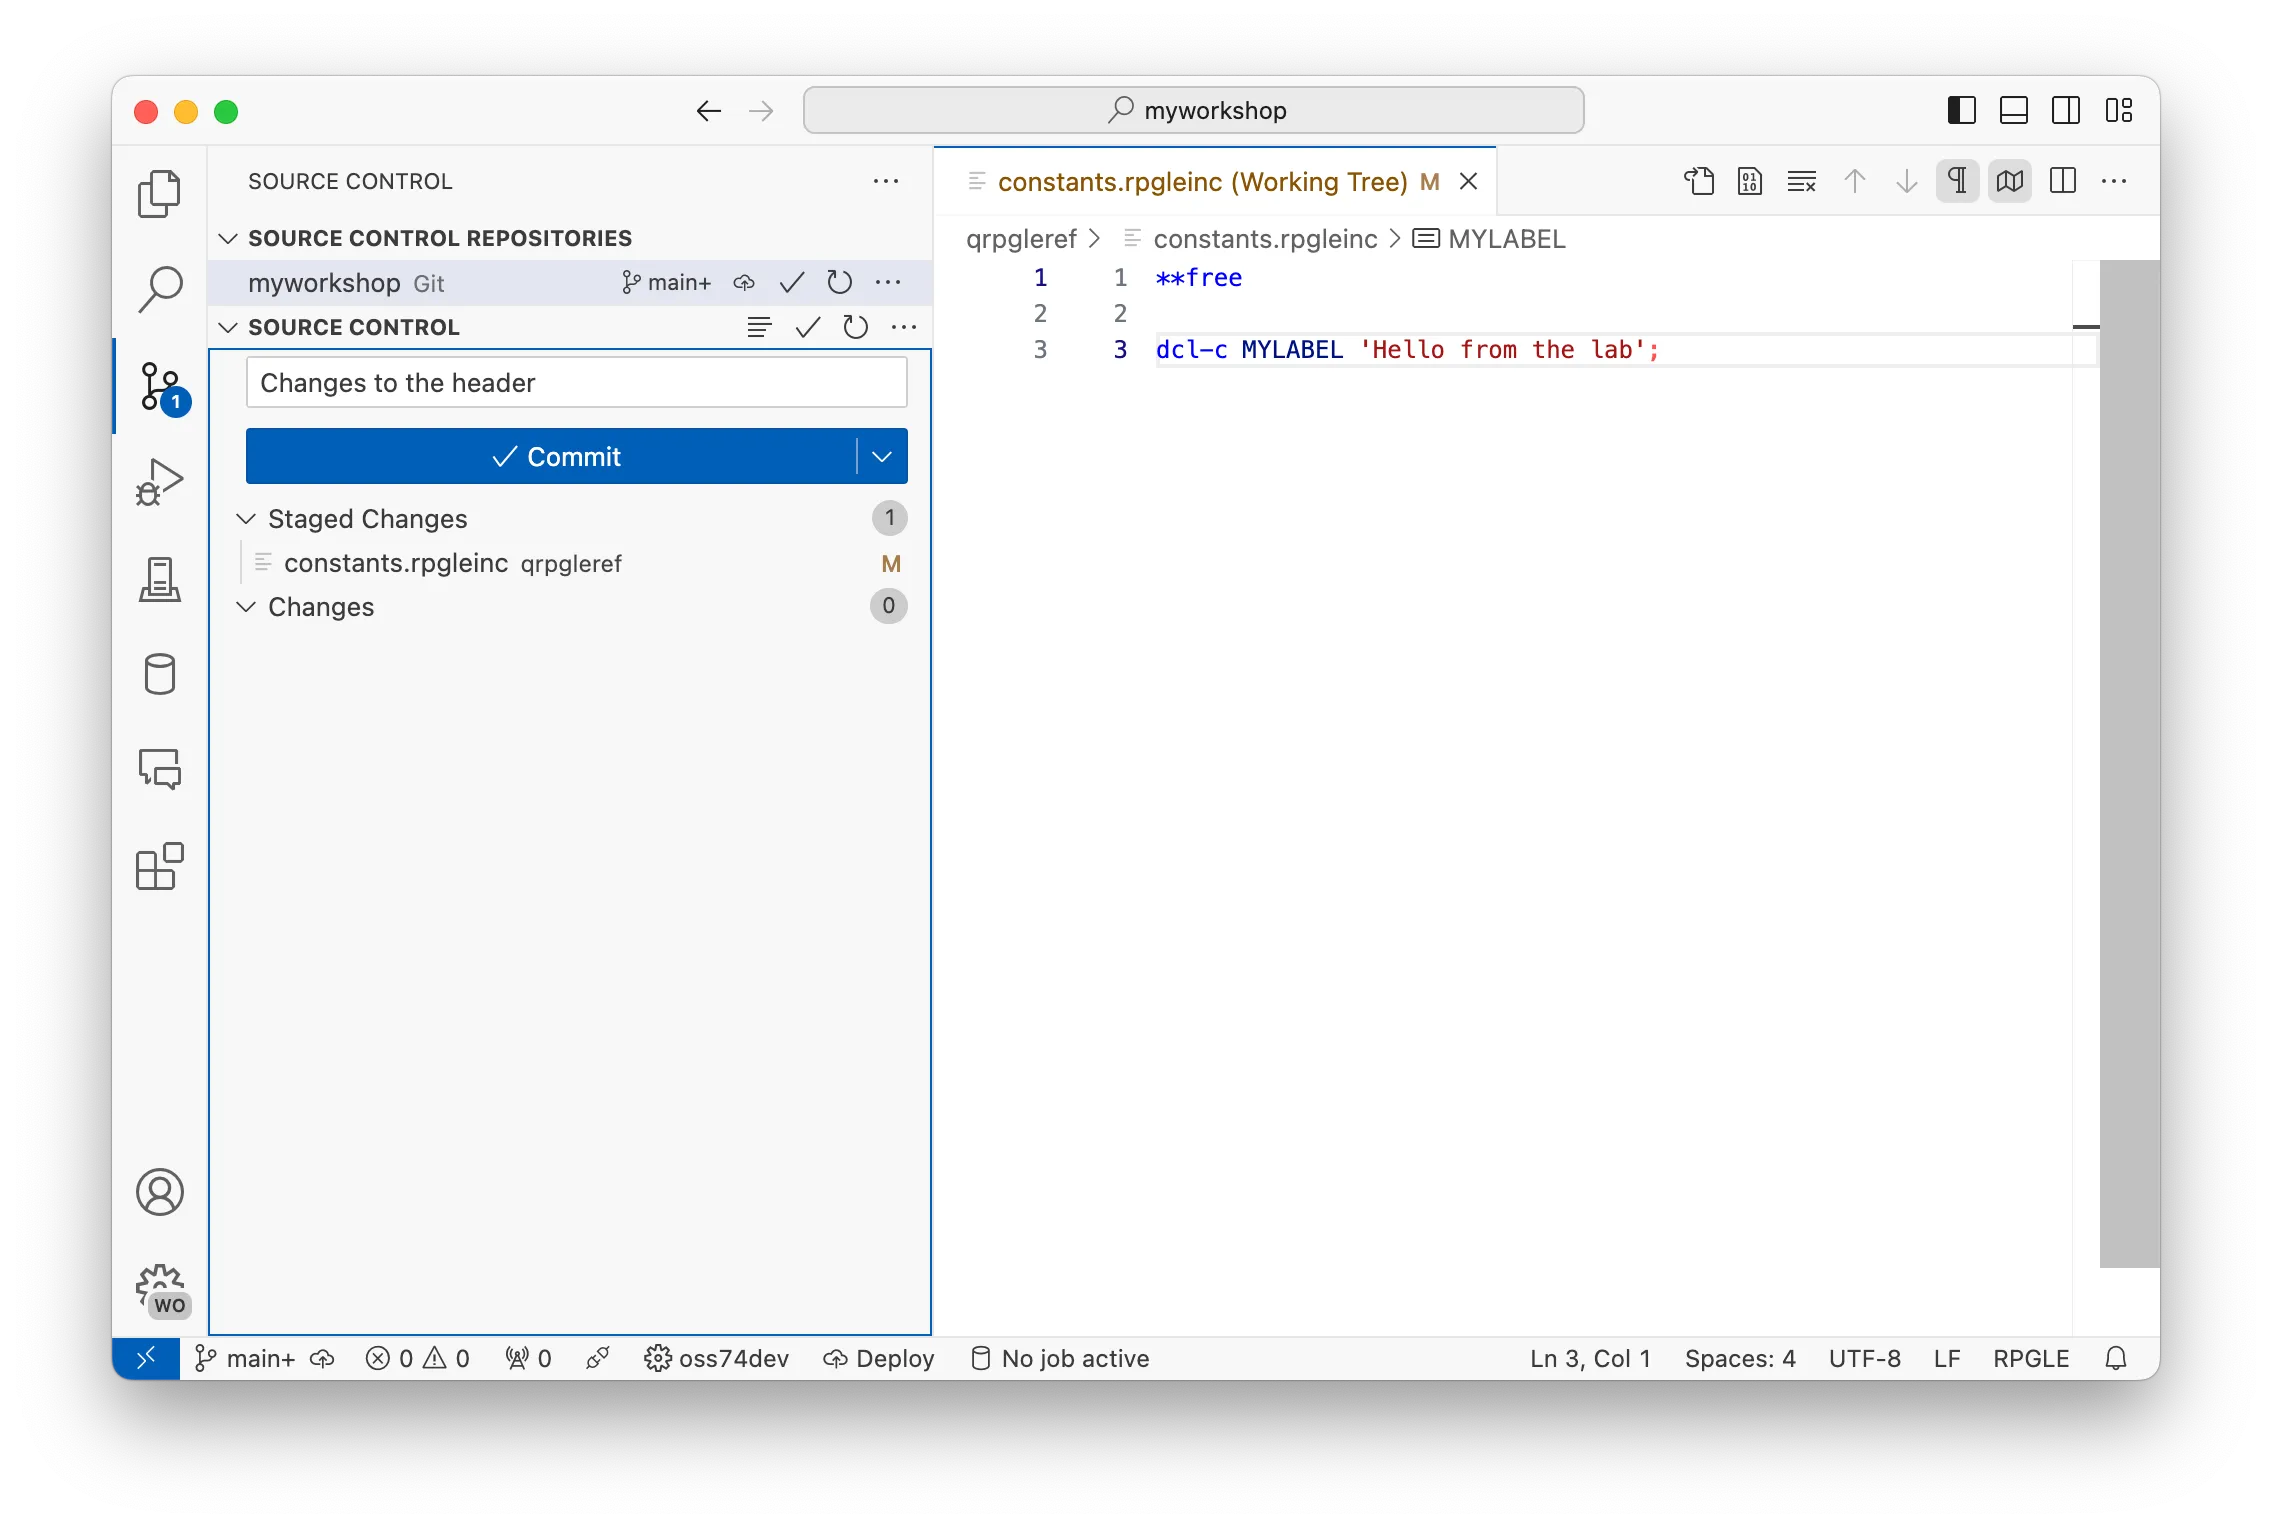
Open up the header file and make a change to the MYLABEL constant.
**free
dcl-c MYLABEL 'Hello from the lab';
After saving the file, the Source Control view will automatically update to show changes in the repository.
Like before, the changed file, now tagged with ‘M’ (for modified), can be hovered on and will show the plus (+). Clicking on the plus will stage it the file, then a commit message can be provided before clicking on the ‘Commit’ button.
Making a GitHub repository
Using git on your local machine is great for when you are developing. But, when you are working in a team, it’s useful to have collaborations tools so code can be shared and worked on by other people. For the purpose of this workshop, we will be creating a repository in GitHub. There are also plenty of other services, such as GitLab, or Azure DevOps.
Tasks
1. Publish to GitHub
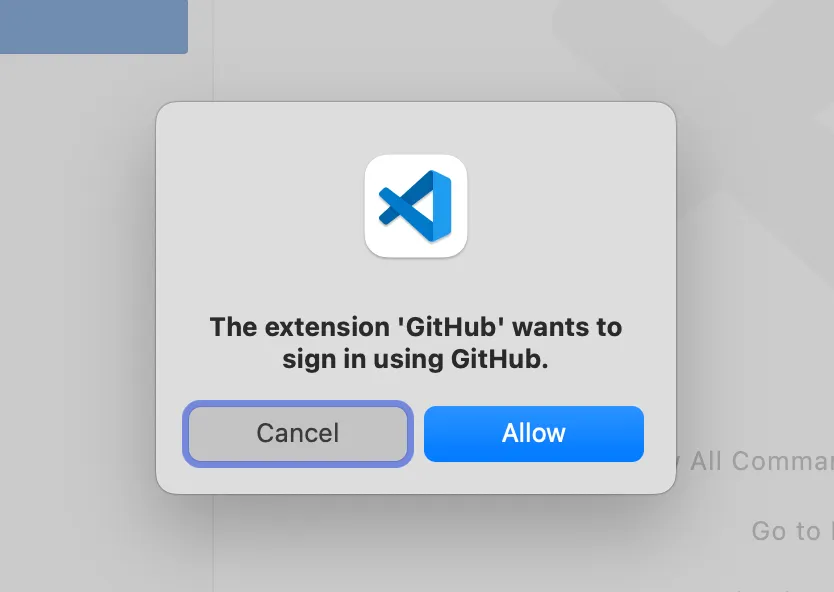
When you have no unstaged or staged changes, the Commit button should turn into the Publish button. Clicking the Publish button should show a popup asking you to sign in to GitHub.
That will take you to GitHub to sign in, and eventually, in your browser, a popup will show asking if you’d like to navigate back to Visual Studio Code. Be sure to Allow this.
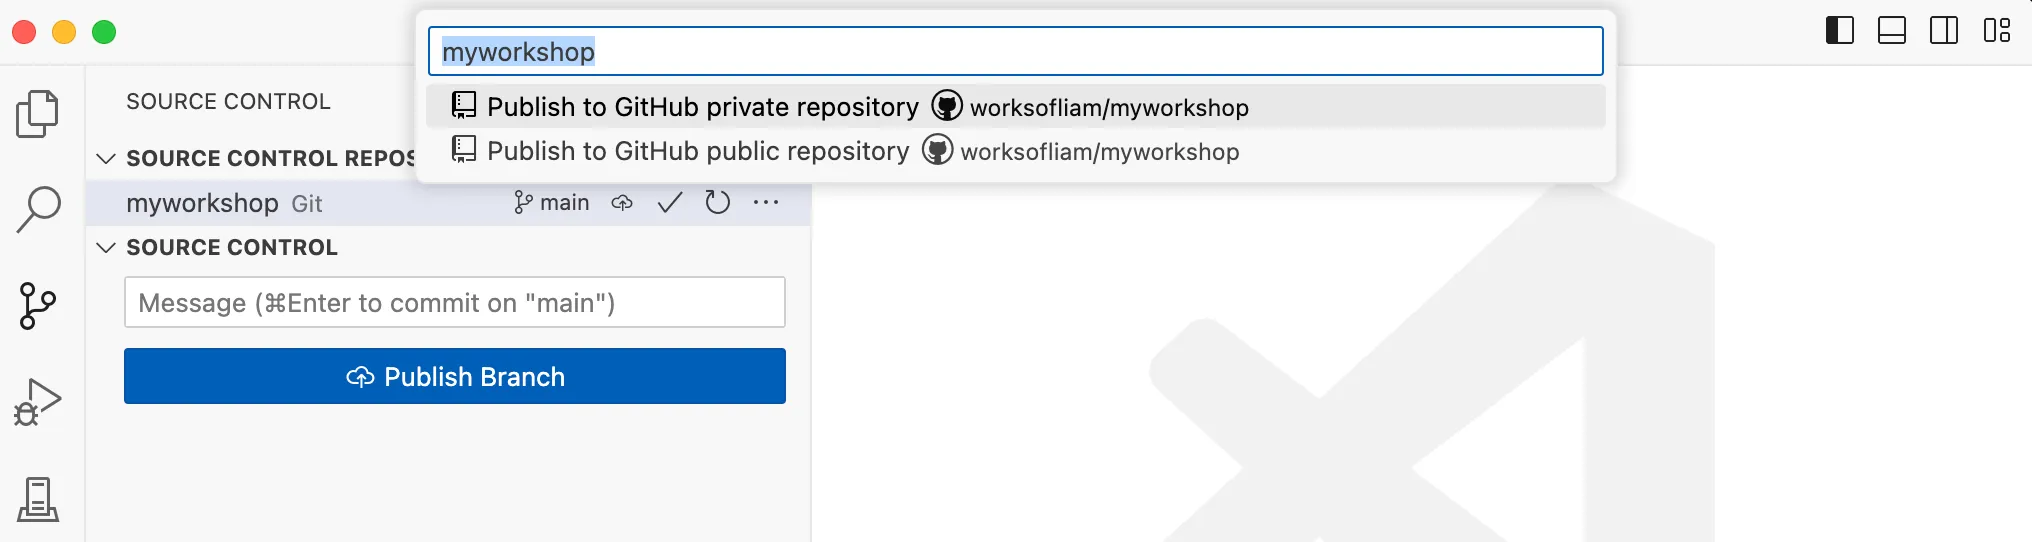
Lastly, it will ask if you want to make this a public or private repository on your GitHub account. Select either, and then it will automatically publish and connect to the remote repository.
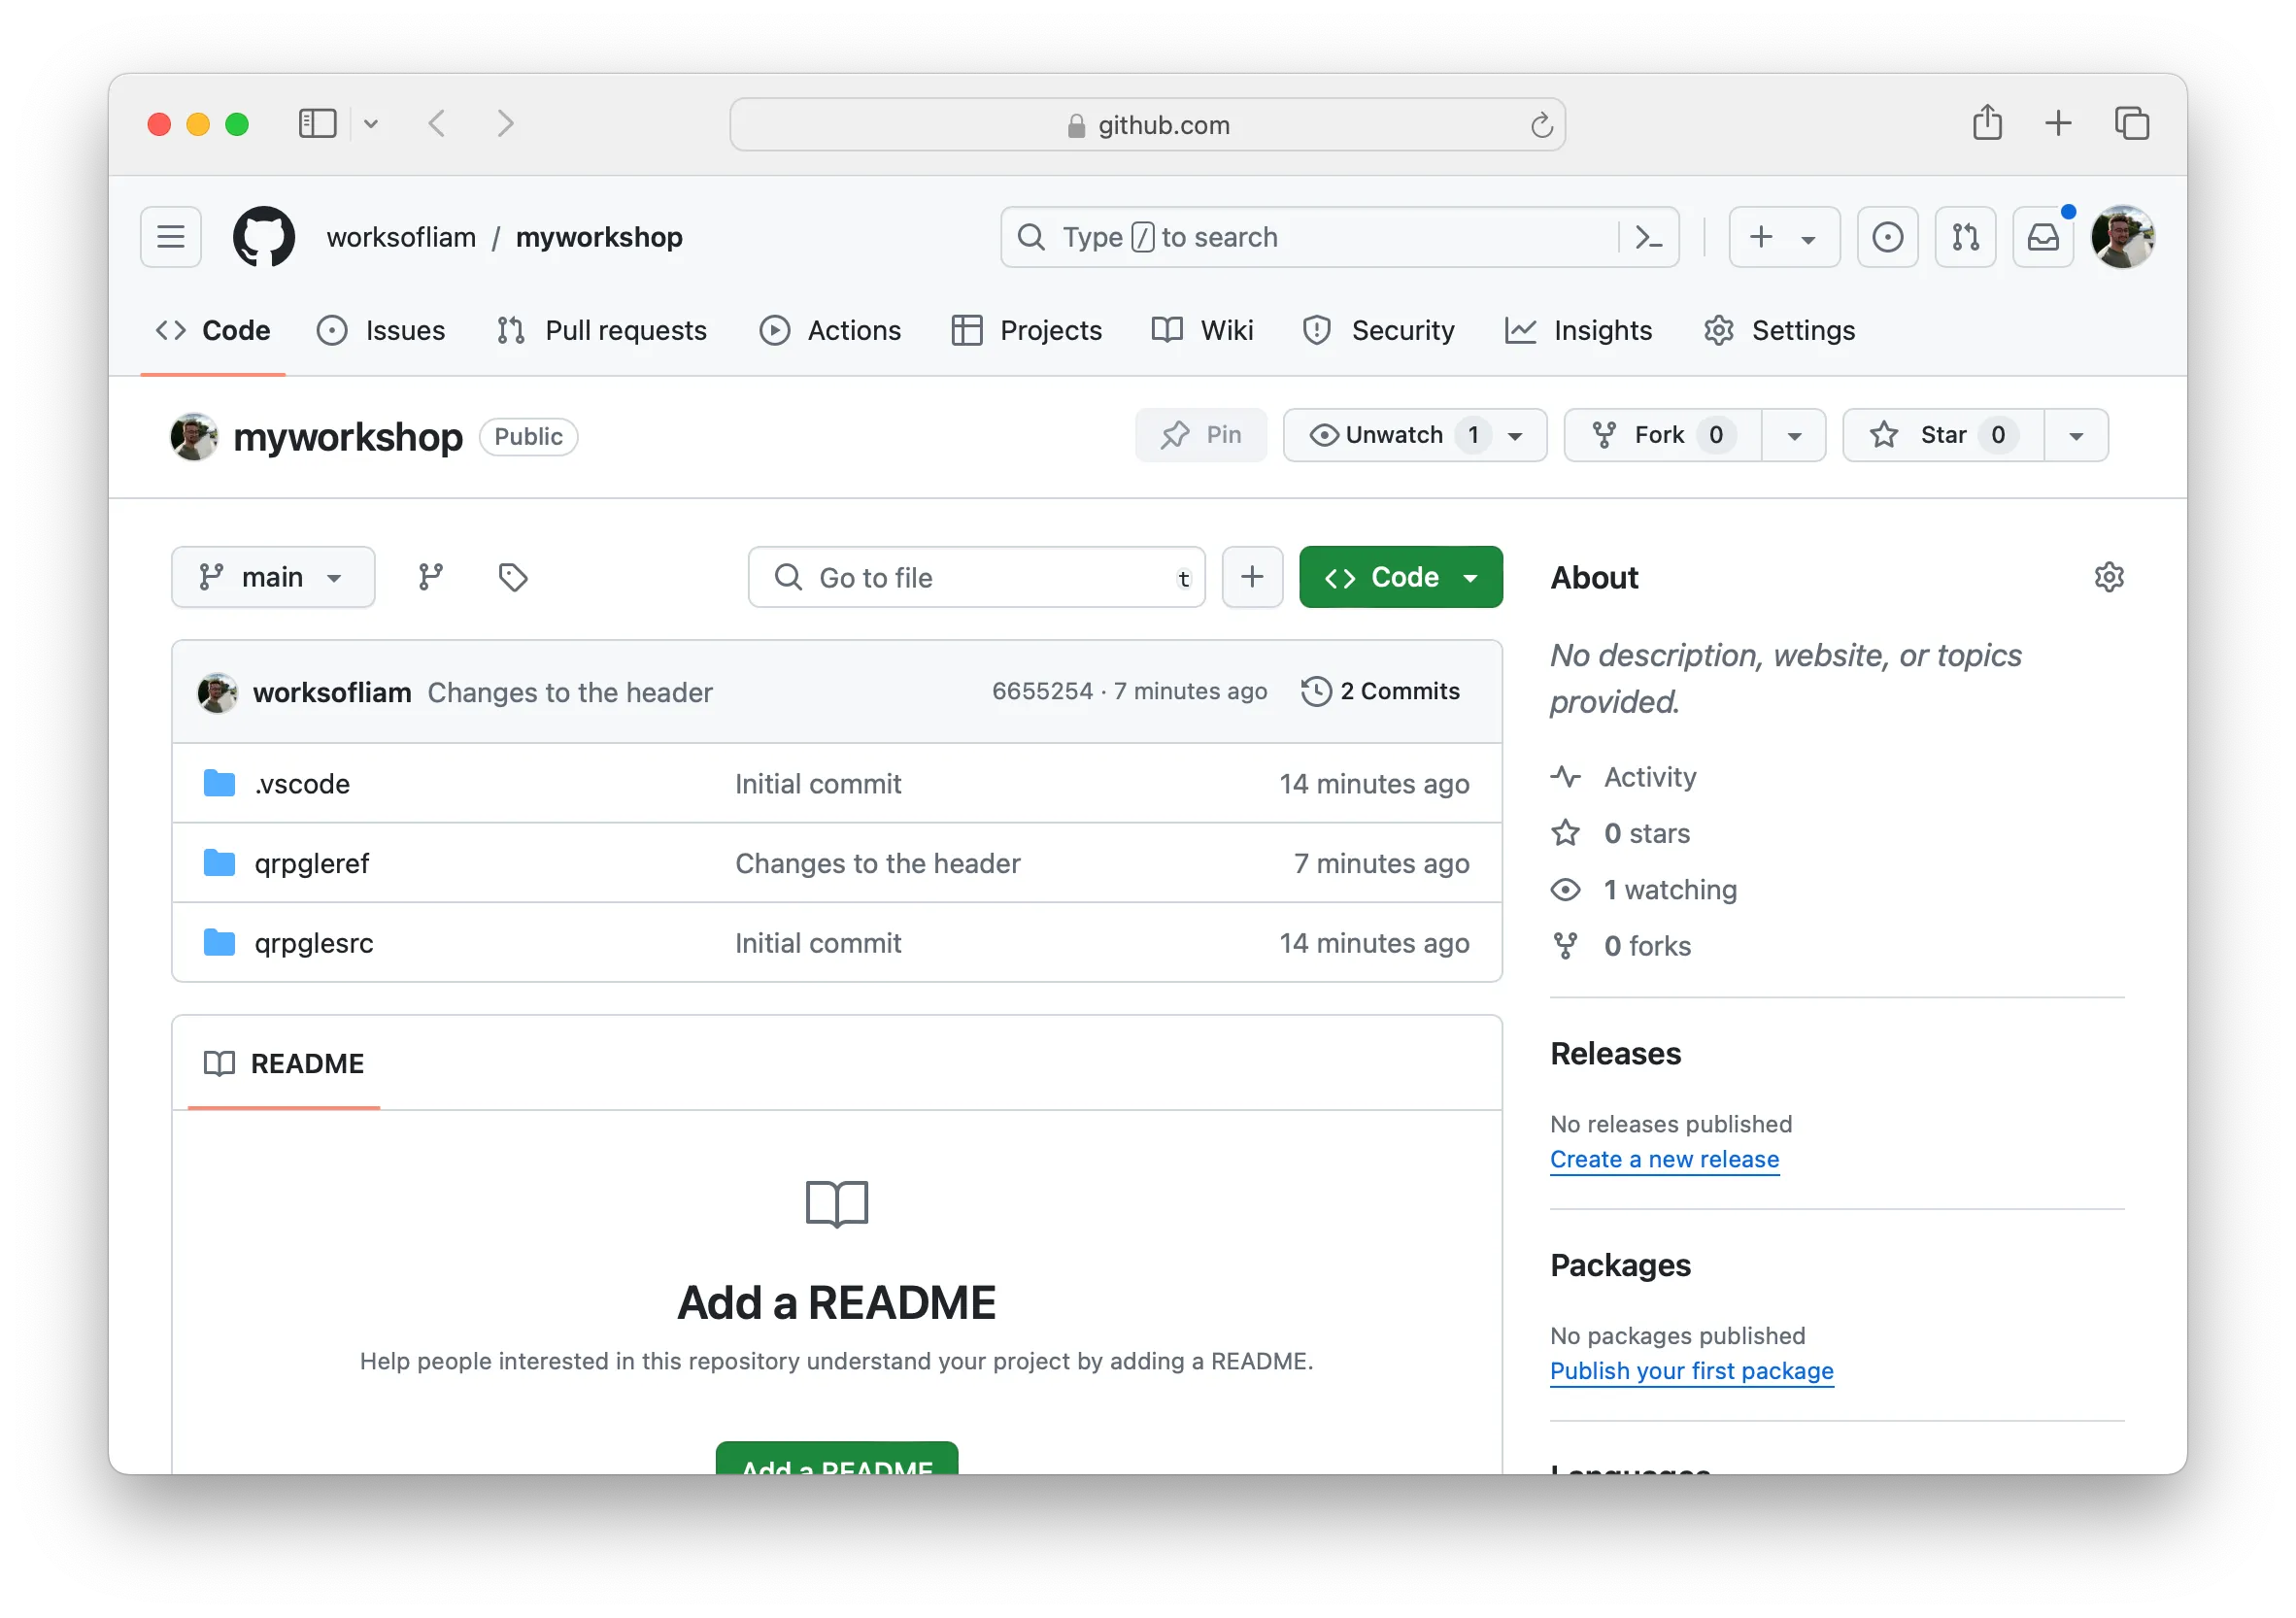
Navigating to your GitHub profile will show the repository and all the history for anyone who has access to see.
Cloning repositories
To show that files and history is stored in git, we are going to delete the local directory/repository and then clone it again. You will use this cloning mechanism when working on other projects too.
Tasks
1. Delete the local directory
Completely close Visual Studio Code and then delete the folder through either:
the system explorer of the OS you are using
through the command like: rm -rf myworkshop
2. Clone the repository
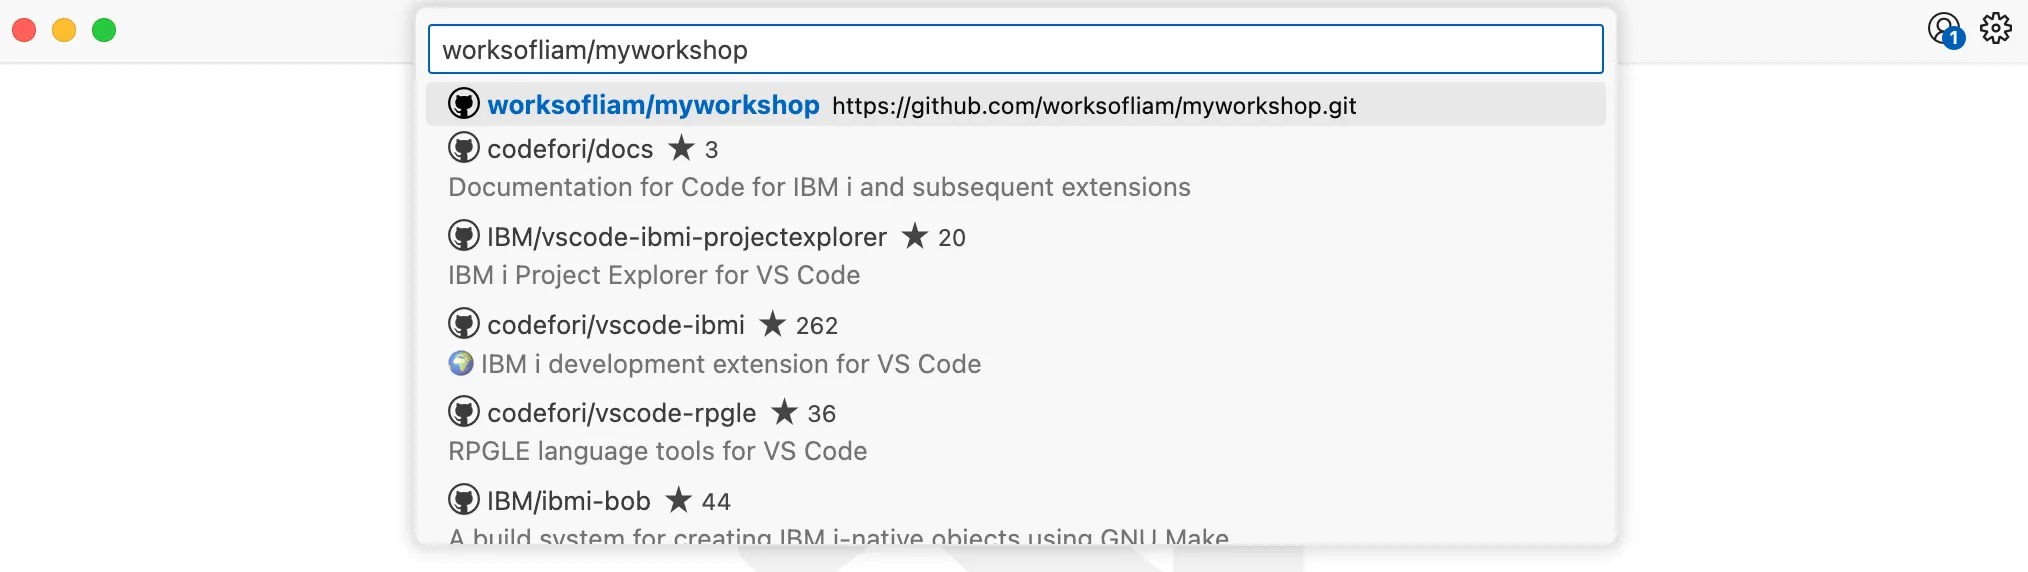
Reopen Visual Studio Code, open the Command Palette (F1 or Control/Command+Shift+P) and search for ‘Git: Clone’. After selecting that option, select ‘Clone from GitHub’ in the new list.
The next list will allow you to search and find repositories on GitHub to clone. You can enter in your GitHub username, followed by a forward-slash, then your repo name to find the repository you published. (youruser/yourrepo).
It may ask where you would like to clone the repository to, in which you can select a location that suits you.
Lastly, it will ask how you want to open the repository. Selecting any option is okay.
Creating branches and PRs
Typically development is not done in the branch that is initially created (which is typically called main). Instead, you would create a new branch, where changes would be made, and before they are merged back in, they can be reviewed. Code reviews will be covered in the next part.
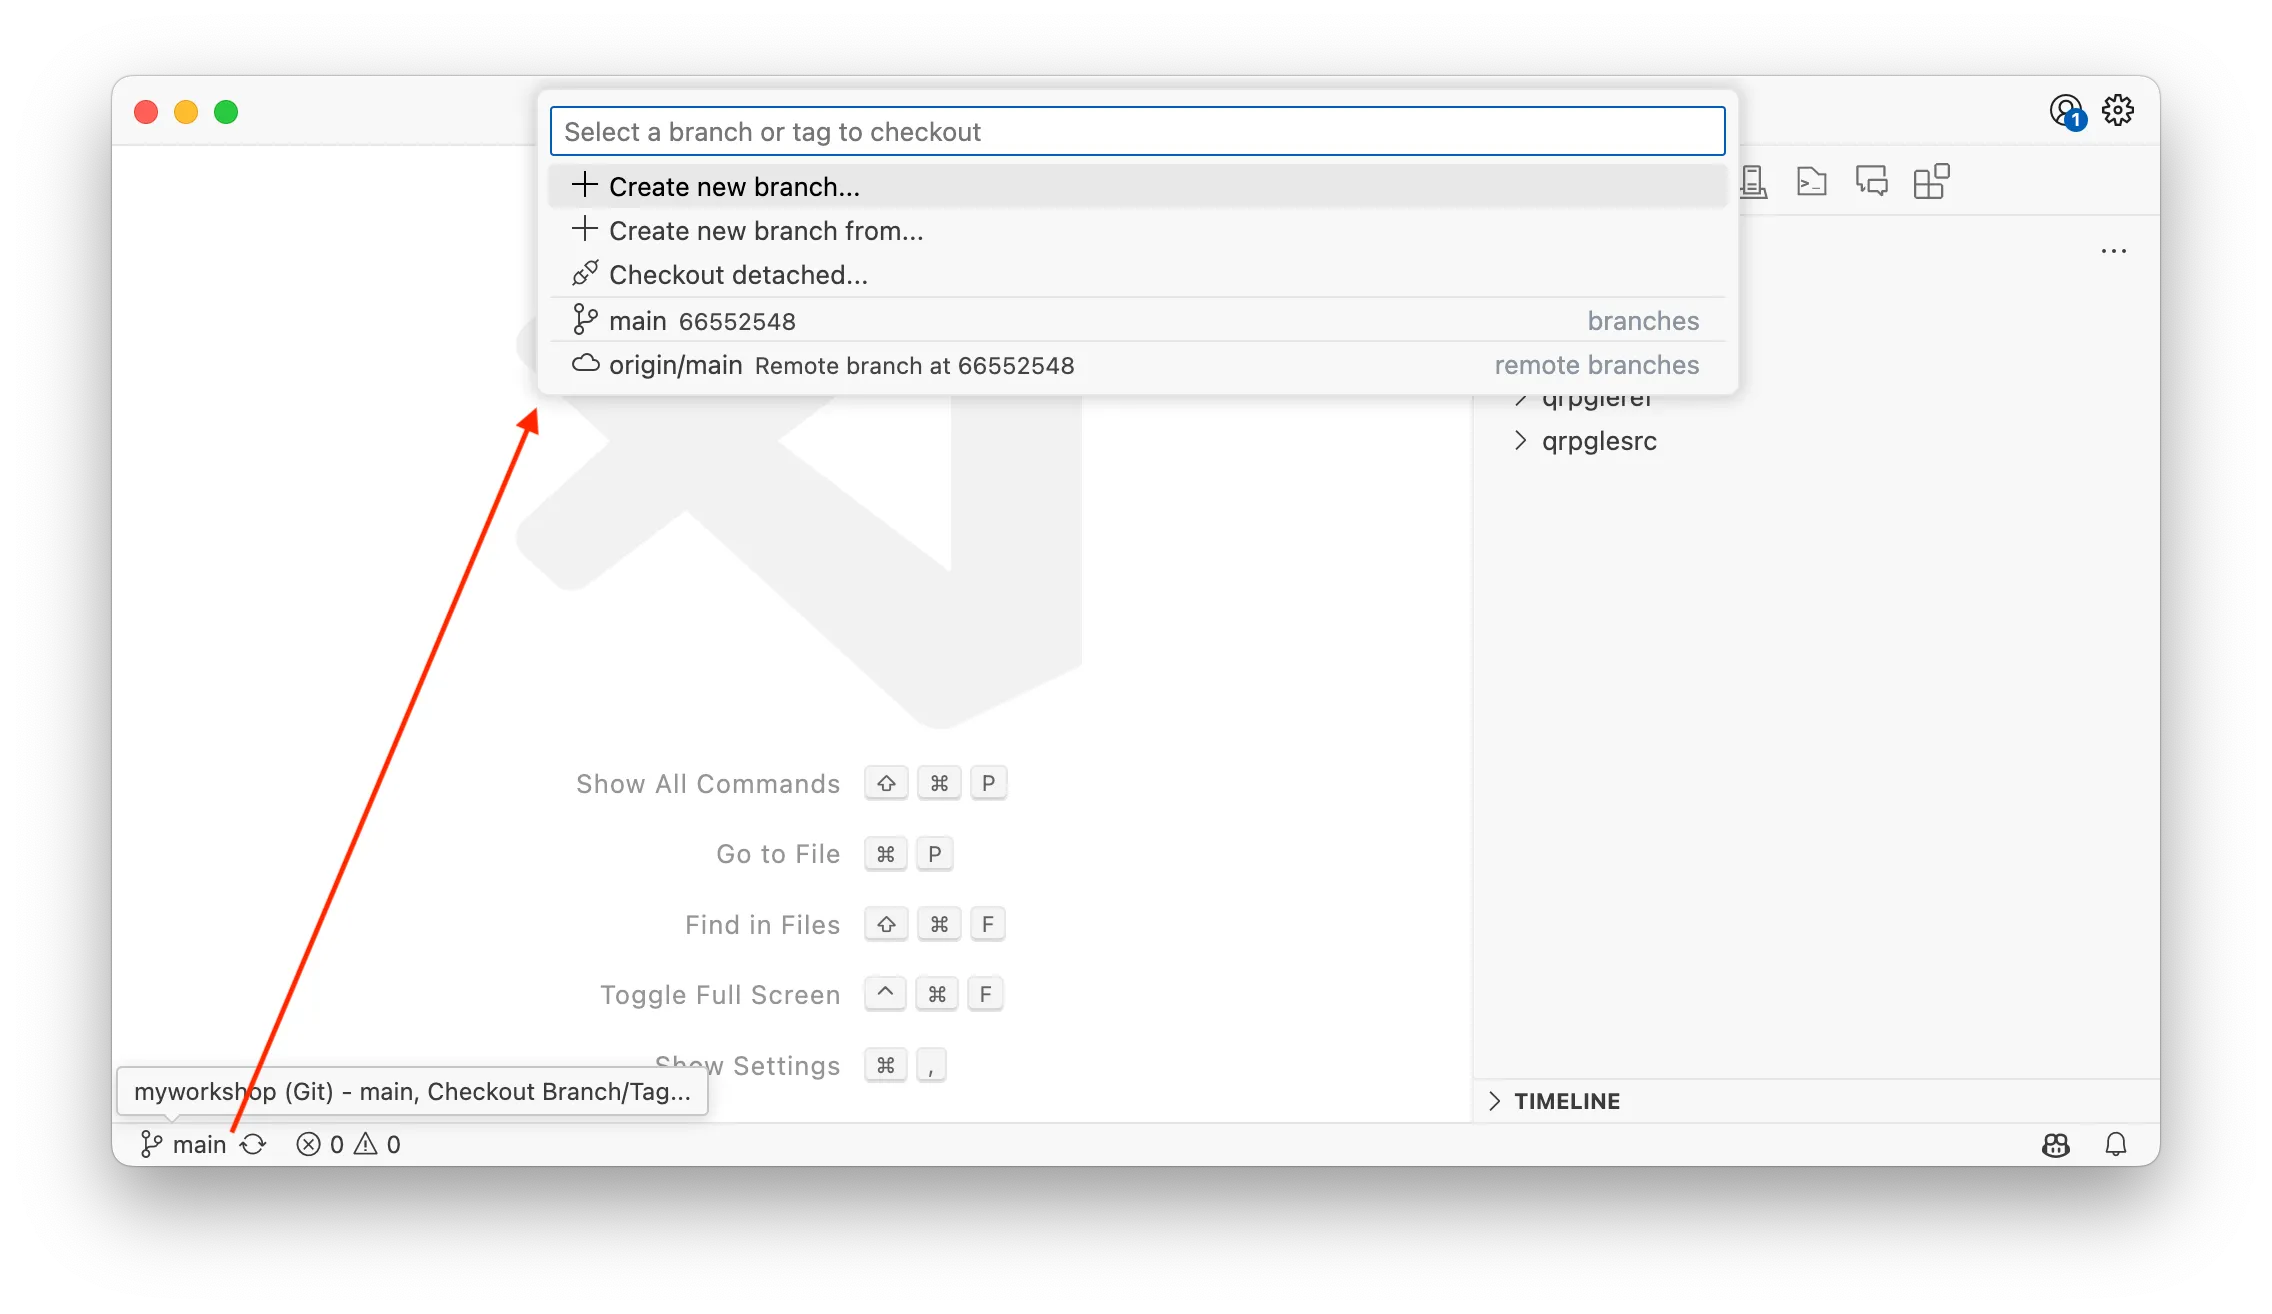
select the current branch name in the bottom left corner of VS Code (in the screenshot, it is showing main as the current branch)
when the quickpick appears, select ‘Create new branch…’, and then enter in a branch name; something like mynewbranch or somethingrandom.
2. Make new commits
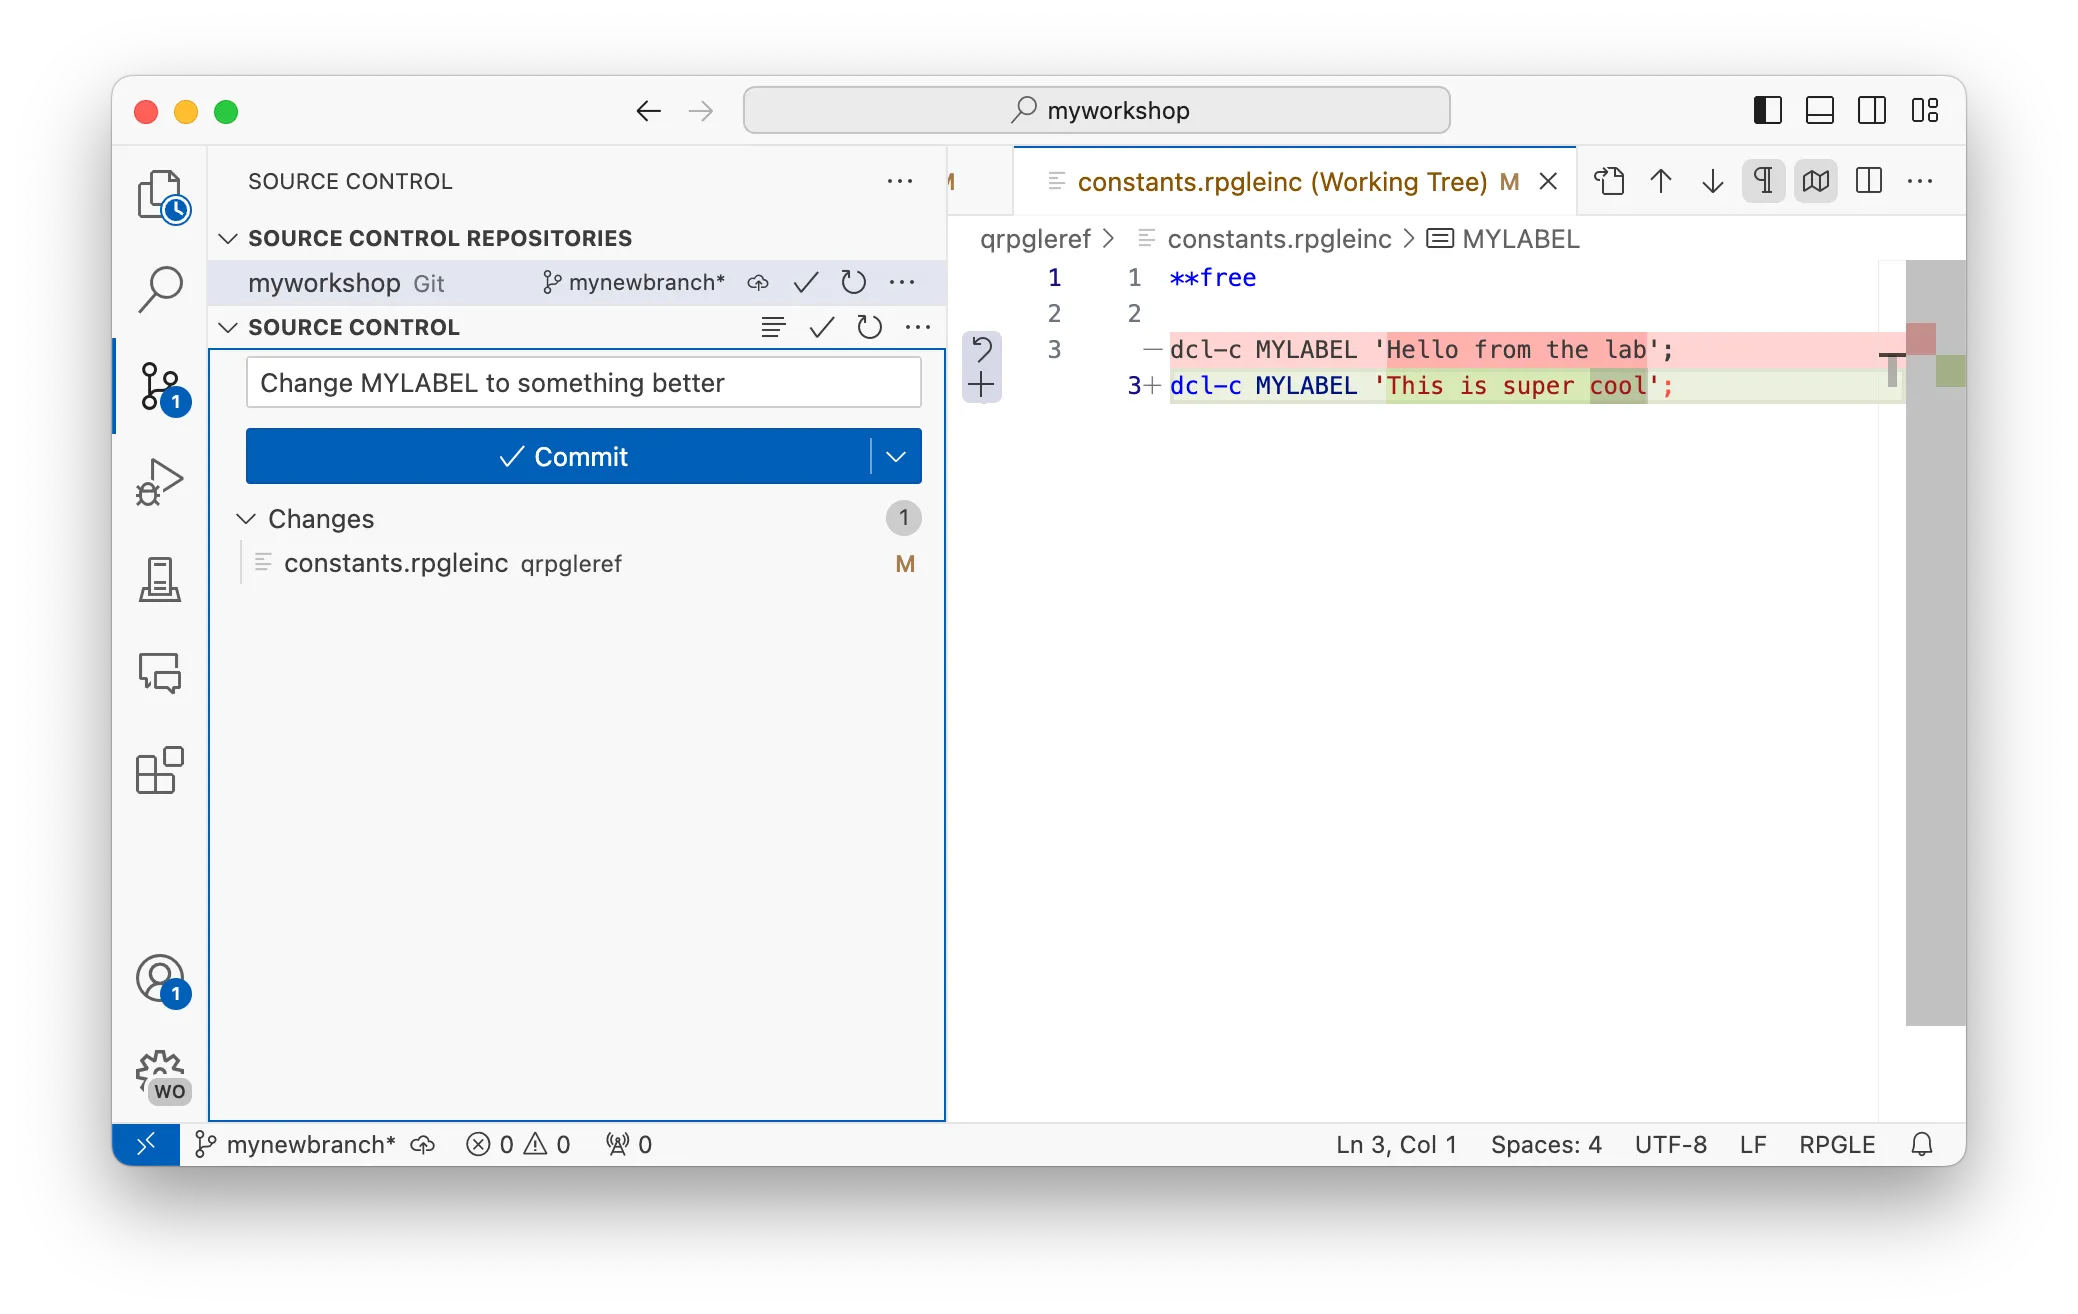
You should see the branch name change in the bottom left corner of VS Code to the branch you created (the screenshot shows mynewbranch).
For your next commit, you can simply make a change to the constant in the header file. Then, Source Control view will update with the change you make.
When you’ve reviewed your changes, entered a commit message, you can click ‘Commit’ to commit code to this branch.
3. Publish the branch
Publishing the branch means moving the branch and commits from your local device to the remote repository so others can have access to it.
When you have no unstaged or staged changes, the Commit button should turn into the Publish button. Clicking the Publish button should copy your branch to the remote repository.
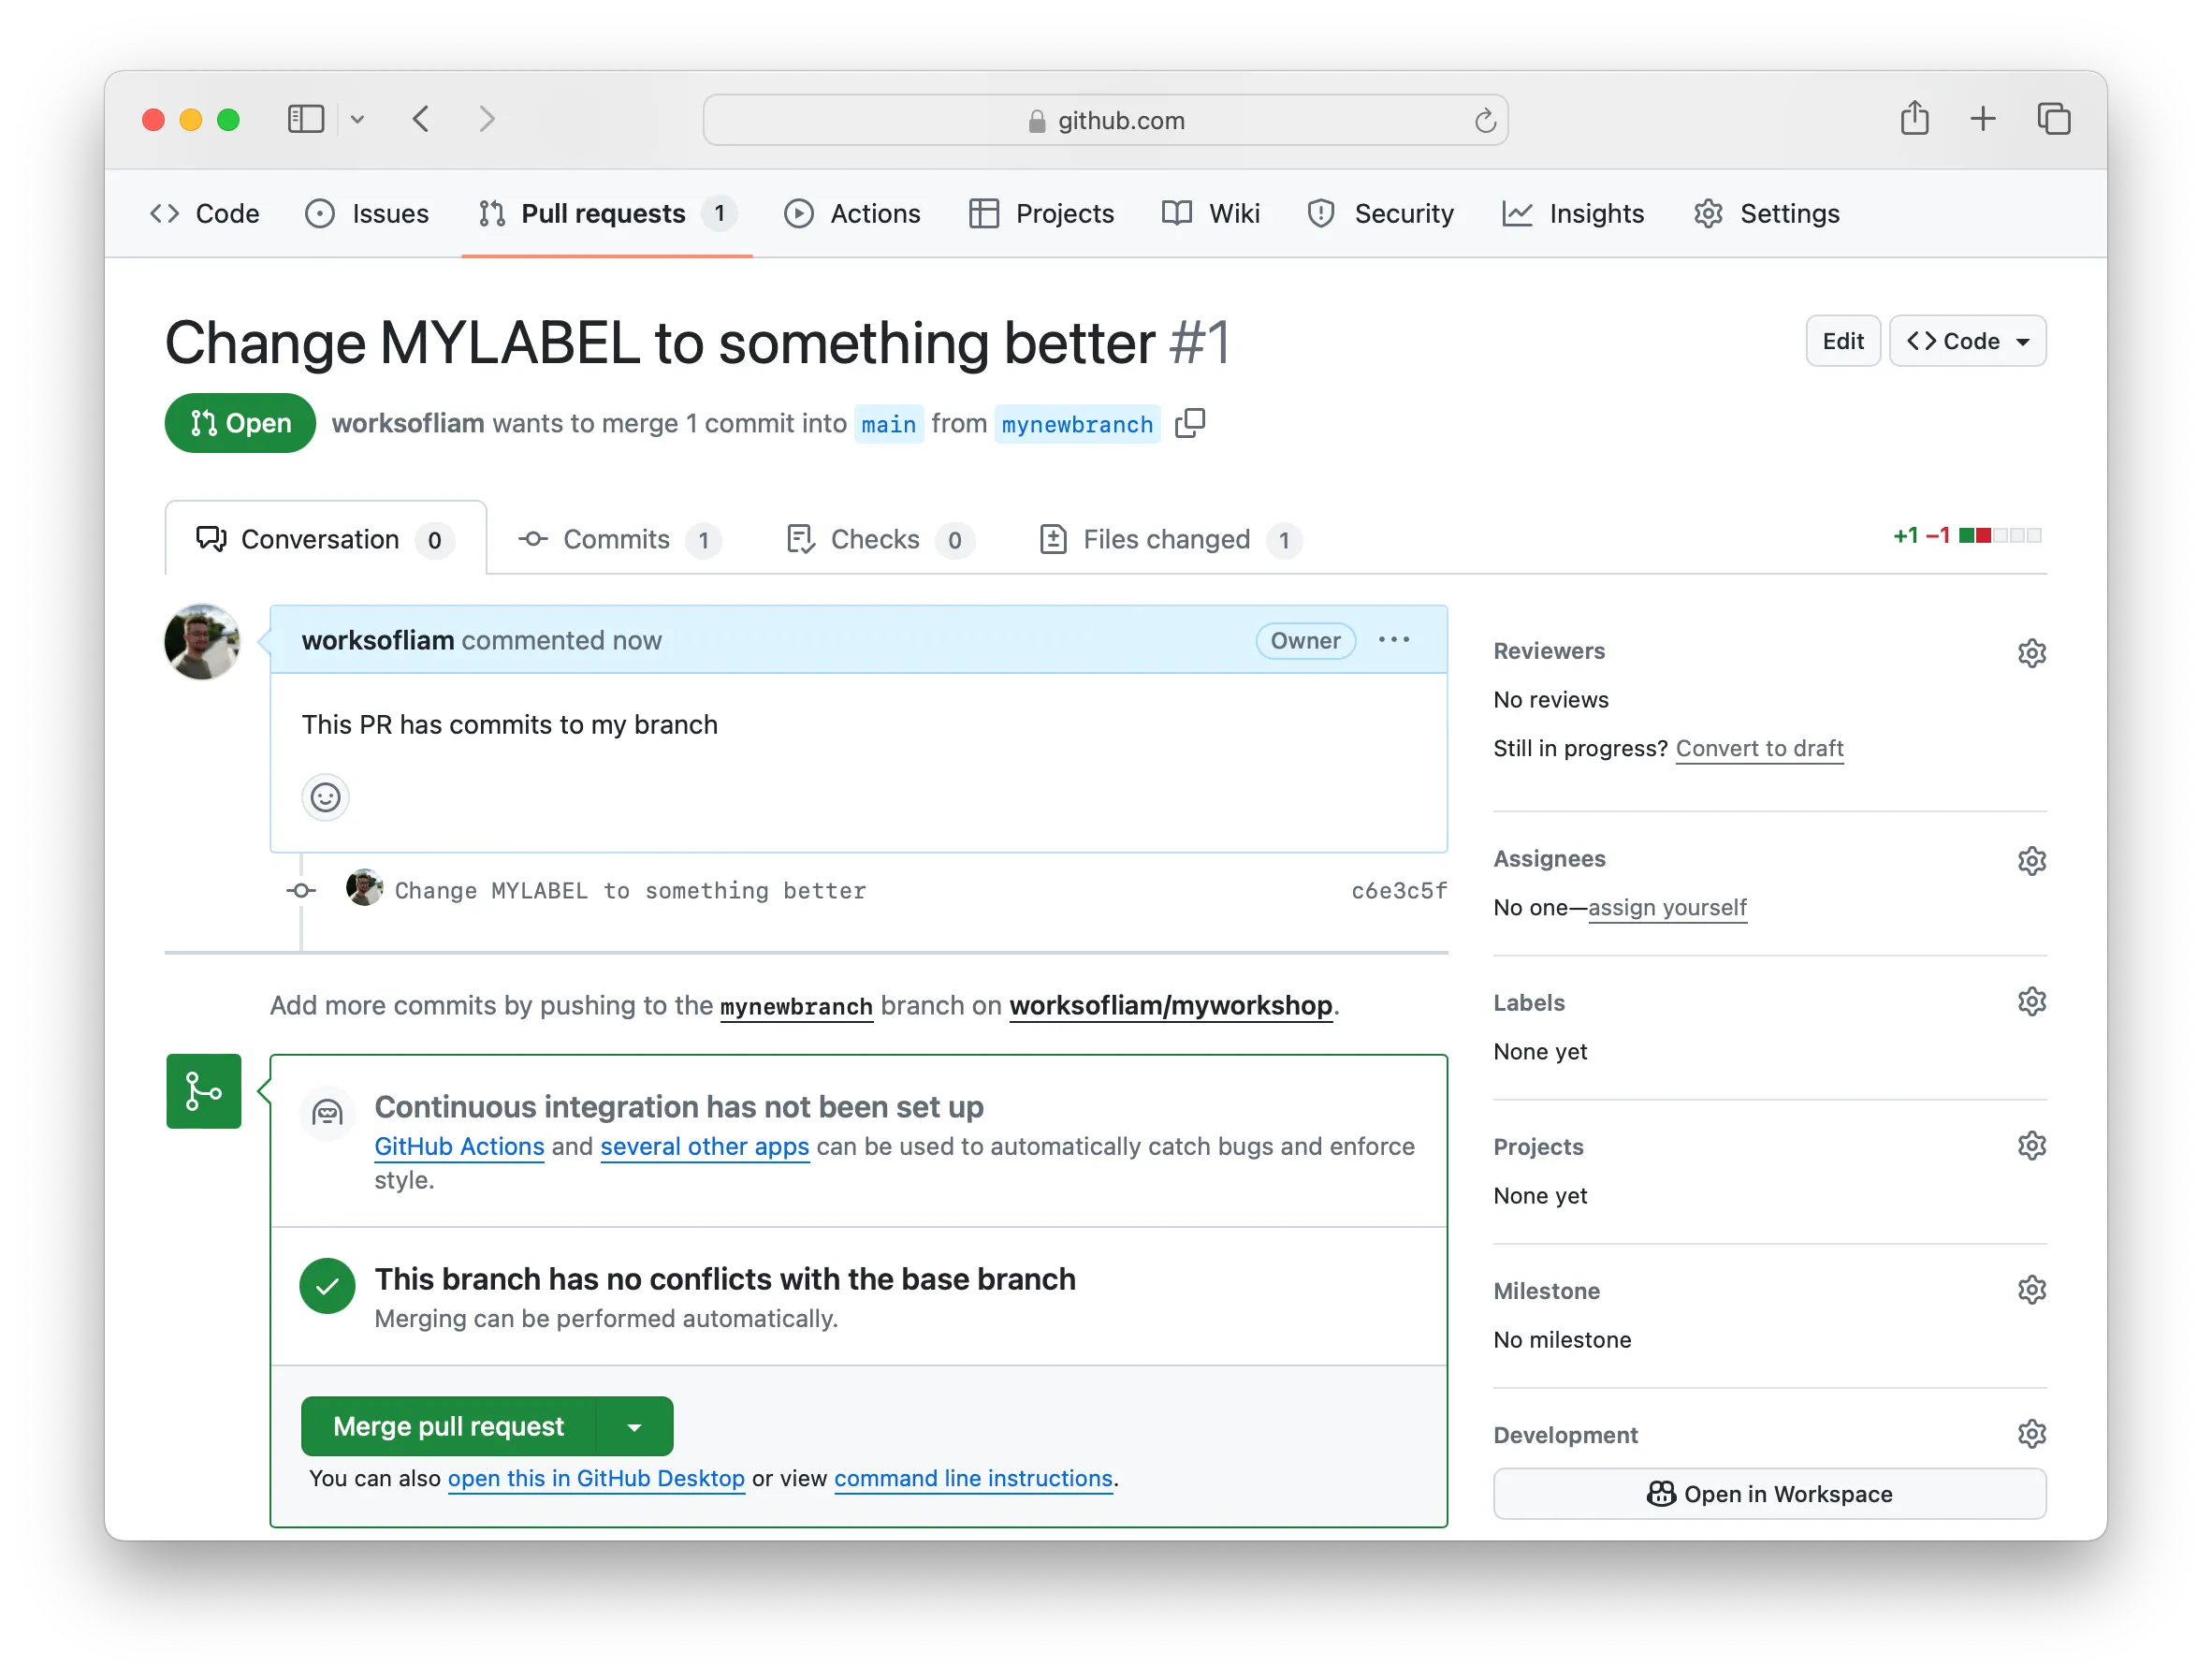
4. Create a Pull Request
Head over to your repository on GitHub, and you should see a notice appear above all else displaying that a push has been made to a new branch.
Click the ‘Compare & pull request’ button to start the PR creation process.
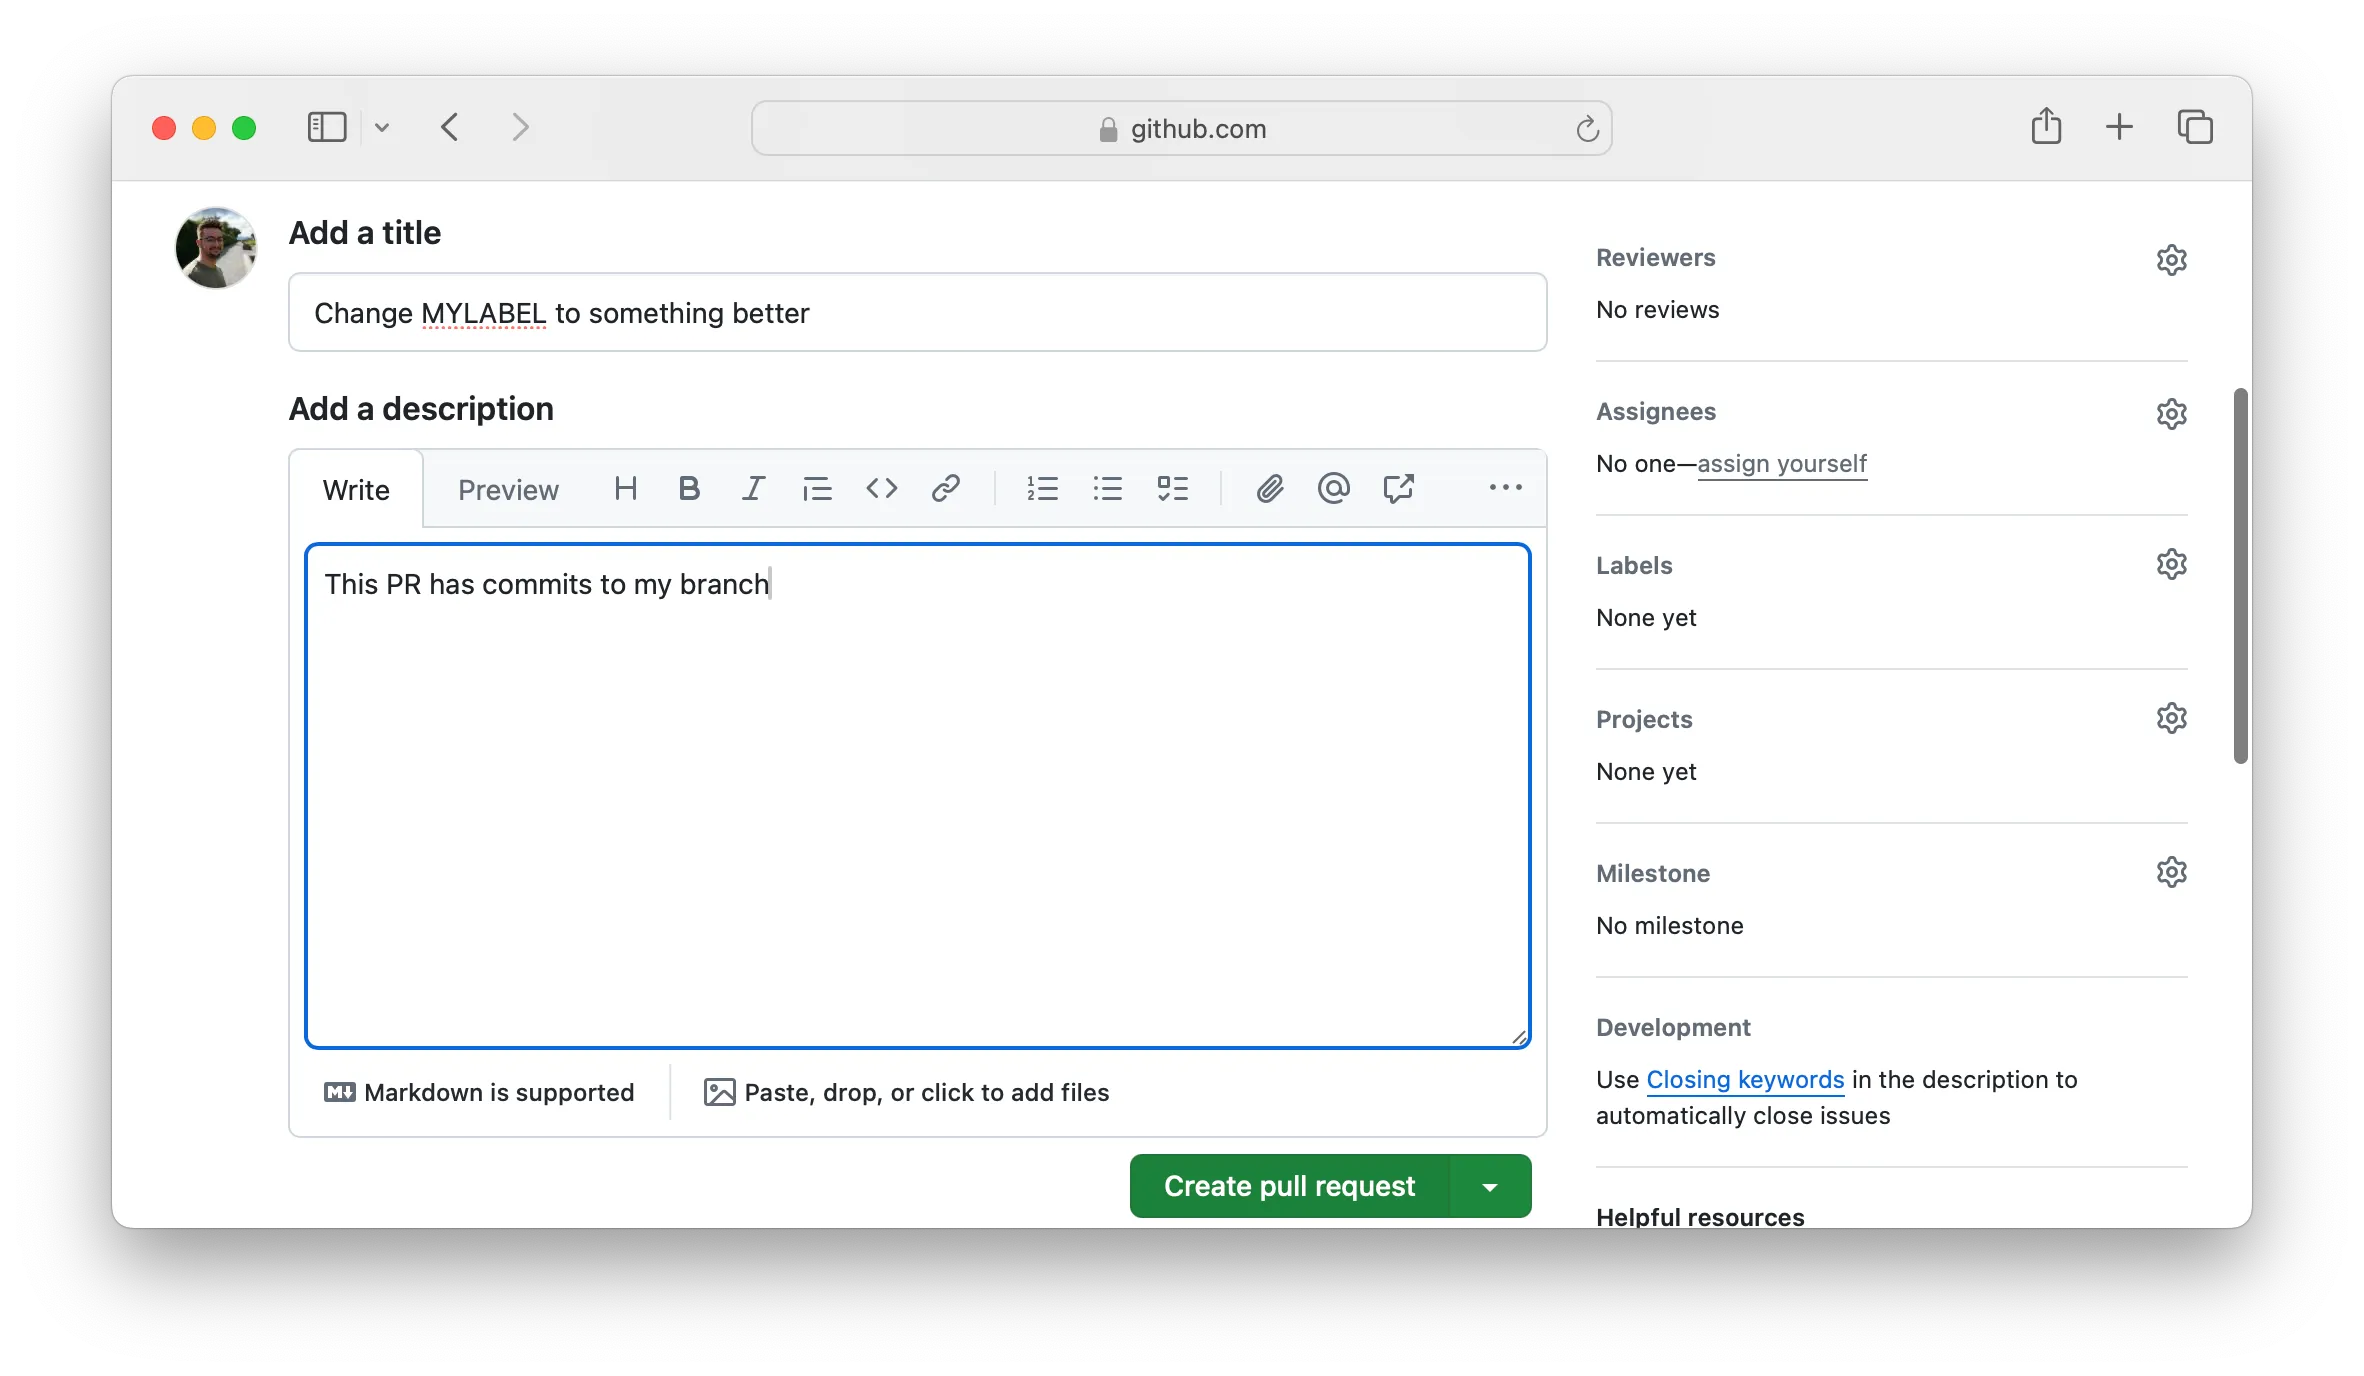
This will take you to another page where the code changes can be reviewed, plus a title and description of the changes can be provided.
When the title and description has been provided, you can click the ‘Create pull request’ button.
5. Review and merge
Typically, when the PR has been created, this is time for one or more people to review the changes you have made. They might pull and checkout the branch on their own device, and then compile the changes manually, and check that everything works as expected. You can see in the UI, you can do a number of things:
view the commits made to this branch
review the changed code and leave comments of specific lines of code
request other people to review the PR
leave general comments
request further changes or approve and merge the PR
Since no one else will be reviewing your Pull Request, you can merge by clicking on the ‘Merge pull request’ button.
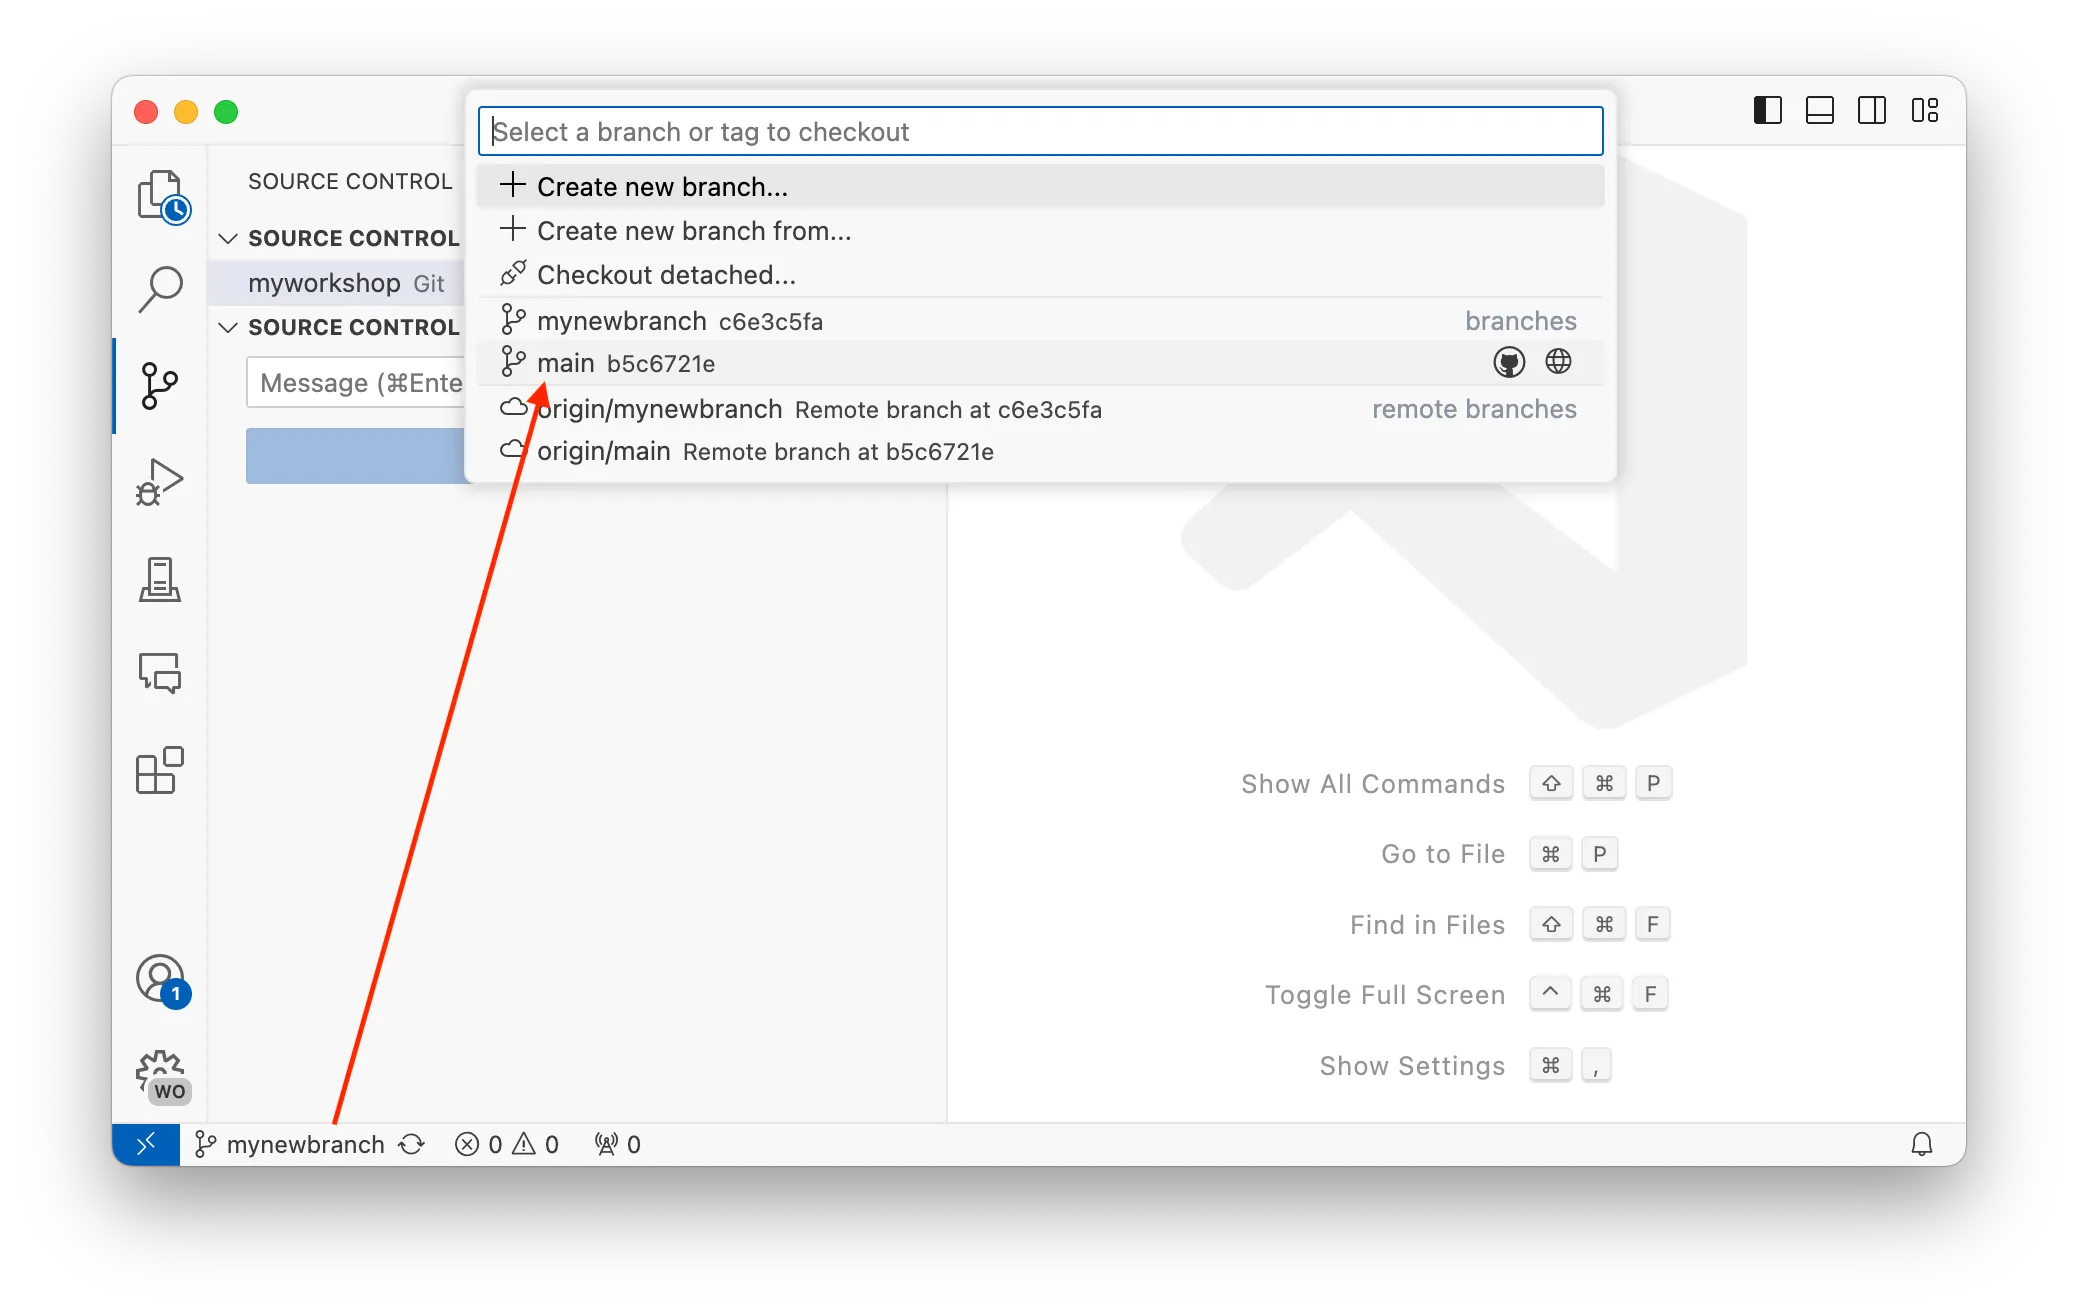
6. Update your local repo
Like when creating a new branch, select on the current branch name in the lower left corner of VS Code (the screenshot showing mynewbranch), and then select main in the quickpick to checkout to main.
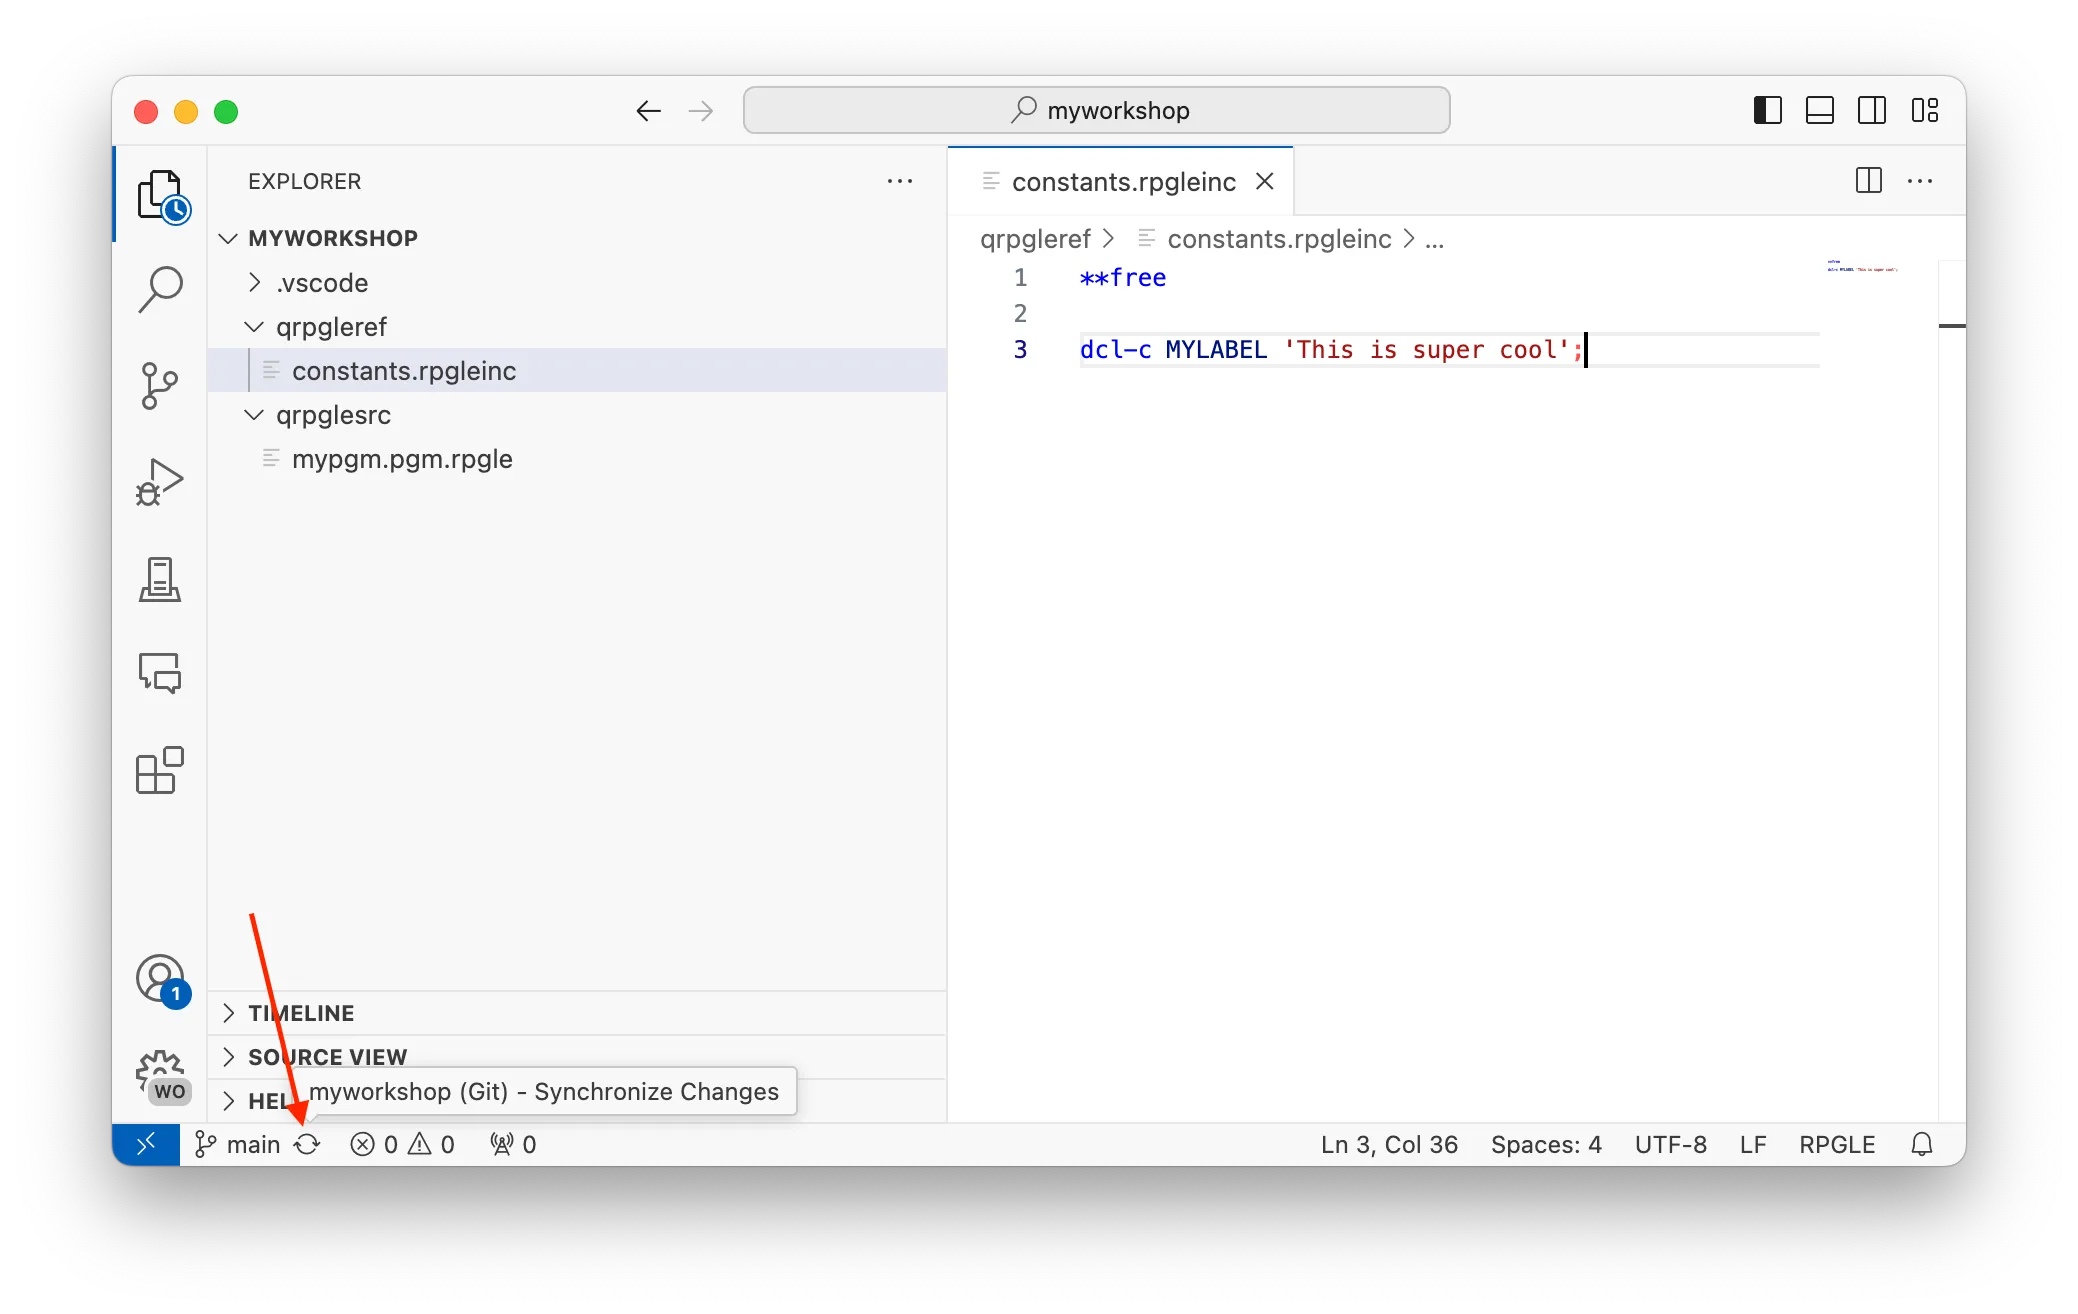
You won’t have the changes from the merge until you do a ‘pull’. A pull simply means pulling commits and branches from the remote repo to your local cloned repo. Visual Studio Code has a ‘sync’ button next to the branch selection button. Clicking this will both push and pull changes against the remote repo.
After syncing, you will have all the missing changes on your local device.
Creating branches and PRs
Tasks
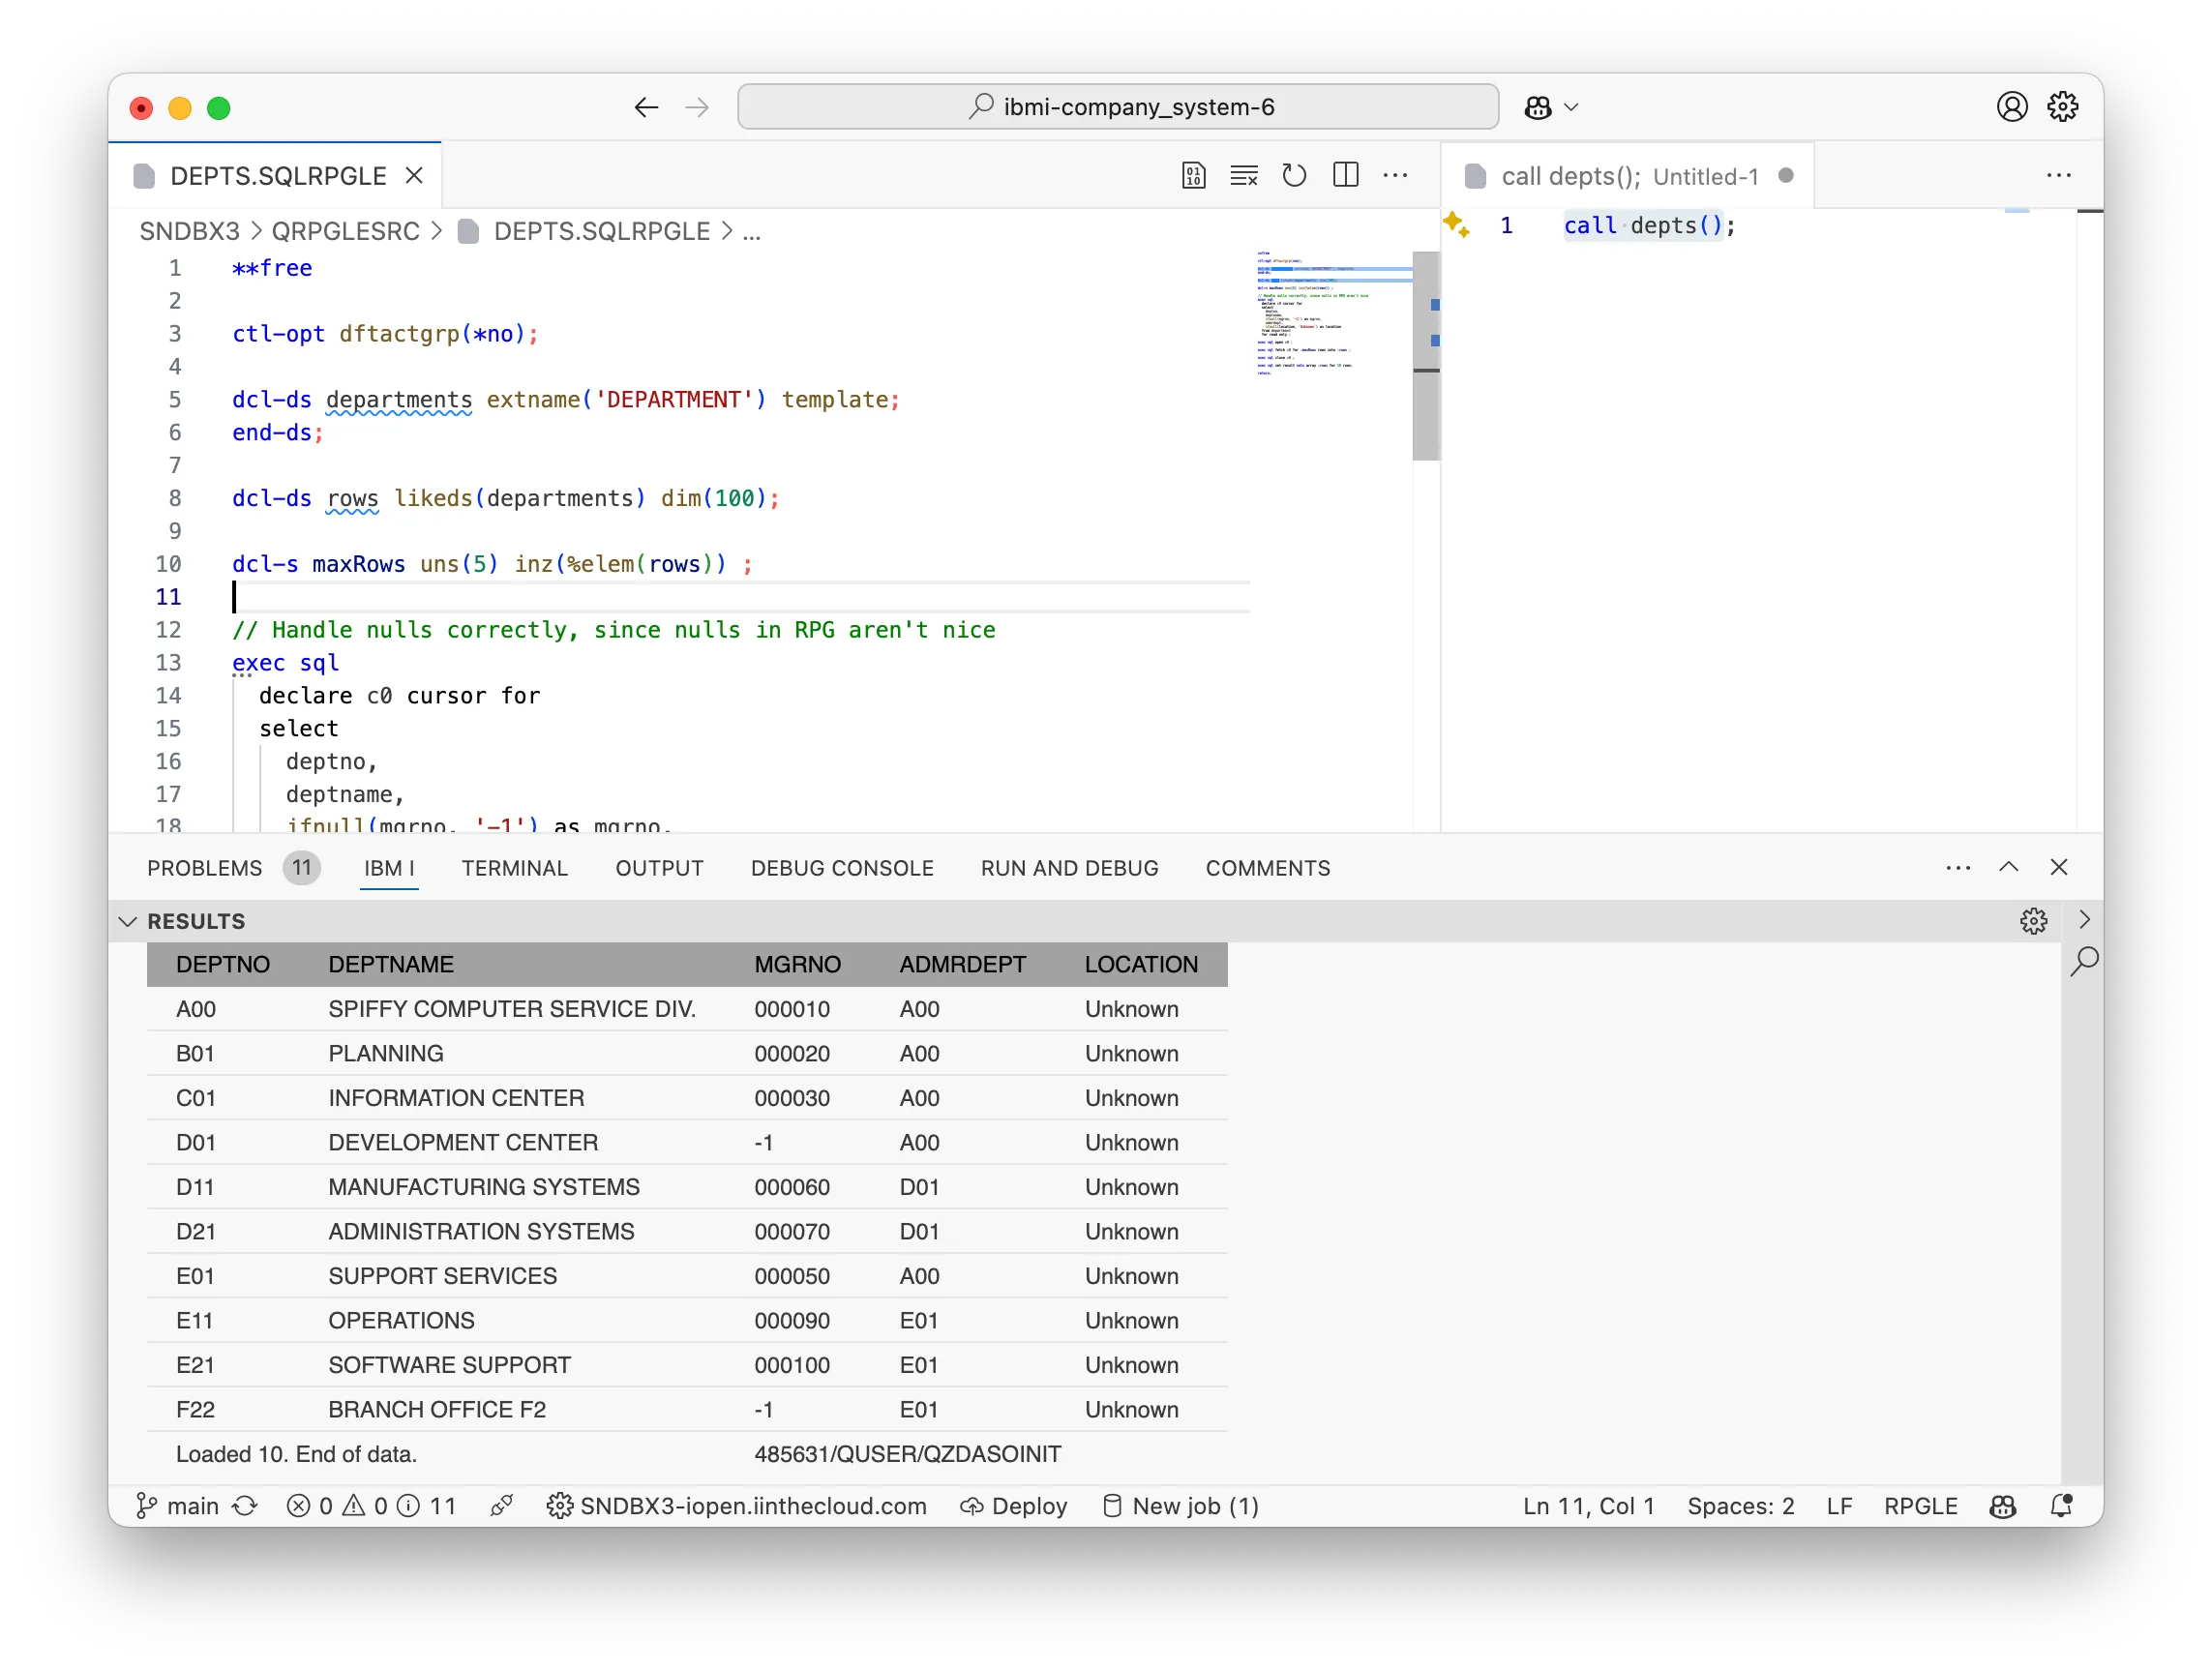
1. The depts program
In your source directory, go ahead and create a new file named depts.sqlrpgle.
This will be a program that we can call via SQL that returns a simple result set.
It used EXTNAME to use a tables columns as subfields of a data structure.
We use LIKEDS with DIM to create an array of rows for our result set.
The data structure array is returning as an SQL result set.
Ensure this program compiles successfully before continuing.
// Handle nulls correctly, since nulls in RPG aren't nice
exec sql
declare c0 cursor for
select
deptno,
deptname,
ifnull(mgrno, '-1') as mgrno,
admrdept,
ifnull(location, 'Unknown') as location
from department
for read only ;
exec sql open c0 ;
exec sql fetch c0 for :maxRows rows into :rows ;
exec sql close c0 ;
exec sql set result sets array :rows for 10 rows;
return;
Then, using SQL (either through Visual Studio Code or Access Client Solutions), this program is called - even without a procedure - and should produce a result set with call depts():
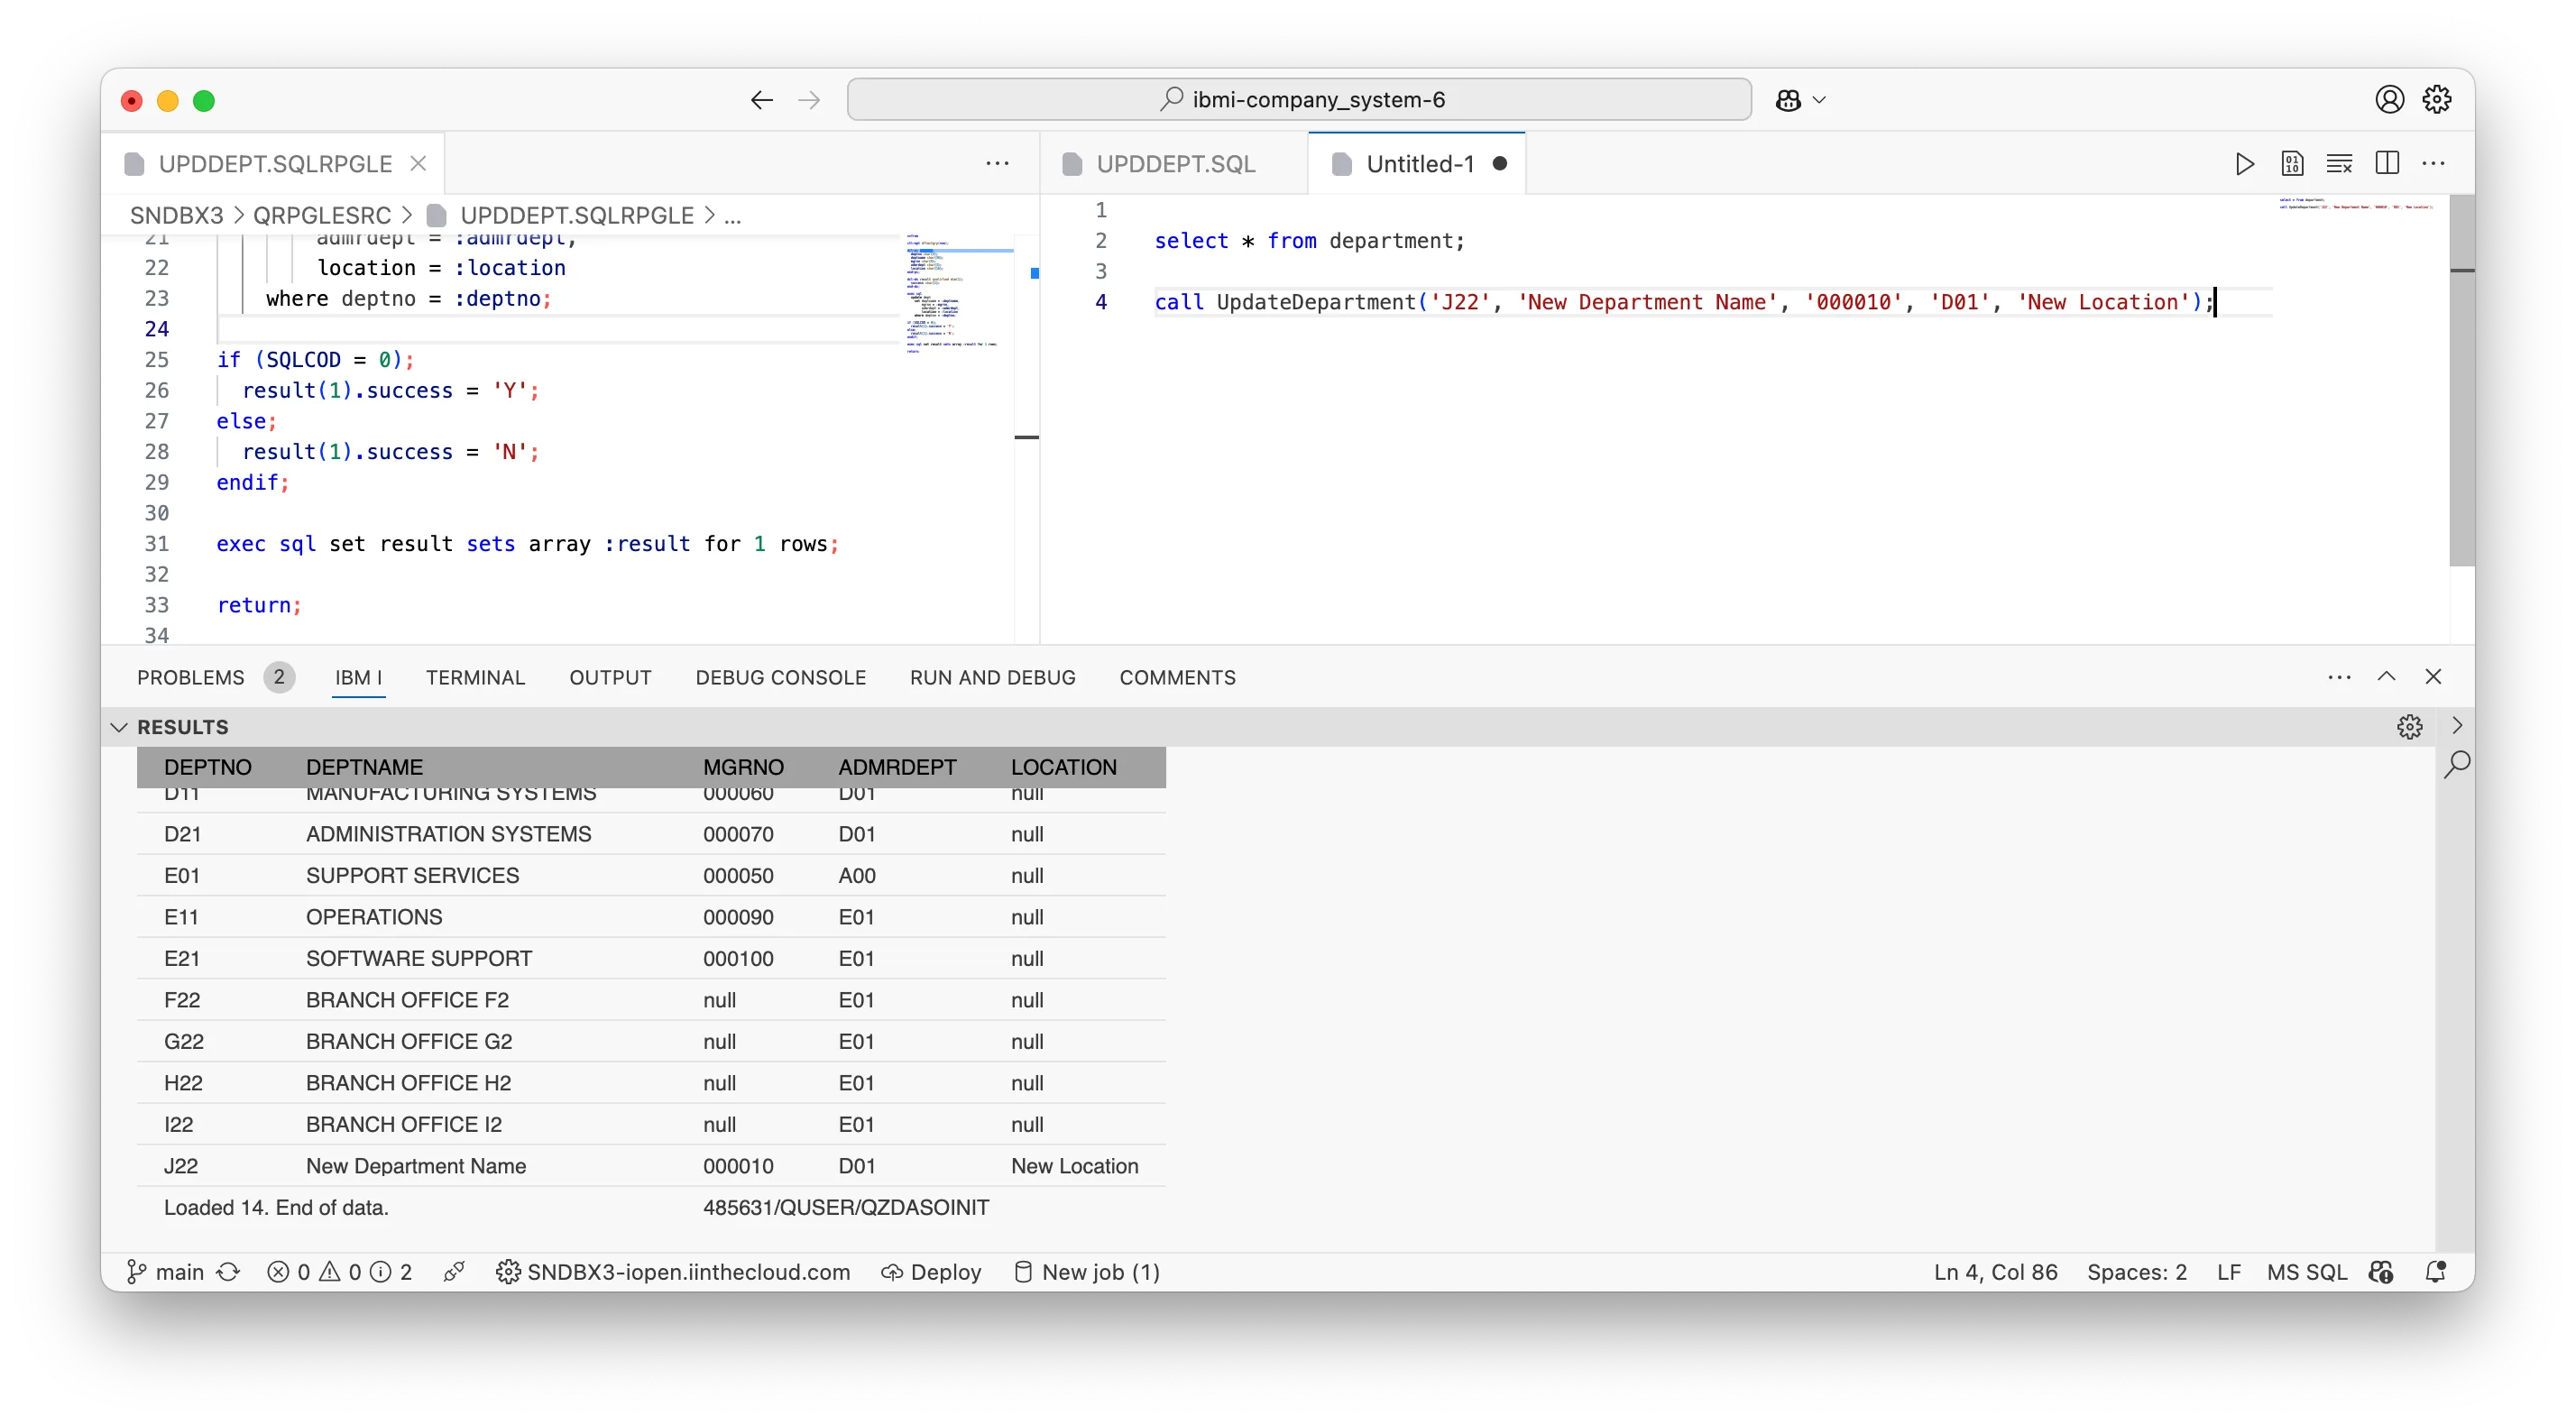
2. UpdateDepartments procedure
Next, we’re going to create two new files. One .sqlrpgle program named UPDDEPT to update a table, and one SQL Procedure (.sql) named UpdateProcedure to call the program. These can both exist in your source directory.
**free
ctl-opt dftactgrp(*no);
dcl-pi upddept;
deptno char(3);
deptname char(36);
mgrno char(6);
admrdept char(3);
location char(16);
end-pi;
dcl-ds result qualified dim(1);
success char(1);
end-ds;
exec sql
update dept
set deptname = :deptname,
mgrno = :mgrno,
admrdept = :admrdept,
location = :location
where deptno = :deptno;
if (SQLCOD = 0);
result(1).success = 'Y';
else;
result(1).success = 'N';
endif;
exec sql set result sets array :result for 1 rows;
return;
Ensure to create the program first, so when you call the procedure, it can be found correctly (since the procedure depends on the program!)
createorreplaceprocedure UpdateDepartment(
IN deptno char(3),
INnewNamechar(36),
IN newManager char(6),
IN parentDepartment char(3),
IN newLocation char(16)
)
LANGUAGE RPGLE
MODIFIES SQLDATA
EXTERNALNAME UPDDEPT GENERAL;
Notice that the paramater types in the procedure match the parameter types of the program. This is important!
The procedure can now be called via SQL, which subsequently calls the RPGLE program and returns a result set: